1. Įvadas
Thank you for choosing the AVATTO WT400-16A-B Smart WiFi Thermostat. This device is designed to provide intelligent temperature control for your water heater and gas boiler systems, offering convenience through programmable schedules, app control, and voice commands. Please read this manual carefully before installation and operation to ensure proper use and optimal performance.
2. Saugos informacija
- Always disconnect power to the heating system before installing or servicing the thermostat.
- Installation should be performed by a qualified electrician or heating technician.
- Saugokite termostatą nuo vandens ar per didelės drėgmės.
- Įsitikinkite, kad visi laidų sujungimai yra tvirti ir atitinka vietinius elektros kodeksus.
- Baterijas laikykite vaikams nepasiekiamoje vietoje. Panaudotas baterijas utilizuokite atsakingai.
3. Pakuotės turinys
Patikrinkite, ar pakuotėje yra visi reikalingi daiktai:
- AVATTO WT400-16A-B Thermostat Unit
- Vartotojo vadovas
- Tvirtinimo varžtai (2 vnt.)
- NTC Sensor Cable (3 meters)
4. Produktas baigtasview
4.1 Pagrindinės savybės
- Išmanusis „WiFi“ valdymas: Connects directly to 2.4 GHz Wi-Fi for remote control via smartphone app.
- Valdymas balsu: Suderinamas su „Amazon Alexa“ ir „Google Assistant“, kad būtų galima valdyti laisvų rankų įranga.
- Programuojami tvarkaraščiai: Offers 6 distinct heating programs for weekdays and 2 for weekends, optimizing energy use.
- Šildymo ir vėsinimo funkcija: Supports both heating and cooling modes for year-round comfort.
- Didelis LCD ekranas: A 4.6-inch screen clearly shows room temperature, set temperature, operating status, battery level, day, and time.
- Lengvas montavimas: Designed for surface mounting with potential-free output (NO, NC, COM).
- Dvi maitinimo parinktys: Operates on AAA batteries with an optional Type-C power input.
4.2 Ekranas ir valdikliai
The thermostat features a clear LCD screen and an intuitive rotary knob for adjustments.
4.3 Suderinamumas
This thermostat is designed for use with water heaters and gas boilers that have dry contact connections. Tai yra not compatible with electric underfloor heating systems or instantaneous electric water heaters.

Image: This diagram illustrates the thermostat's compatibility. It is compatible with gas boilers featuring dry contact connections (indicated by a checkmark) and is not compatible with electric heating systems or actuator valves (indicated by cross marks).
5. Sąranka
5.1 diegimas
The thermostat is designed for surface mounting. Choose a suitable location on an interior wall, away from direct sunlight, drafts, or heat sources that could affect temperature readings.
- Atjunkite maitinimą: Išjunkite pagrindinį šildymo sistemos maitinimą grandinės pertraukikliu.
- Sumontuokite galinę plokštę: Detach the front panel of the thermostat from its backplate. Secure the backplate to the wall using the provided screws.
- Laidai: Connect the heating system wires to the NO (Normally Open), NC (Normally Closed), and COM (Common) terminals on the backplate. Refer to your heating system's manual for specific wiring diagrams. The thermostat provides a potential-free output.
- Pritvirtinkite priekinį skydelį: Once wiring is complete and secure, reattach the front panel to the backplate.
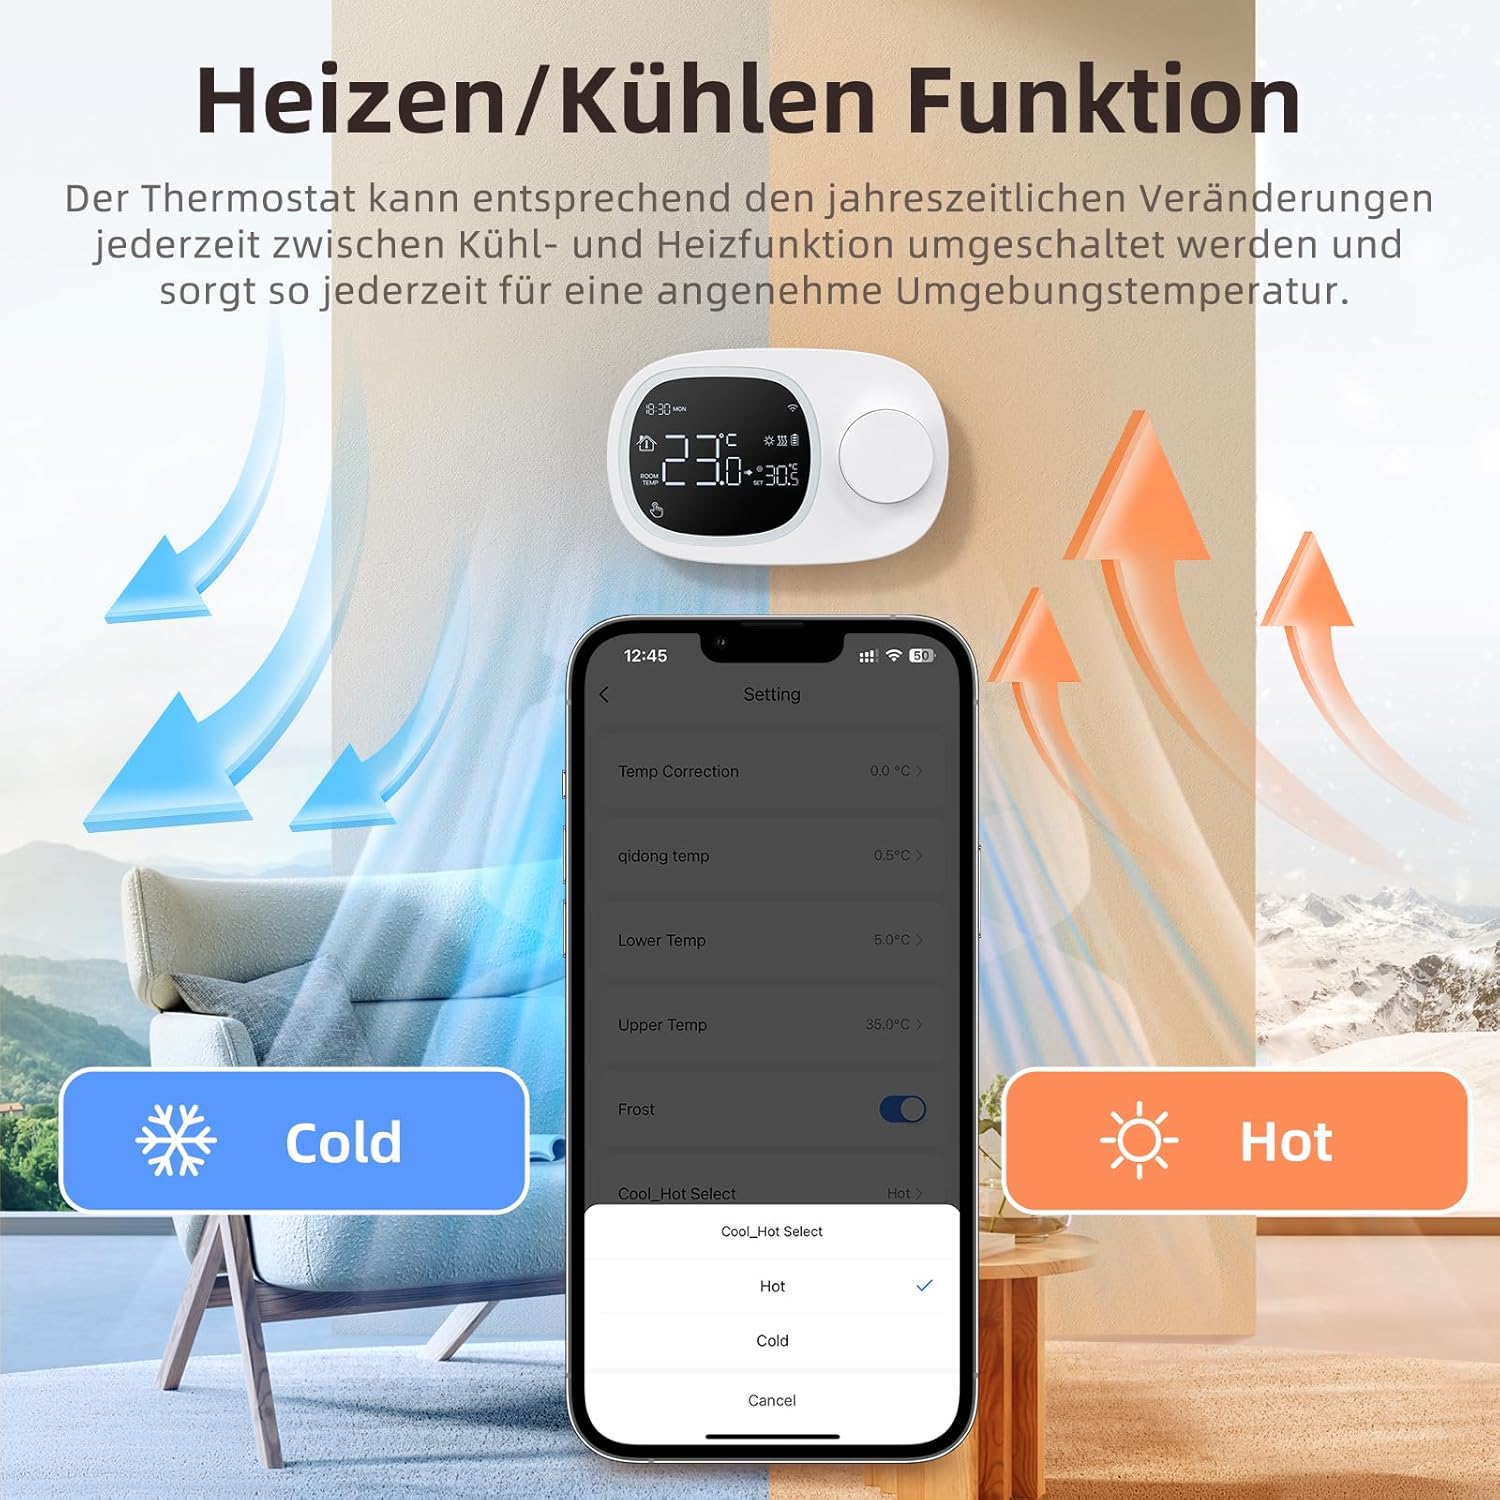
Image: This image shows the thermostat's backplate with wiring terminals and its physical dimensions (13.3 cm width, 8.6 cm height, 2.5 cm depth).
5.2 Maitinimo šaltinis
The thermostat can be powered by three AAA batteries or via a Type-C USB connection.
- Akumuliatoriaus montavimas: Open the battery compartment on the back of the thermostat and insert three AAA batteries, observing the correct polarity. The screen will display the battery level. Under normal operation, batteries typically last about 6 months.
- Type-C Power (Optional): For continuous power, you can connect a Type-C USB cable to the designated port.

Image: This image illustrates the battery compartment for AAA batteries and the Type-C port for alternative power input.
5.3 WiFi ryšys
To enable smart features, connect your thermostat to your home's 2.4 GHz Wi-Fi network.
- Atsisiųsti programą: Download and install the 'Smart Life' or 'AVATTO' app from your smartphone's app store.
- Registruotis / Prisijungti: Susikurkite paskyrą arba prisijunkite prie programėlės.
- Pridėti įrenginį: In the app, select 'Add Device' or the '+' icon. Choose 'Thermostat' or 'Heating Control'.
- Susiejimo režimas: Follow the in-app instructions to put the thermostat into pairing mode (usually involves pressing and holding a button on the thermostat until a Wi-Fi icon flashes).
- Prisijunkite prie „Wi-Fi“: Ensure your mobile phone is connected to your home's 2.4 GHz Wi-Fi network. Enter your Wi-Fi password in the app.
- Užbaigti sąranką: The app will guide you through the final steps to connect the thermostat.
6. Naudojimo instrukcijos
6.1 Pagrindinės operacijos
- Maitinimo įjungimas/išjungimas: Norėdami įjungti arba išjungti termostatą, paspauskite maitinimo mygtuką.
- Reguliuoti temperatūrą: Rotate the knob to set your desired room temperature. The display will show both the current room temperature and the set temperature.
6.2 Programuojami režimai
The thermostat allows you to set a weekly schedule to automatically adjust the temperature.
- Weekday Programs: Set up to 6 different heating periods for Monday to Friday.
- Weekend Programs: Set up to 2 heating periods per day for Saturday and Sunday.
- Nustatymų tvarkaraštis: Access the programming menu via the thermostat's interface or the Smart Life/AVATTO app to configure your desired times and temperatures for each period.

Image: This image displays the app interface for setting a weekly programmable schedule, showing different time slots and temperatures for each day.
6.3 Programų valdymas
Control your thermostat remotely using the Smart Life or AVATTO app.
- Nuotolinis temperatūros reguliavimas: Change the set temperature from anywhere.
- Tvarkaraščių valdymas: Easily create, modify, or disable heating schedules.
- Režimo perjungimas: Switch between heating and cooling modes.
- Įrenginio bendrinimas: Bendrinkite termostato valdymą su šeimos nariais.
6.4 Valdymas balsu
Integrate your thermostat with Amazon Alexa or Google Assistant for convenient voice commands.
- Paskyrų susiejimas: Follow the instructions in the Smart Life/AVATTO app to link your account with Alexa or Google Assistant.
- Balso komandos: Naudokite tokias komandas kaip:
- „Alexa, nustatyk [Termostato pavadinimas] į 22 laipsnius.“
- "Hey Google, what is the temperature in [Room Name]?"

Image: This image demonstrates remote control via the Smart Life app and voice control using an Alexa device, showing a command to set the room temperature.
6.5 Šildymo ir vėsinimo funkcija
The thermostat supports both heating and cooling modes. You can switch between these functions as needed to maintain a comfortable ambient temperature throughout the year.
- Režimo pasirinkimas: The mode can typically be changed through the thermostat's menu settings or directly within the Smart Life/AVATTO app.
- Temperatūros histerezė: The thermostat features precise temperature control with adjustable hysteresis (0.5-10°C) to prevent rapid cycling of your heating/cooling system.
- Temperatūros ribos: Set minimum and maximum temperature limits (e.g., 5-35°C) to ensure safe and efficient operation.

Image: This image illustrates the heating and cooling functions, showing temperature arrows and the app interface for selecting 'Hot' or 'Cold' modes.
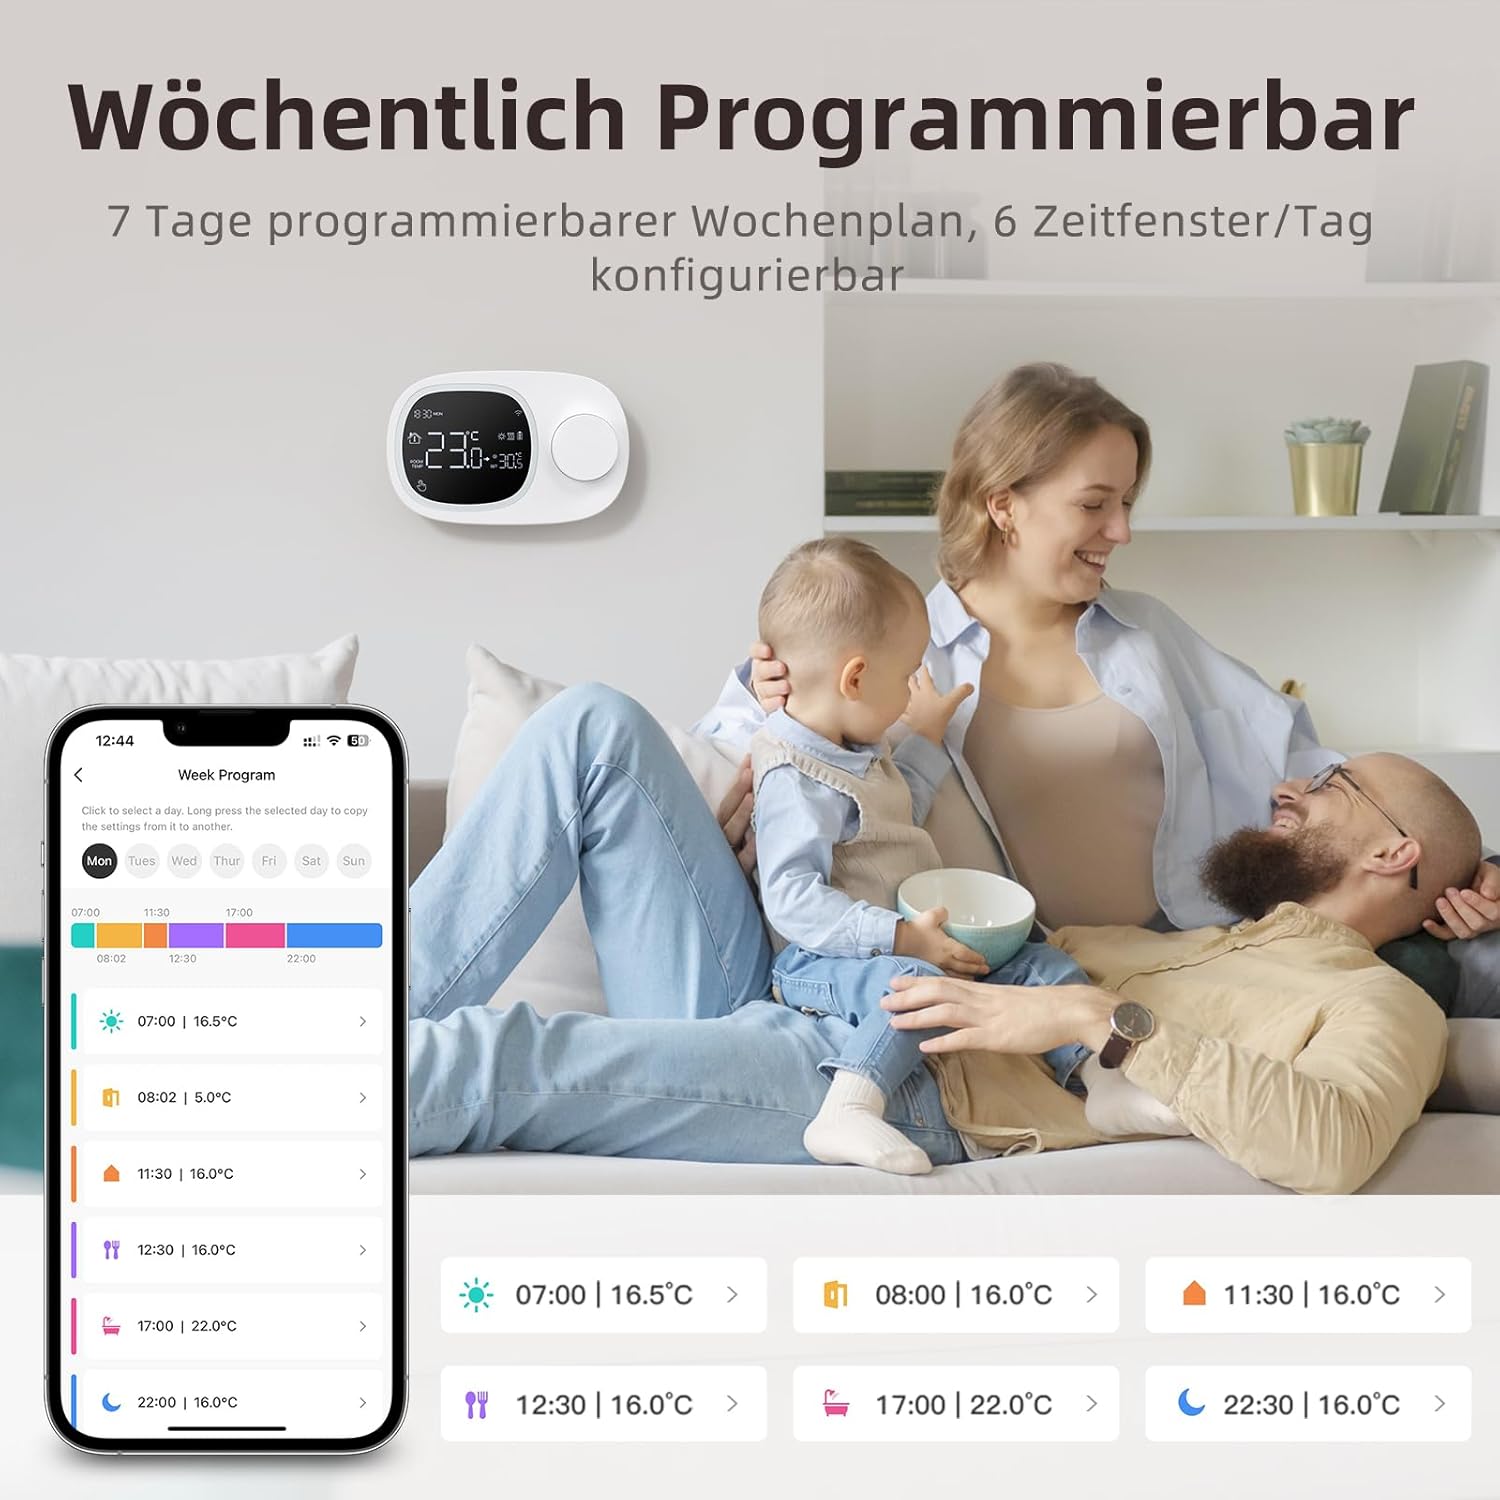
Image: This image highlights the precise temperature control features, including temperature hysteresis (0.5-10°C), minimum temperature setting (0.5°C), and upper/lower temperature limits (5-35°C).
7. Priežiūra
7.1 Akumuliatoriaus keitimas
When the battery level indicator on the screen shows low power, replace the three AAA batteries promptly to ensure continuous operation. Refer to section 5.2 for battery installation instructions.
8. Problemų sprendimas
Jei kyla problemų dėl termostato, žr. šias dažniausiai pasitaikančias problemas ir sprendimus:
| Problema | Galima priežastis / sprendimas |
|---|---|
| Thermostat does not power on. | Check if the AAA batteries are correctly inserted and charged. Ensure the power button is functioning. If using Type-C power, verify the cable connection. |
| Confused characters appear on the screen. | This may indicate an installation issue. Reinstall the device, ensuring all connections are secure. |
| Displayed temperature is inaccurate. | Access the advanced menu mode on the thermostat or the calibration menu in the Smart Life/Tuya app to adjust temperature settings. |
| Device starts normally, but screen does not show output temperature. | Check the connection between the main control board and the power board. Verify that all wiring is correct according to the markings on the device connector. |
| Nepavyksta prisijungti prie „Wi-Fi“. | Ensure your router is broadcasting a 2.4 GHz Wi-Fi signal. Confirm your mobile phone is connected to the 2.4 GHz network during pairing. Check Wi-Fi password. |
9. Specifikacijos
- Prekinis ženklas: AVATTO
- Modelio numeris: WT400-16A-B (also referred to as WT580)
- Spalva: Juoda
- Matmenys (termostatas): Apytiksliai 13.3 x 8.6 x 2.5 cm
- Prekės svoris: 270 gramų
- Power Output (Heating System): Iki 3800 vatų
- ttage: 240 voltai (kintamoji srovė)
- Medžiaga: Plastikiniai
- Power Source (Thermostat): 3 x AAA Batteries (sold separately), optional Type-C USB
- Ryšys: „Wi-Fi“ (2.4 GHz), „Bluetooth“
- Valdiklio tipas: Amazon Alexa, Google Assistant
- Ypatingos savybės: Voice control, LCD display (temperature, weather, time, date, room temp, heating icon), 0.5°C temperature increments, Silent operation, Smart Life/Tuya Smart remote control.
- Konkretus produkto naudojimas: Water heaters and gas boilers with dry contact.
10. Garantija ir palaikymas
Information regarding specific warranty details is not available in this document. For technical assistance, troubleshooting, or any questions not covered in this manual, please contact AVATTO customer support. You may also find additional support resources through the Smart Life or AVATTO application.