Įvadas
This manual provides essential information for the safe and proper installation, operation, and maintenance of your Veepeak 30 Amp Flanged Outlet NEMA L14-30R Locking Receptacle. Please read all instructions carefully before installation and use. Retain this manual for future reference.
Saugos informacija
ĮSPĖJIMAS: Electrical shock hazard. Improper installation or use can result in serious injury or death. Always follow local electrical codes and consult a qualified electrician if you are unsure about any part of the installation process.
- Prieš montuodami arba atlikdami šio įrenginio techninę priežiūrą, visada atjunkite maitinimą nuo grandinės pertraukiklio arba saugiklių dėžutės.
- Ensure all wiring connections are secure and correct according to the wiring diagram and local codes.
- Neviršykite nurodytų prietaiso elektros vardinių verčių.
- This product is designed for use with NEMA L14-30P compatible plugs only.
- Keep the weatherproof cap closed when the outlet is not in use to protect against moisture and dust.
Pakuotės turinys
- 1 x Veepeak 30 Amp NEMA L14-30R Flanged Outlet
- Montavimo varžtai
Specifikacijos
| Specifikacija | Vertė |
|---|---|
| Amppakilimas | 30 Amps |
| ttage | 125/250 voltų kintamoji srovė |
| NEMA konfigūracija | L14-30R |
| Stulpai / Laidai | 3 Pole, 4 Wire Grounding |
| Maksimali apkrova | 7500 vatų |
| Rekomenduojamas vielos matuoklis | 10 AWG/4C |
| Medžiaga | Polivinilchloridas (PVC) |
| Sertifikatai | ETL Listed (Conforms to UL & CSA standards) |
| Reikalingas skylės dydis | 2.5 colių |
Sąranka ir diegimas
Reikalingi įrankiai: Screwdriver, wire strippers, drill (for mounting hole), appropriate drill bit.
- Paruoškite montavimo vietą: Choose a suitable, dry location for installation. Drill a 2.5-inch diameter hole for the receptacle body. Ensure there is enough space behind the mounting surface for wiring connections.
- Laidų jungtys:
Refer to the wiring diagram below and the color-coded terminals on the back of the receptacle. Strip approximately 1/2 inch of insulation from each wire. Insert the wires into the corresponding terminals and tighten the screws securely. Ensure no bare wire strands are exposed outside the terminals.

Vaizdas: Galinis view of the L14-30R outlet, displaying the four color-coded terminals for wiring connections (Green for Ground, White for Neutral, Red and Black for Hot).

Image: NEMA L14-30R configuration diagram. 'X' and 'Y' are hot lines (125V each to neutral, 250V between them), 'W' is neutral, and 'G' is ground.
- Green (G): Žemės viela.
- Balta (W): Neutralus laidas.
- Black (X): Hot wire (Line 1).
- Red (Y): Hot wire (Line 2).
- Pritvirtinkite lizdą: Insert the receptacle body into the drilled hole. Secure the flanged outlet to the mounting surface using the provided screws. Ensure it is flush and stable.
- Atkurti maitinimą: Baigus montavimą ir patikrinus visas jungtis, atkurkite elektros tiekimą automatiniu jungikliu.
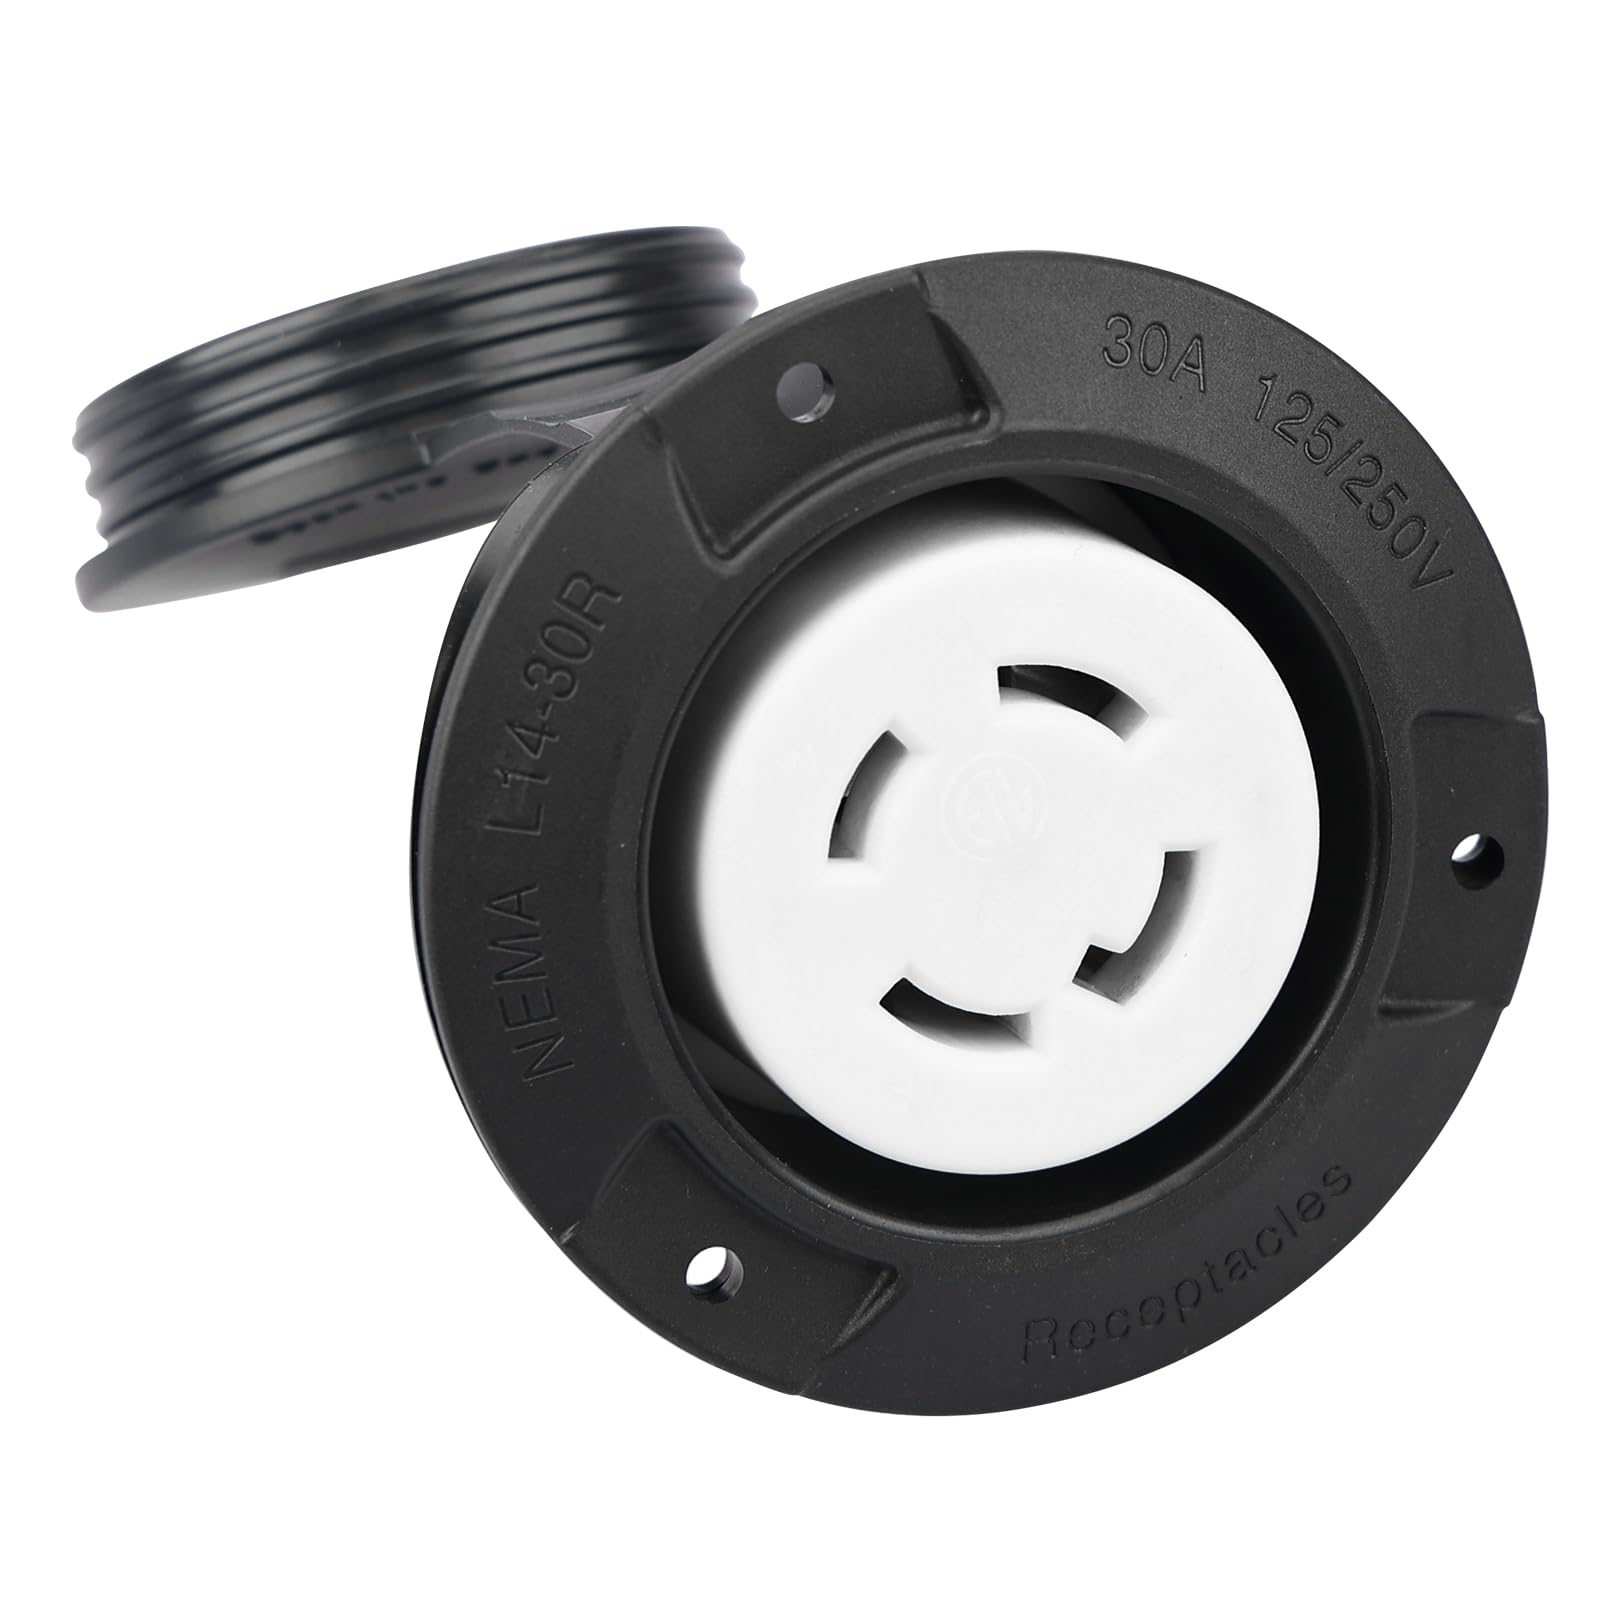
Vaizdas: priekis view of the Veepeak L14-30R flanged outlet with its weatherproof cap open, revealing the NEMA L14-30R locking receptacle.
Naudojimo instrukcijos
- Dangtelio atidarymas: Lift the weatherproof cap to access the receptacle.
- Kištuko prijungimas: Align the NEMA L14-30P plug with the receptacle. Insert the plug and twist clockwise to lock it into place. Ensure the plug is fully seated and locked.
- Kištuko atjungimas: Twist the plug counter-clockwise to unlock, then pull it straight out from the receptacle.
- Closing the Cap: When the outlet is not in use, ensure the weatherproof cap is securely closed over the receptacle to protect it from environmental elements like rain, snow, and dust.

Vaizdas: priekis view of the Veepeak L14-30R flanged outlet with its weatherproof cap securely closed, providing protection.
Priežiūra
Reguliarus techninis aptarnavimas užtikrina optimalų našumą ir saugumą.
- Valymas: Periodically clean the exterior of the outlet with a damp cloth. Do not use abrasive cleaners or solvents. Ensure the cap is closed during cleaning.
- Patikra: Regularly inspect the outlet for any signs of damage, wear, or corrosion. Check the weatherproof cap for proper sealing.
- Ryšio patikrinimas: Annually, or if issues arise, disconnect power and check the wiring connections for tightness. Loose connections can cause overheating.
Trikčių šalinimas
- Nėra galios:
- Check the circuit breaker or fuse for the circuit. Reset if tripped.
- Patikrinkite, ar maitinimo šaltinis yra aktyvus.
- Įsitikinkite, kad kištukas yra visiškai įkištas ir užfiksuotas lizde.
- Atsipalaidavęs ryšys:
- If the plug feels loose or power is intermittent, disconnect power and inspect the wiring connections at the back of the receptacle for tightness.
- Inspect the plug on the appliance for damage.
- Damage to Outlet:
- If the outlet housing or terminals show signs of damage, cracking, or burning, discontinue use immediately and replace the unit.
Jei trikčių šalinimo veiksmai neišsprendžia problemos, kreipkitės į kvalifikuotą elektriką.
Garantija ir palaikymas
Veepeak provides a one-year hassle-free replacement warranty for this product. For warranty claims or customer service inquiries, please contact Veepeak customer support through the retailer where the product was purchased or visit the official Veepeak websvetainę.


