1. Įvadas
This manual provides essential information for the safe and effective operation, maintenance, and troubleshooting of your Bosch Professional GKS 130 Circular Saw. Please read all instructions carefully before using the tool to ensure your safety and prolong the life of the product.
The GKS 130 Professional circular saw is designed for rough cutting applications. Its 1300 W motor provides sufficient cutting performance for various tasks, including those performed by construction workers, carpenters, and renovation contractors. The tool can be used with a dust extractor for a cleaner working environment.
Pagrindinės funkcijos:
- Reliable design for continuous cutting.
- Fast cutting speed with a powerful 1300W motor.
- Suitable for cutting various materials such as plywood, softwood, MDF, and OSB board types.
- Integrated dust blower function for a clear cutting line.
- Expandable with the GKS 190 dust extractor.
- Comfortable auxiliary handle for secure tool holding.
- Easy operating depth adjustment via a Quick-lock switch.
2. Saugos instrukcijos
ĮSPĖJIMAS: Perskaitykite visus su šiuo elektriniu įrankiu pateiktus saugos įspėjimus, instrukcijas, iliustracijas ir specifikacijas. Jei nesilaikysite visų toliau išvardytų nurodymų, galite gauti elektros smūgį, gaisrą ir (arba) rimtus sužalojimus.
Bendra elektrinių įrankių sauga:
- Darbo zonos sauga: Darbo vieta turi būti švari ir gerai apšviesta. Netvarkingos arba tamsios vietos skatina nelaimingus atsitikimus. Nenaudokite elektrinių įrankių sprogioje aplinkoje, pavyzdžiui, ten, kur yra degių skysčių, dujų ar dulkių.
- Elektros sauga: Elektrinių įrankių kištukai turi atitikti lizdą. Niekada jokiu būdu nekeiskite kištuko. Venkite kūno kontakto su įžemintais paviršiais.
- Asmeninis saugumas: Always wear eye protection, hearing protection, and a dust mask. Dress properly; avoid loose clothing or jewelry. Secure long hair.
- Įrankio naudojimas ir priežiūra: Nenaudokite elektrinio įrankio per jėgą. Naudokite savo darbui tinkamą elektrinį įrankį. Prieš atlikdami bet kokius pakeitimus, keisdami priedus ar padėdami elektrinius įrankius sandėliuoti, atjunkite kištuką nuo maitinimo šaltinio.
Diskinio pjūklo specifinė sauga:
- Laikykite įrankį už izoliuotų griebimo paviršių kai atliekate operaciją, kai pjovimo priedas gali liesti paslėptus laidus arba savo laidą.
- Laikykite rankas atokiau nuo pjovimo zonos ir peilio. Antrąją ranką laikykite ant papildomos rankenos arba variklio korpuso. Jei pjūklą laikote abiem rankomis, ašmenys negali jų nupjauti.
- Nelieskite po ruošiniu. Apsauga negali apsaugoti jūsų nuo ašmenų po ruošiniu.
- Sureguliuokite pjovimo gylį pagal ruošinio storį. Po ruošiniu turėtų būti matomas mažiau nei visas disko dantis.
- Niekada nelaikykite ruošinio rankose ar už kojos pjaunant. Pritvirtinkite ruošinį prie stabilios platformos.
- Always use the correct size and type of blade for the material being cut.
- Ensure the lower guard is functioning correctly and retracts smoothly.
3. Gaminio komponentai
Familiarize yourself with the various parts of your Bosch Professional GKS 130 Circular Saw for safe and efficient operation.

3.1 paveikslas: Bosch GKS 130 Circular Saw with key dimensions. The saw measures approximately 352 mm in length, 232 mm in width, and 241 mm in height.

3.2 paveikslas: Diagram illustrating key functions: Oro pūstuvas for a dust-free view of the workpiece and cutting line, and Veleno užraktas for easy disc/tool changes and direct dust extraction into a bag or via an all-purpose dust extractor.
4. Sąranka
4.1 Išpakavimas ir patikrinimas
- Carefully remove the circular saw and all accessories from the packaging.
- Patikrinkite įrankį, ar jis nebuvo pažeistas transportavimo metu. Nenaudokite pažeisto įrankio.
- Verify that all included components are present. The product typically includes attachments.
4.2 Peilio montavimas ir nuėmimas
ĮSPĖJIMAS: Always disconnect the saw from the power supply before installing or removing the blade.
- Paspauskite ir laikykite nuspaudę veleno fiksavimo mygtuką, kad peilis nesisuktų.
- Use the appropriate wrench (usually included) to loosen the blade retaining screw. Turn the screw in the direction indicated on the saw (often opposite to normal threading).
- Pakelkite apatinį apsauginį peilio dangtelį ir atsargiai nuimkite seną peiliuką.
- Clean the blade flanges and ensure they are free of debris.
- Place the new blade onto the spindle, ensuring the teeth are pointing in the correct direction of rotation (indicated by an arrow on the saw and blade).
- Re-attach the outer blade flange and tighten the blade retaining screw firmly while holding the spindle lock button. Do not overtighten.
4.3 Pjovimo gylio reguliavimas
The cutting depth can be easily adjusted using the Quick-lock switch.
- Atlaisvinkite gylio reguliavimo svirtį/rankenėlę.
- Move the saw base up or down to achieve the desired cutting depth. Ensure that only a small portion of the blade (less than a full tooth) extends below the workpiece.
- Tvirtai priveržkite gylio reguliavimo svirtį/rankenėlę.
4.4 Įstrižojo kampo reguliavimas
The saw allows for bevel cuts. To adjust the bevel angle:
- Loosen the bevel adjustment lever/knob, typically located at the front of the saw base.
- Tilt the saw base to the desired angle, indicated on the bevel scale.
- Tighten the bevel adjustment lever/knob firmly.
5. Naudojimo instrukcijos
5.1 Įjungimas / išjungimas
- To start the saw, press the trigger switch. Some models may have a safety lock-off button that must be pressed first.
- Norėdami sustabdyti pjūklą, atleiskite paleidimo jungiklį.
5.2 Pjūvio atlikimas
ĮSPĖJIMAS: Visada įsitikinkite, kad ruošinys yra tvirtai pritvirtintasampprieš pjovimą.
- Aiškiai pažymėkite pjovimo liniją ant ruošinio.
- Position the saw base flat on the workpiece, with the blade aligned to the cutting line. Ensure the blade is not touching the workpiece before starting the motor.
- Užveskite pjūklą ir leiskite diskui pasiekti visą greitį prieš pradėdami pjauti.
- Lėtai ir tolygiai stumkite pjūklą į priekį per ruošinį. Tvirtai laikykite abiem rankomis.
- Allow the saw to complete the cut naturally. Do not force the saw.
- Baigę pjauti, atleiskite gaiduką ir leiskite diskui visiškai sustoti, prieš nukeldami pjūklą nuo ruošinio.

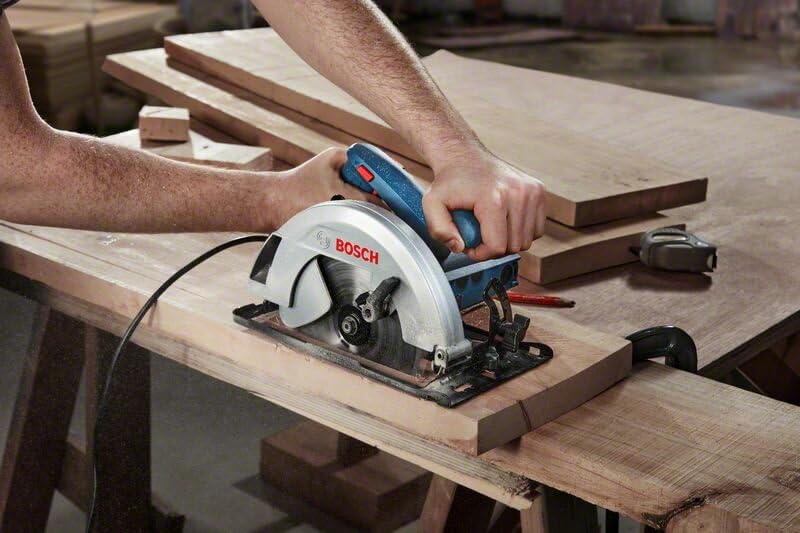
5.1 paveikslas: Proper technique for using the circular saw to cut wood, ensuring a stable workpiece and firm grip.

5.2 paveikslas: The saw in action, demonstrating its cutting capability and the generation of sawdust during operation.

5.3 paveikslas: A user operating the circular saw to cut a wooden beam, highlighting the blade guard mechanism.

5.4 paveikslas: The circular saw being used to cut through a wooden pallet, showcasing its versatility for various wood types.
5.5 paveikslas: The circular saw positioned on a workbench, ready for cutting, with additional wood pieces and a measuring tape nearby.

5.6 paveikslas: A worker wearing safety gear, including a hard hat and safety glasses, operating the circular saw on a large sheet of material.
5.3 Dulkių valdymas
The GKS 130 features an integrated dust blower to keep the cutting line clear. For more comprehensive dust management:
- Connect a suitable dust extractor, such as the GKS 190 dust extractor, to the saw's dust port.
- Ensure the dust extractor is properly attached and functioning before starting the saw.
6. Priežiūra
Reguliarus techninis aptarnavimas užtikrina jūsų diskinio pjūklo ilgaamžiškumą ir saugų veikimą.
6.1 Valymas
- Prieš valydami visada atjunkite įrankį nuo maitinimo šaltinio.
- Reguliariai valykite ventiliacijos angas, kad variklis neperkaistų.
- Remove sawdust and debris from the blade guard, base plate, and depth adjustment mechanism. A brush or compressed air can be used.
- Keep the main handle and auxiliary handle clean and free of grease or oil.
6.2 Peilių priežiūra
- Prieš kiekvieną naudojimą patikrinkite pjūklo diską, ar jis nėra aštrus, įtrūkęs ar netrūksta dantų. Pažeistus diskus nedelsdami pakeiskite.
- Ensure the blade is clean. Resin and pitch buildup can affect cutting performance and increase kickback risk. Use a suitable blade cleaner.
6.3 Angliniai šepetėliai
The motor is equipped with carbon brushes. When the carbon brushes wear out, the motor will automatically shut off. Have the carbon brushes replaced by an authorized Bosch service center.
7. Problemų sprendimas
Šiame skyriuje aptariamos dažniausiai pasitaikančios problemos, su kuriomis galite susidurti naudodami diskinį pjūklą.
| Problema | Galima priežastis | Sprendimas |
|---|---|---|
| Pjūklas neįsijungia | Nėra maitinimo šaltinio; Sugedęs jungiklis; Susidėvėję anglies šepetėliai | Check power connection; Test outlet; Contact service for switch/brush replacement. |
| Prastas pjovimo našumas / Ašmenys stringa | Dull or dirty blade; Incorrect blade for material; Improper cutting depth; Workpiece not secured | Replace/clean blade; Use correct blade; Adjust cutting depth; Secure workpiece firmly. |
| Per didelė vibracija | Damaged or unbalanced blade; Loose blade retaining screw | Replace blade; Tighten blade screw. |
| Apatinis peilio apsaugas užsikabina | Sawdust buildup; Damaged guard mechanism | Clean guard area thoroughly; Contact service if damaged. |
8. Techninės specifikacijos
The following specifications apply to the Bosch Professional GKS 130 Circular Saw:
| Specifikacija | Vertė |
|---|---|
| Prekės ženklas | Bosch |
| Modelio numeris | GKS130 |
| Maitinimo šaltinis | Su laidu elektra |
| Vattage | 1300 vatų |
| Greitis | 6380 aps./min |
| Ašmenų ilgis | 184 milimetrų |
| Dantų skaičius | 24 |
| Ašmenų medžiaga | Legiruotasis plienas |
| Paviršiaus rekomendacija | Mediena |
| Ypatinga funkcija | Gylio reguliavimas |
| Gaminio matmenys | 35L x 24.5W x 20H centimetrai |
| Prekės svoris | 4.69 kilogramo |
| Rankenos medžiaga | Metalo lydinys |
| Įtraukti komponentai | Priedai |
| Kilmės šalis | Kinija |
9. Garantija ir klientų aptarnavimas
For warranty information, service, or technical support, please refer to the warranty card included with your product or visit the official Bosch Professional websvetainėje. Išsaugokite pirkimo kvitą kaip pirkimo įrodymą bet kokiems garantiniams prašymams.
Bosch is committed to providing high-quality tools and support. Do not attempt to repair the tool yourself; always contact an authorized service center for repairs to ensure safety and maintain warranty validity.