1. Įvadas
This manual provides essential information for the safe installation, operation, and maintenance of your Harvia The Wall SWS80 Sauna Heater. Please read these instructions carefully before installation and use, and retain them for future reference.
The Harvia The Wall SWS80 is an 8kW sauna heater designed for sauna rooms up to 423 cubic feet. It features a stainless steel housing, direct rock-to-element contact for efficient heat distribution, and a convenient top-mounted illuminated control panel.
2. Svarbios saugos instrukcijos
ĮSPĖJIMAS: Kad sumažintumėte gaisro, elektros smūgio ar sužalojimo riziką, laikykitės šių nurodymų:
- Installation and electrical connections must be performed by qualified personnel in accordance with all applicable national and local codes and regulations.
- Do not operate the heater without sauna stones. Ensure stones are properly placed to cover heating elements.
- Keep flammable materials (towels, clothing, wood, etc.) away from the heater. Maintain specified safety distances.
- Do not pour excessive amounts of water on the hot stones. Use only clean tap water.
- The heater surface and stones become extremely hot during operation. Avoid direct contact to prevent burns.
- Children and individuals with reduced physical, sensory, or mental capabilities should be supervised or instructed on safe use.
- Užtikrinkite tinkamą vėdinimą pirties patalpoje.
- In case of malfunction, immediately disconnect power and contact a qualified service technician.
- This heater is equipped with built-in overheat protection. If the heater overheats, it will automatically shut off.
3. Sąranka ir diegimas
3.1 Išpakavimas ir patikrinimas
Carefully unpack the sauna heater and inspect it for any damage during transit. Ensure all components listed in the packing list are present.
3.2 Šildytuvo montavimas
The Harvia The Wall SWS80 is a wall-mount heater and includes mounting brackets for easy installation. The control panel can be configured on either the left or right side of the unit to best accommodate your sauna room design. Refer to the detailed installation instructions provided in the separate "Installation and Operation Manual" for specific measurements and procedures.

Image: Harvia The Wall SWS80 sauna heater installed on a wall within a sauna room, positioned adjacent to wooden benches. This illustrates the typical wall-mounted setup.
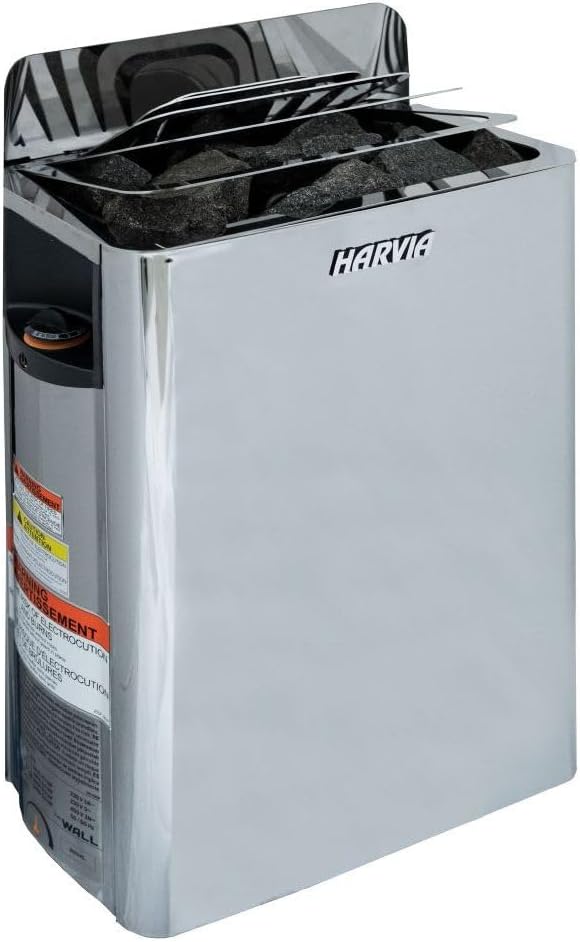
Paveikslėlis: Detalus priekis view of the Harvia The Wall SWS80 sauna heater, showcasing its stainless steel exterior and the sauna stones neatly arranged in the upper compartment.
3.3 Elektros prijungimas
The heater requires a 240V, single-phase electrical supply with an ampera 33.3 Amps. All electrical work must be carried out by a licensed electrician in compliance with local and national electrical codes.
3.4 Pirties akmenų klojimas
Place the included sauna stones into the heater's stone compartment. Ensure the stones are arranged loosely to allow for proper air circulation and to cover the heating elements completely. Do not pack stones too tightly.

Vaizdas: Stambus planas view from above the Harvia The Wall SWS80 heater, illustrating the proper placement of sauna stones within the compartment, ensuring coverage of the heating elements.
4. Naudojimo instrukcijos
4.1 Valdymo skydas
The Harvia The Wall SWS80 features a built-in, top-mounted illuminated control panel for easy operation, even in low-light conditions. This panel includes controls for on/off, time, and temperature settings.

Image: A close-up of the integrated control panel on the side of the Harvia The Wall SWS80 sauna heater, highlighting the illuminated dials for adjusting temperature and setting the timer.
4.2 Turning On the Heater
- Ensure the sauna room is clear of any obstructions and that the door is closed.
- Turn the temperature control dial to your desired sauna temperature.
- Turn the timer dial to the desired operating time. The heater will begin to heat up.
4.3 Timer Functionality
The built-in timer allows you to set the heater to operate for a specific duration. Please note that the timer on this unit is designed for a maximum continuous operation of one hour before automatically shutting off. If a longer heating period is desired, the timer must be reset after the initial hour.
4.4 Vandens pylimas ant akmenų
Once the stones are hot, you may gently pour small amounts of clean tap water over them to create steam (löyly). Do not pour excessive amounts of water at once, as this can damage the heating elements and pose a burn risk.
5. Priežiūra
5.1 Reguliarus valymas
Ensure the heater is completely cool and disconnected from power before cleaning. Wipe the stainless steel exterior with a damp audinys. Nenaudokite abrazyvinių valiklių ar tirpiklių.
5.2 Stone Inspection and Replacement
Periodically inspect the sauna stones for signs of crumbling or deterioration. Over time, stones can break down, which may affect heating efficiency and air circulation. Replace any damaged stones with new, genuine Harvia sauna stones. The durable structure and technical features of the heater are designed to extend its lifespan, but proper stone maintenance is crucial.
6. Problemų sprendimas
| Problema | Galima priežastis | Sprendimas |
|---|---|---|
| Šildytuvas neįsijungia. | No power supply, circuit breaker tripped, timer not set. | Check power connection, reset circuit breaker, ensure timer is set correctly. Consult an electrician if issues persist. |
| Šildytuvas nepakankamai šildo. | Incorrect temperature setting, poor stone placement, damaged heating element, sauna room too large. | Adjust temperature dial, rearrange stones for better air flow, inspect elements (by qualified personnel), verify sauna room volume is within specifications (max 423 cu. ft.). |
| Šildytuvas netikėtai išsijungia. | Suveikė apsauga nuo perkaitimo, pasibaigė laikmačio galiojimo laikas. | Allow heater to cool down, check for obstructions around the heater. Reset timer if the one-hour limit was reached. |
| Control panel not responding. | Electrical fault, damaged control unit. | Disconnect power and contact a qualified service technician. |
7. Techninės specifikacijos
- Modelis: HSWS8U1B
- Galia: 8 kW
- ttage: 240 V
- Fazė: Vienfazė
- Amppakilimas: 33.3 Amps
- Matmenys (P x G x A): 16.9" (429mm) x 10.15" (257mm) x 27.59" (700mm)
- Prekės svoris: 75 svaro
- Recommended Sauna Room Size: Iki 423 kub. ft.
- Korpuso medžiaga: Nerūdijantis plienas
- Kilmė: Designed, engineered, and made in Finland
8. Garantija ir palaikymas
For detailed warranty information, please refer to the "Installation and Operation Manual" included with your product. Harvia provides comprehensive support for its products.
If you require technical assistance, spare parts, or have questions regarding your Harvia The Wall SWS80 sauna heater, please contact Harvia customer service or your authorized dealer.
Gamintojas: Harvija


