1. Įvadas
The GVDA GD128PLUS Smart Rechargeable Digital Multimeter is an advanced, versatile tool designed for accurate and reliable electrical measurements. Featuring a 10000-count display, auto-ranging capabilities, and True RMS functionality, it is suitable for professionals and electronics enthusiasts alike. This manual provides essential information for safe and effective operation, setup, maintenance, and troubleshooting of your multimeter.
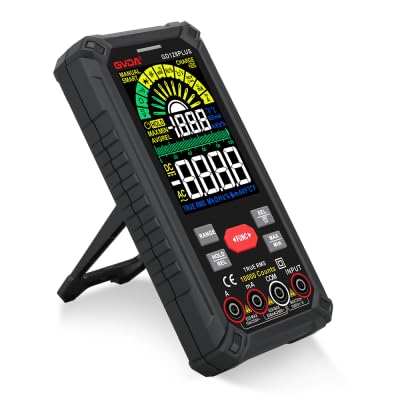
Figure 1.1: GVDA GD128PLUS Digital Multimeter with its integrated kickstand.
2. Saugos informacija
Visada laikykitės šių saugos priemonių, kad išvengtumėte sužalojimų ar multimetro sugadinimo:
- Neviršykite jokių maksimalių įvesties ribų jokiam matavimo diapazonui.
- Būkite ypač atsargūs dirbdami su ttagesant didesnei nei 30 V AC RMS, 42 V pikinei vertei arba 60 V DC įtampai. Šie įtampų lygiaitagtai kelia šoko pavojų.
- Visada atjunkite grandinės maitinimą ir iškraukite visus didelės įtampos krūvius.tage capacitors before performing resistance, continuity, or diode tests.
- Ensure the test leads are in good condition, without any damaged insulation.
- Do not operate the multimeter if it appears damaged or if the case is open.
- Use the correct function and range for each measurement.
- Matavimo metu laikykite pirštus už bandymo zondų apsaugų.
- Do not use the multimeter in wet environments or in the presence of explosive gases or dust.
- The Non-Contact Voltage (NCV) function is for indication only; always verify voltage presence with direct measurement.
3. Pakuotės turinys
Išpakuodami patikrinkite, ar yra visi toliau išvardyti daiktai ir ar jie yra geros būklės:
- 1 x GVDA GD128PLUS Digital Multimeter
- 1 x bandymo laidų pora (raudona ir juoda)
- 1x USB įkrovimo laidas
- 1 x K tipo termoelemento zondas
- 1 x medžiaginis nešiojimo krepšys
- 1 x Naudotojo vadovas (šis dokumentas)
- 1 x dovanų dėžutė (pakuotė)
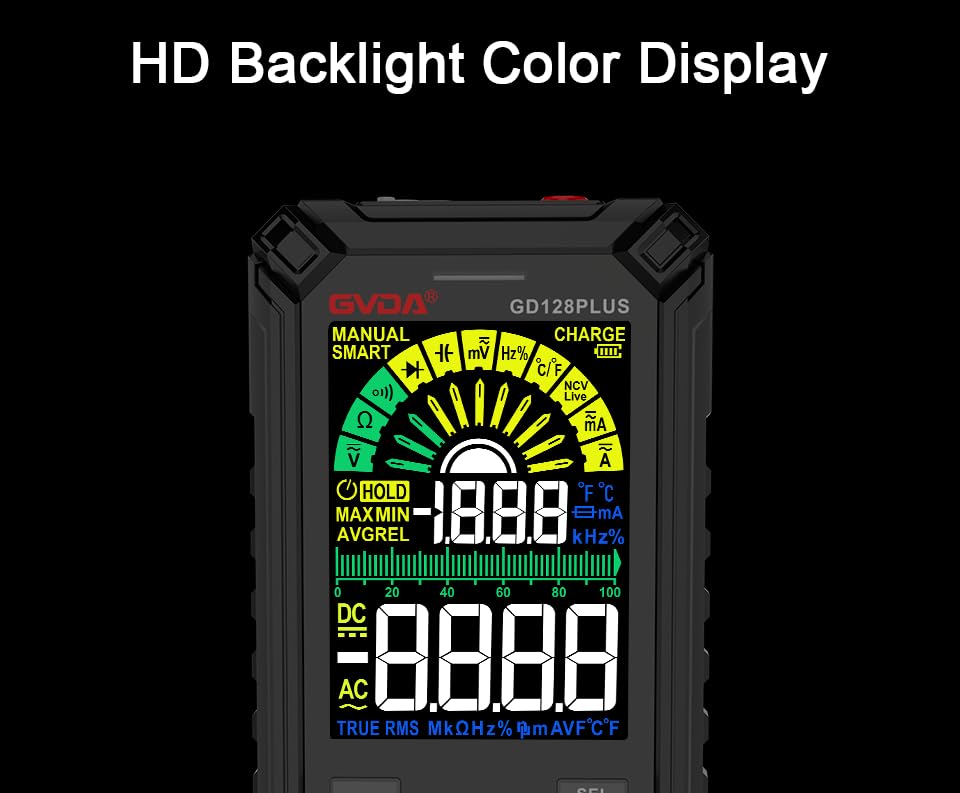
Figure 3.1: All components included in the GVDA GD128PLUS Multimeter package.
4. Produkto savybės ir komponentai
The GD128PLUS multimeter is equipped with a range of features for comprehensive electrical testing:
- 10000 skaitmenų ekranas: Užtikrina didelę skiriamąją gebą tiksliems matavimams.
- Automatinis diapazonas: Automatiškai parenka tinkamą matavimo diapazoną, taip supaprastindamas veikimą.
- Tikrasis RMS: Ensures accurate readings for non-sinusoidal AC waveforms.
- Įkraunama ličio baterija: Built-in 3.7V battery for convenience and portability.
- HD Backlight Color Display: Clear and easy-to-read display in various lighting conditions.
- Nekontaktinis ttage (NCV) aptikimas: Saugiai aptinka kintamosios srovės įtampos buvimątage be tiesioginio kontakto.
- LED žibintuvėlis: Integruotas apšvietimas tamsioms darbo vietoms apšviesti.
- Duomenų laikymas (HOLD): Įšaldo dabartinį rodmenį ekrane.
- Santykinis matavimas (REL): Displays the difference between a stored reference value and the current reading.
- MAX/MIN matavimas: Matavimo seanso metu įrašo didžiausias ir mažiausias vertes.
- Įvesties lizdo LED indikacija: Guides correct test lead connection for selected function.
- Apsauga nuo perkrovos: Protects the device from damage due to excessive input.
4.1. Multimeter Layout

Figure 4.1: Key components and input jacks of the GVDA GD128PLUS Multimeter.
Šių komponentų vietą žr. 4.1 paveiksle:
- Ekranas: HD Backlight Color LCD for readings and indicators.
- Funkciniai mygtukai: RANGE, HOLD/REL, FUNC, SEL, MAX/MIN.
- Įvesties lizdai:
- COM lizdas: Bendras (neigiamas) įėjimas visiems matavimams.
- VΩHzCap°C/°F Jack: Teigiamas tūrio įėjimastage, Resistance, Frequency, Capacitance, and Temperature measurements.
- mAμA lizdas: Teigiama įvestis milimetriuiampčia ir mikroampsrovės matavimai.
- 10A lizdas: Teigiama įvestis 10 Ampsrovės matavimai.
- Įjungimo / išjungimo mygtukas: Įsikūręs viršutiniame krašte.
- Įkrauti lizdą: USB-C prievadas vidinei baterijai įkrauti.
- Žibintuvėlio klavišas: Button to activate the integrated LED flashlight.
- Įspėjamasis indikatorius: LED light for safety alerts.
- Laikiklis: Integrated kickstand on the back for hands-free viewing.
5. Sąranka
5.1. Pradinis įkrovimas
Before first use, it is recommended to fully charge the multimeter's internal lithium battery. Connect the provided USB charging cable to the multimeter's charge jack and to a standard USB power adapter (not included) or a computer USB port. The display will indicate charging status. A full charge typically takes a few hours.

Figure 5.1: The multimeter's rechargeable lithium battery can be charged directly using a USB cable.
5.2. Attaching Test Leads
For most measurements, connect the black test lead to the COM jack and the red test lead to the appropriate positive input jack (VΩHzCap°C/°F, mAμA, or 10A) depending on the desired measurement function. The input jack LED indicators will illuminate to guide correct connection.
6. Naudojimo instrukcijos
6.1. Maitinimo įjungimas/išjungimas
Paspauskite ir palaikykite Maitinimo įjungimas/išjungimas button (located on the top edge) to turn the multimeter on or off. The device features an auto-power-off function to conserve battery life after a period of inactivity.
6.2. Matavimo režimai
The GD128PLUS offers various measurement modes, accessible via the rotary dial and function buttons:
6.2.1. ttagMatavimas (AC/DC)
- Pasukite sukamąjį ratuką į padėtį V position. The multimeter will automatically detect AC or DC voltage.
- Prijunkite juodą bandymo laidą prie COM lizdą ir raudoną bandymo laidą prie VΩHzCap°C/°F domkratas.
- Connect the test probes in parallel to the circuit or component under test.
- Perskaitykite ttage reikšmė ekrane.
6.2.2. Srovės matavimas (AC/DC)
- Pasukite sukamąjį ratuką į padėtį mA/μA or 10A position depending on the expected current.
- Prijunkite juodą bandymo laidą prie COM jack. Connect the red test lead to the Maμa. lizdas mažoms srovėms arba 10A jack for larger currents.
- Connect the multimeter in series with the circuit. Ensure the circuit is de-energized before connecting.
- Įjunkite grandinę ir nuskaitykite srovės vertę.
- Atsargiai: Never connect the multimeter in parallel for current measurement, as this can damage the device and the circuit.
6.2.3. Varžos matavimas (Ω)
- Pasukite sukamąjį ratuką į padėtį Ω padėtis.
- Prijunkite juodą bandymo laidą prie COM lizdą ir raudoną bandymo laidą prie VΩHzCap°C/°F domkratas.
- Prieš matuodami varžą, įsitikinkite, kad grandinėje nėra įtampos ir visi kondensatoriai yra iškrauti.
- Prijunkite bandymo zondus prie matuojamo komponento.
- Nuskaitykite varžos vertę.
6.2.4. Capacitance Measurement (F)
- Pasukite sukamąjį ratuką į padėtį Cap padėtis.
- Prijunkite juodą bandymo laidą prie COM lizdą ir raudoną bandymo laidą prie VΩHzCap°C/°F domkratas.
- Prieš prijungdami zondus, įsitikinkite, kad kondensatorius yra visiškai išsikrovęs.
- Prijunkite bandymo zondus per kondensatorių.
- Nuskaitykite talpos vertę.
6.2.5. Dažnio matavimas (Hz)
- Pasukite sukamąjį ratuką į padėtį Hz padėtis.
- Prijunkite juodą bandymo laidą prie COM lizdą ir raudoną bandymo laidą prie VΩHzCap°C/°F domkratas.
- Connect the test probes in parallel to the signal source.
- Nuskaitykite dažnio reikšmę.
6.2.6. Diode Test and Continuity Test
- Pasukite sukamąjį ratuką į padėtį Diodas / tęstinumas padėtis. Naudoti SEL button to toggle between diode test and continuity test.
- Prijunkite juodą bandymo laidą prie COM lizdą ir raudoną bandymo laidą prie VΩHzCap°C/°F domkratas.
- Diodo testas: Prijunkite raudoną zondą prie diodo anodo, o juodą – prie katodo. Tiesioginė įtampatage drop will be displayed. Reverse the probes; an open circuit (OL) should be displayed.
- Tęstinumo testas: Connect the probes across the circuit or component. A continuous beep indicates a low resistance (continuity).
6.2.7. Nekontaktinis ttage (NCV) aptikimas
- Pasukite sukamąjį ratuką į padėtį NCV padėtis.
- Move the top end of the multimeter near the conductor suspected of having AC voltage.
- The multimeter will emit an audible beep and the warning indicator will flash, with the display showing signal strength, if AC voltagaptinkamas e.
- Pastaba: This function is for preliminary detection only. Always use direct contact measurement for precise voltage patikrinimas.
6.2.8. Temperatūros matavimas (°C/°F)
- Pasukite sukamąjį ratuką į padėtį ° C / ° F padėtis.
- Connect the K-type thermocouple probe to the COM ir VΩHzCap°C/°F domkratai, stebint poliškumą.
- Place the tip of the thermocouple on or near the object whose temperature is to be measured.
- Read the temperature on the display. Use the SEL mygtuką, kad perjungtumėte tarp Celsijaus ir Farenheito laipsnių.
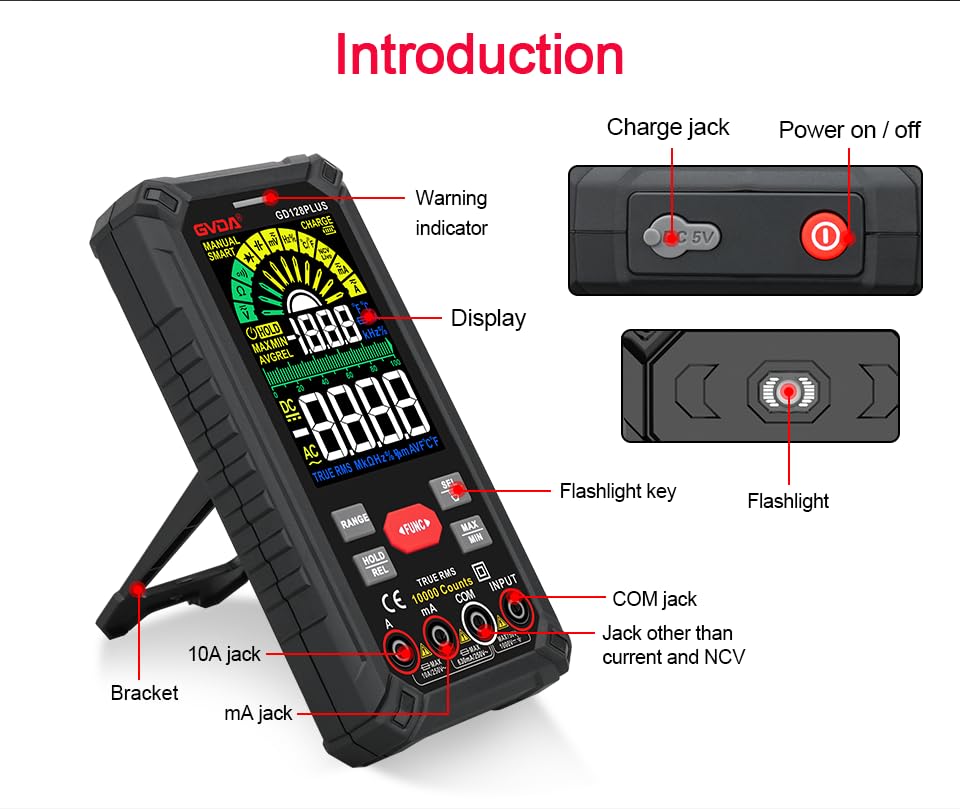
Figure 6.1: The multimeter can perform temperature tests using the included K-type thermocouple probe.
6.3. Specialiosios funkcijos
- RANGE mygtukas: In manual range mode, press to cycle through available ranges. In auto range mode, press to switch to manual range.
- HOLD/REL Button:
- Short press: Activates Data Hold, freezing the current reading. Press again to release.
- Long press: Activates Relative Measurement (REL). The current reading becomes the reference, and subsequent readings show the difference from this reference. Long press again to exit.
- MAX/MIN mygtukas: Press to enter MAX/MIN recording mode. The display will show the maximum, minimum, and average values detected since activation. Press again to cycle through MAX, MIN, AVG. Long press to exit.
- FUNC mygtukas: Used to switch between different functions within the same rotary dial position (e.g., AC/DC voltage, diodas/tęstinumas).
- Žibintuvėlis: Press the dedicated flashlight key on the side to turn the LED flashlight on or off.

Figure 6.2: The multimeter features a convenient LED flashlight for illuminating work areas.
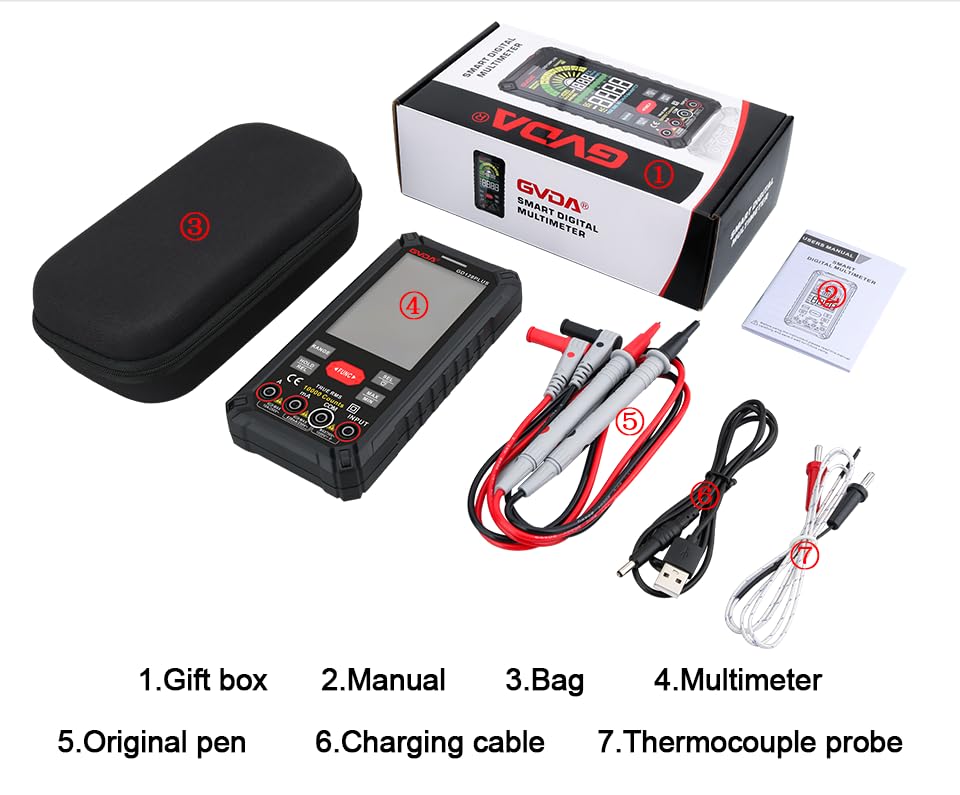
Figure 6.3: The HD Backlight Color Display provides clear and comprehensive measurement information.
7. Priežiūra
7.1. Valymas
Nuvalykite dėklą su skelbimuamp cloth and mild detergent. Do not use abrasives or solvents. Ensure the multimeter is off and disconnected from any circuits before cleaning.
7.2. Akumuliatoriaus įkrovimas
The multimeter is equipped with a rechargeable lithium battery. When the low battery indicator appears on the display, connect the multimeter to a USB power source using the provided charging cable. Avoid fully discharging the battery frequently to prolong its lifespan.
7.3. Sandėliavimas
When not in use for extended periods, store the multimeter in a cool, dry place, away from direct sunlight and extreme temperatures. It is advisable to charge the battery periodically (e.g., every 3-6 months) to maintain its health.
8. Problemų sprendimas
| Problema | Galima priežastis | Sprendimas |
|---|---|---|
| Multimetras neįsijungia. | Žemas arba išsikrovęs akumuliatorius. | Charge the multimeter using the USB cable. |
| Rodomas užrašas „OL“ (perkrova). | Matavimas viršija pasirinktą diapazoną arba maksimalią matuoklio talpą. | Switch to a higher range (if in manual range) or ensure the measurement is within the meter's specifications. |
| Netikslūs rodmenys. | Incorrect function/range selected; poor test lead connection; external interference. | Verify function and range; ensure test leads are securely connected; move away from strong electromagnetic fields. |
| Nėra tęstinumo pyptelėjimo. | Circuit is open; multimeter not in continuity mode. | Check the circuit for breaks; ensure the multimeter is set to continuity mode (use SEL button if necessary). |
9. Specifikacijos
| Parametras | Vertė |
|---|---|
| Ekranas | 10000 Counts, HD Backlight Color LCD |
| Range | Automatinis/rankinis diapazonas |
| Tikras RMS | Taip |
| DC ttage Diapazonas | Iki 1000V |
| AC ttage Diapazonas | Iki 750V |
| DC srovės diapazonas | Iki 10A |
| Kintamosios srovės diapazonas | Iki 10A |
| Atsparumo diapazonas | Yes (Ohm) |
| Pajėgumų diapazonas | Yes (Farad) |
| Dažnių diapazonas | Yes (Hz) |
| Temperatūros diapazonas | -40°C iki 1000°C / -40°F iki 1832°F |
| Diodo testas | Taip |
| Tęstinumo testas | Taip (su garsiniu signalu) |
| NCV (Non-Contact Voltage) | Taip |
| Maitinimo šaltinis | 3.7 V įkraunama ličio baterija |
| Samplingo norma | apytiksliai 3 karto per sekundę |
| Matmenys | 166 mm x 83 mm x 29 mm (apytiksliai 6.5 x 3.3 x 1.1 colio) |
| Svoris | Maždaug 1.26 svaro (0.57 kg) |
| Veikimo aplinka | 0-40°C, relative humidity <80% |
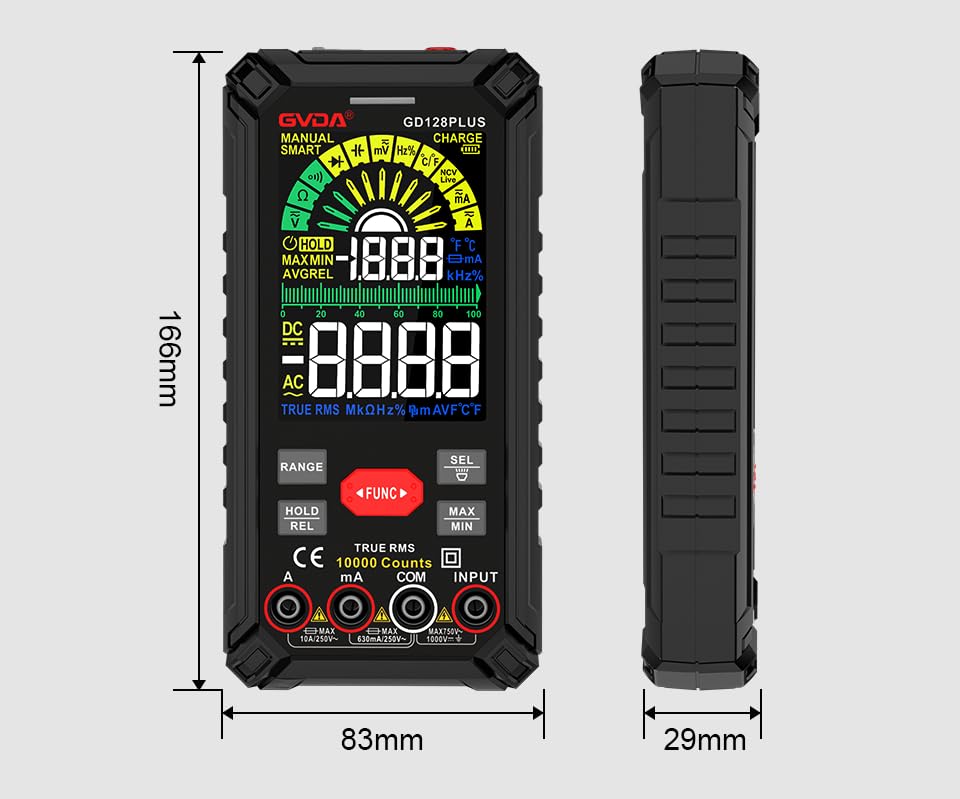
Figure 9.1: Physical dimensions of the GVDA GD128PLUS Multimeter.
10. Garantija ir palaikymas
This GVDA GD128PLUS Digital Multimeter is designed for reliability and performance. For warranty information, technical support, or service inquiries, please refer to the contact details provided by your retailer or visit the official GVDA websvetainėje. Prašome išsaugoti pirkimo įrodymą garantiniams reikalavimams.


