Įvadas
This manual provides detailed instructions for the assembly, operation, and maintenance of your Vetroo AL800 Mid Tower ATX PC Computer Case. Please read this manual thoroughly before beginning installation to ensure proper setup and optimal performance.

Figure 1: Vetroo AL800 Mid Tower ATX PC Computer Case (Black)
Saugos informacija
- Prieš montuodami arba išimdami bet kokius komponentus, visada atjunkite maitinimo šaltinį nuo sieninio lizdo.
- Handle components with care to avoid damage from electrostatic discharge. Consider using an anti-static wrist strap.
- Keep the case and components away from liquids and excessive humidity.
- Užtikrinkite tinkamą vėdinimą, kad išvengtumėte perkaitimo.
- Nebandykite modifikuoti korpuso ar jo komponentų, nes tai gali panaikinti garantiją ir sukelti pavojų saugumui.
Pakuotės turinys
Patikrinkite, ar pakuotėje yra visi reikalingi daiktai:
- Vetroo AL800 Mid Tower ATX PC Computer Case
- Priedų dėžutė (varžtai, tarpikliai, kabelių laikikliai)
- Pre-installed 1x 120mm PWM/ARGB Fan (rear)
- Vartotojo vadovas (šis dokumentas)
Pagrindinės savybės
- ARGB LED Strip: Integrated LED lighting and ARGB case fans can be synchronized with compatible motherboards via a 5V 3-pin interface.
- Door Opening Design: Features a 4mm thick tempered glass side panel with a convenient door-opening mechanism for easy access to internal components.
- High Performance Airflow: A mesh front panel and strategically placed dust filters ensure optimal airflow and system cooling.
- Platus suderinamumas: Supports ATX, M-ATX, and ITX motherboards. Accommodates GPUs up to 340mm in length and CPU coolers up to 165mm in height.
- Skysčio aušinimo palaikymas: Front panel supports up to a 360mm liquid cooling radiator.
- Ventiliatoriaus palaikymas: Supports up to 8 x 120mm fans.
- Paprastas kabelių valdymas: Includes two soft silicone cord grommets for organized cable routing.
- Powerful I/O Panel: Features 1x USB 3.2 Type-C port, 2x USB 3.0 ports, and a combined microphone/headphone jack.
Sąranka ir diegimas
1. Bendras pasiruošimas
- Padėkite dėklą ant lygaus, stabilaus paviršiaus.
- Open the tempered glass side panel by gently pulling it open. It is hinged for easy access.
- Remove the tempered glass panel if necessary for easier installation by lifting it off its hinges once open.

Figure 2: Tempered Glass Door Opening Design
2. Pagrindinės plokštės montavimas
- Įstatykite įvesties/išvesties skydą (jei taikoma) į galinę korpuso angą.
- Align your ATX, M-ATX, or ITX motherboard with the pre-installed standoffs.
- Secure the motherboard using the provided screws from the accessory box.
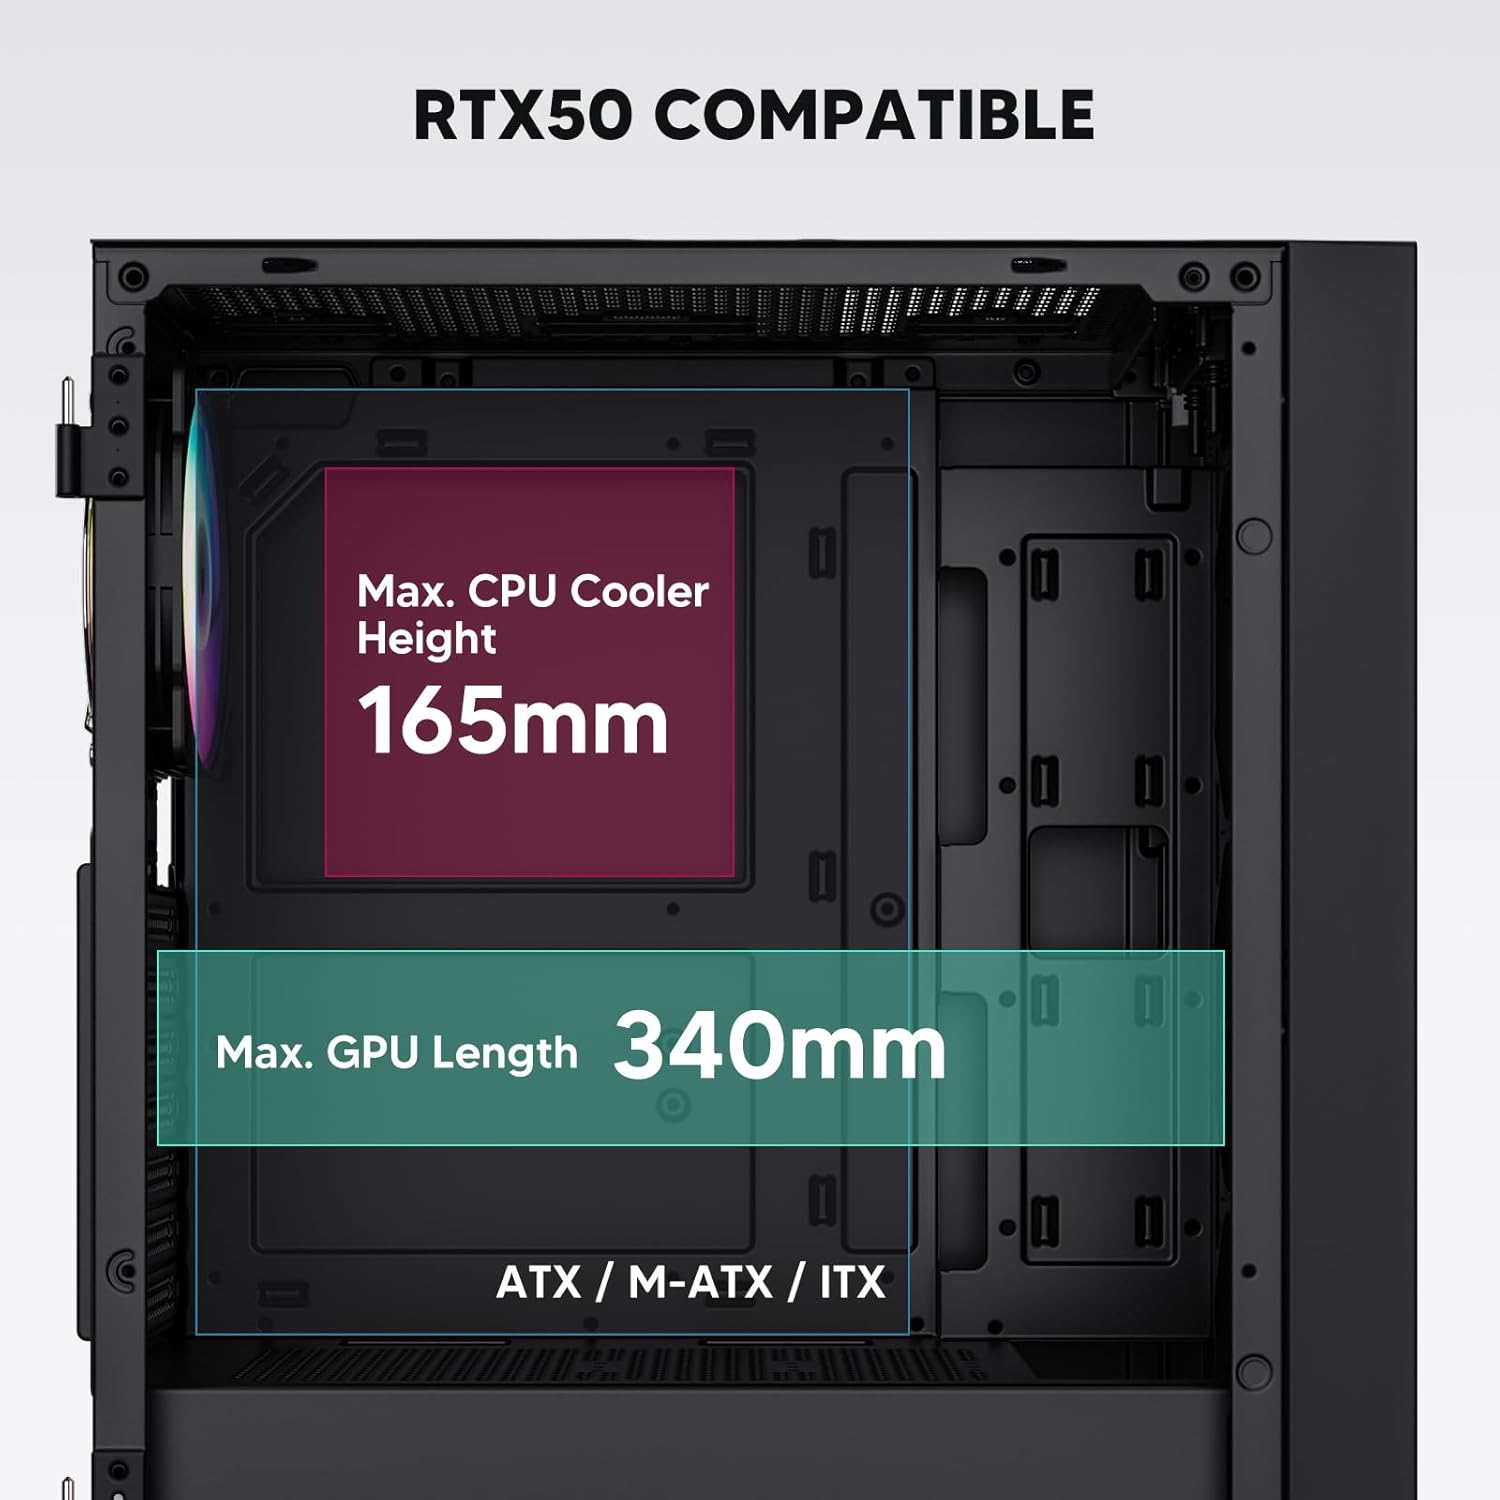
Figure 3: Motherboard and Component Clearance (Max CPU Cooler Height 165mm, Max GPU Length 340mm)
3. Atminties įrenginio (HDD/SSD) diegimas
- Locate the dedicated mounting points for SSDs and HDDs.
- Install 2.5" SSDs onto the SSD trays or mounting brackets.
- Install 3.5" HDDs into the drive cage located at the bottom of the case.
- Secure all drives with the appropriate screws.

Figure 4: Internal Layout with Drive Bay Locations (SSD, HDD, Power Supply)
4. Maitinimo šaltinio įrengimas
- Mount your power supply unit (PSU) in the dedicated compartment at the bottom rear of the case.
- Ensure the PSU fan faces downwards (if the case has a bottom vent) or upwards, depending on your cooling preference.
- Secure the PSU with screws from the rear of the case. The case supports PSUs up to 200mm in length.
5. Išplėtimo plokštės (GPU) diegimas
- Nuimkite reikiamus PCI-E lizdų dangtelius nuo korpuso galo.
- Įdėkite vaizdo plokštę arba kitas išplėtimo korteles į pagrindinės plokštės PCI-E lizdus.
- Secure the cards with screws. The case supports GPUs up to 340mm in length.
6. Aušinimo sistemos įrengimas (ventiliatoriai / radiatoriai)
- The case comes with one pre-installed 120mm PWM/ARGB fan at the rear.
- Additional fans (120mm or 140mm) can be installed at the front, top, and bottom.
- Liquid cooling radiators up to 360mm can be installed at the front, and up to 240mm at the top.
- Refer to the diagram for supported fan and radiator configurations.

Figure 5: Fan and Liquid Radiator Support Diagram
7. Priekinio skydelio jungtys
- Connect the front panel cables (Power, Reset, USB 3.0, USB Type-C, HD Audio) to the corresponding headers on your motherboard.
- Consult your motherboard manual for the exact pin layout of these headers.
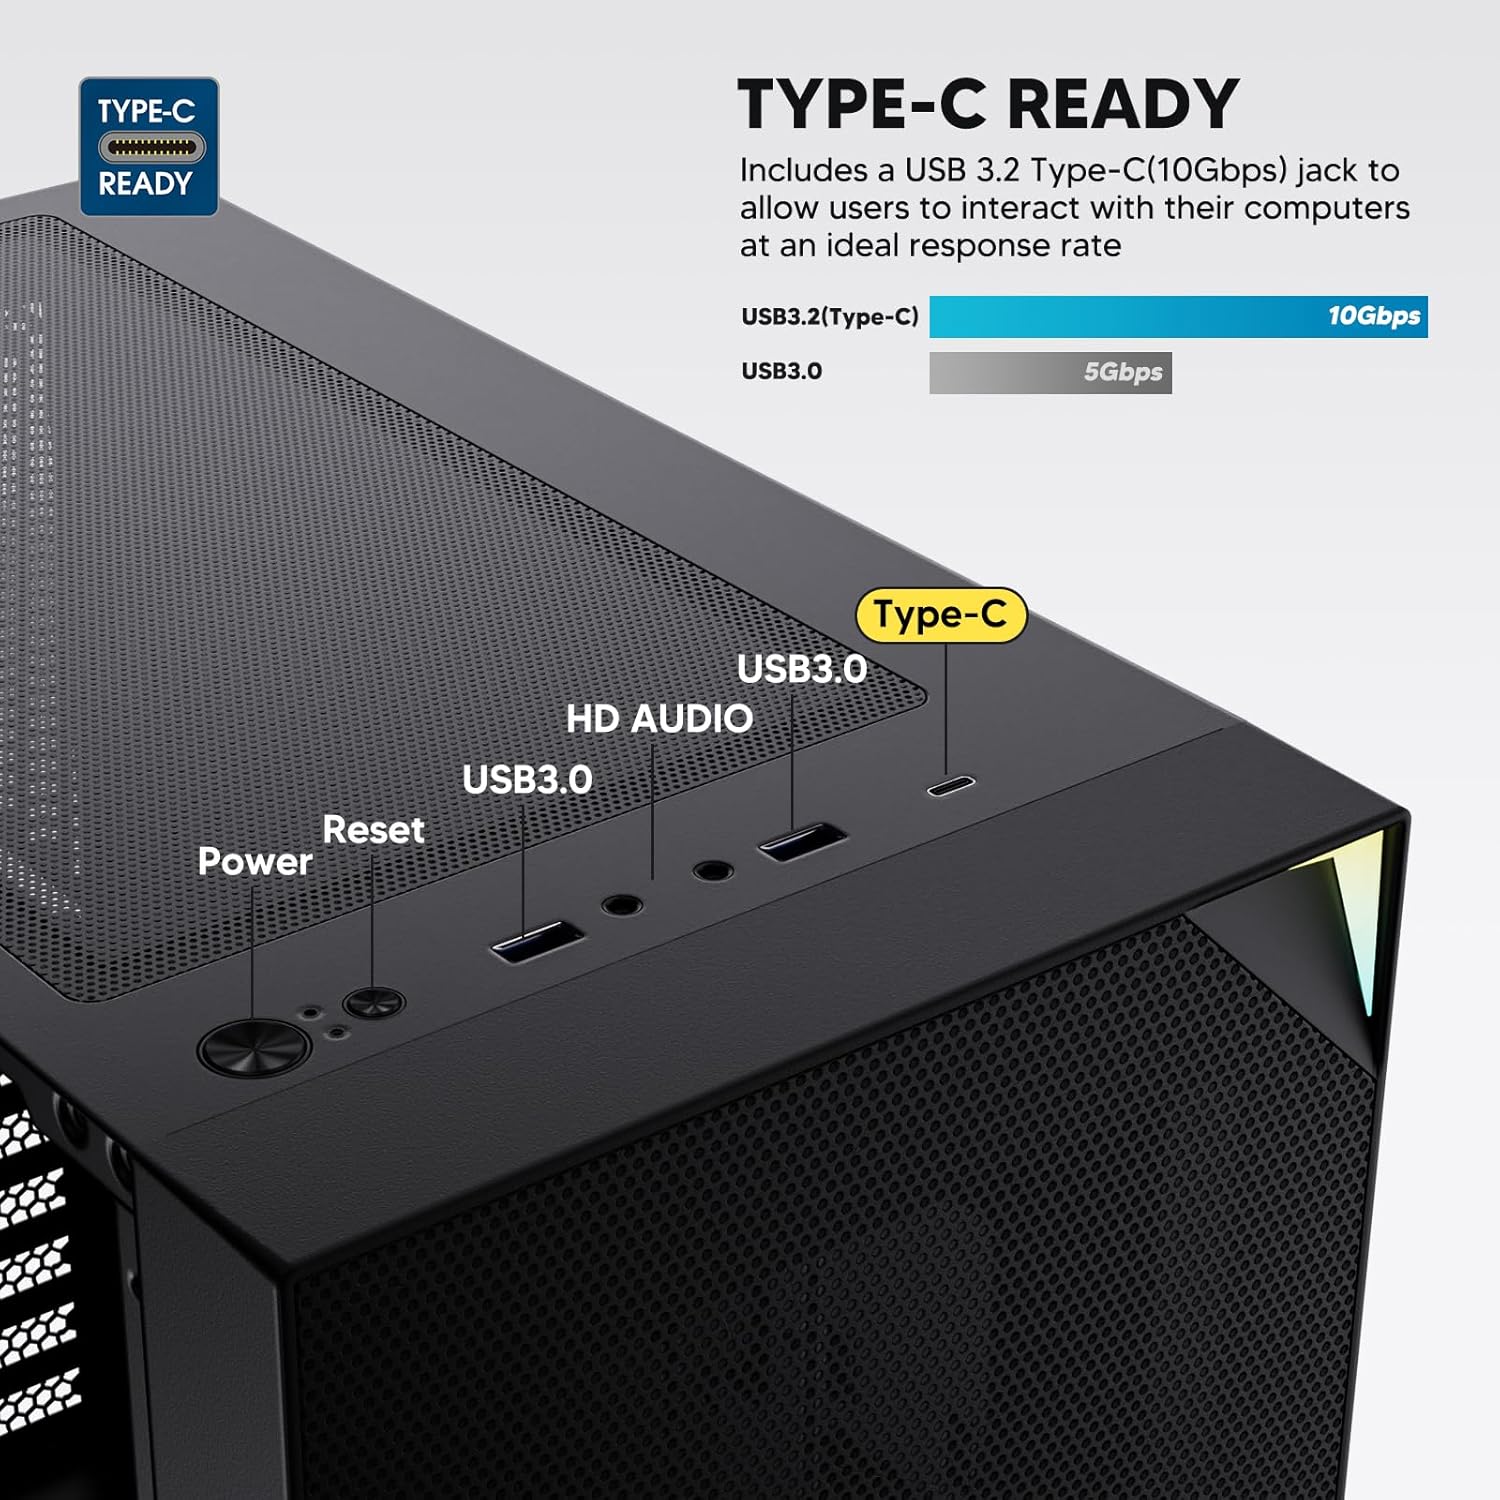
Figure 6: Top I/O Panel Connections
8. ARGB and PWM Connections
- The pre-installed fan and ARGB LED strip require connection to your motherboard.
- Connect the 4-pin PWM connector from the fan to a compatible fan header on your motherboard for speed control.
- Connect the 3-pin ARGB connector from the fan and LED strip to a 5V 3-pin ARGB header on your motherboard for lighting synchronization. Nejunkite prie 12 V RGB lizdo, nes tai sugadins šviesos diodus.
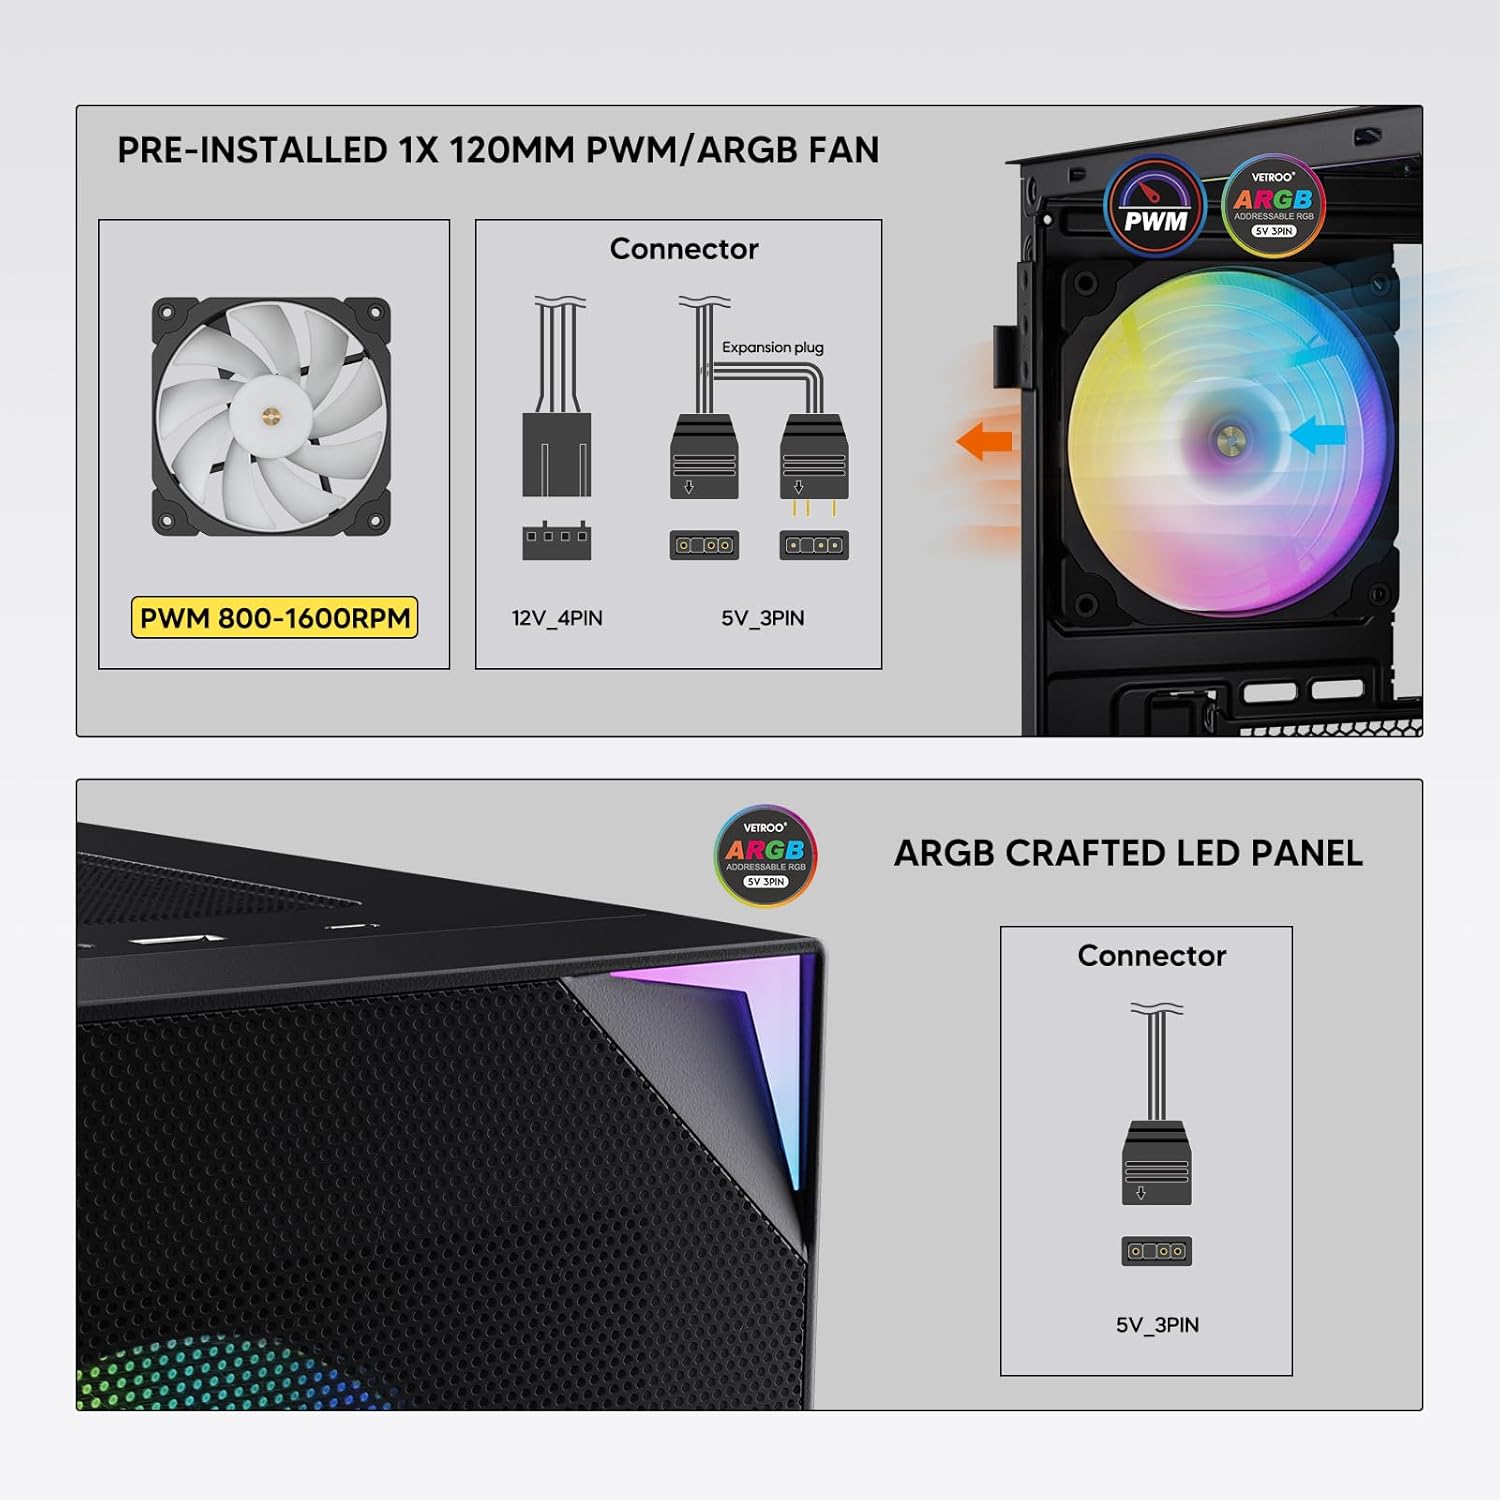
Figure 7: PWM and ARGB Connector Details
9. Kabelių valdymas
- Utilize the cable routing cutouts and tie-down points behind the motherboard tray to organize cables.
- The soft silicone grommets help protect cables and provide a clean look.
- Proper cable management improves airflow and aesthetics.
Operacija
1. Pradinis įjungimas
- After all components are securely installed and cables connected, close the tempered glass side panel.
- Connect your monitor, keyboard, mouse, and power cable to the PC.
- Pasukite maitinimo jungiklį ant maitinimo bloko į padėtį „ĮJUNGTA“.
- Press the power button on the top I/O panel of the case to start your system.
2. ARGB apšvietimo valdymas
- If connected to a compatible motherboard's 5V 3-pin ARGB header, the lighting of the pre-installed fan and LED strip can be controlled via your motherboard's RGB software (e.g., ASUS Aura Sync, MSI Mystic Light Sync, Gigabyte RGB Fusion, ASRock Polychrome Sync).
- Refer to your motherboard's manual for specific instructions on using its ARGB control software.
3. Oro srauto valdymas
- The mesh front panel is designed for optimal air intake.
- Ensure that intake fans (typically front and bottom) and exhaust fans (typically rear and top) are configured to create positive or neutral air pressure for efficient cooling and dust prevention.

Figure 8: Airflow Diagram with Dust Filters
Priežiūra
1. Dulkių filtro valymas
- The case is equipped with dust filters on the top and bottom panels.
- Regularly check and clean these filters to maintain optimal airflow and prevent dust buildup inside the system.
- Gently remove the magnetic dust filters and clean them with compressed air or by rinsing with water (ensure they are completely dry before re-installation).
2. Tempered Glass Panel Care
- Clean the tempered glass panel with a soft, lint-free cloth and a non-abrasive glass cleaner.
- Venkite stiprių cheminių medžiagų ar abrazyvinių medžiagų, kurios gali subraižyti ar pažeisti stiklą.
Trikčių šalinimas
- Sistema neįsijungia:
- Įsitikinkite, kad maitinimo laidas yra tvirtai prijungtas tiek prie maitinimo bloko, tiek prie sieninio lizdo.
- Įsitikinkite, kad maitinimo šaltinio jungiklis yra „ĮJUNGTA“ padėtyje.
- Check that the front panel power button cable is correctly connected to the motherboard header.
- Confirm all power cables (24-pin ATX, CPU, GPU) are properly seated in the motherboard and components.
- Ventiliatoriai nesisuka / ARGB nešviečia:
- Check that the fan's PWM connector is securely plugged into a motherboard fan header.
- Verify the ARGB 3-pin connector is correctly attached to a 5V 3-pin ARGB header on the motherboard (not 12V RGB).
- Įsitikinkite, kad jūsų pagrindinės plokštės ARGB programinė įranga yra tinkamai įdiegta ir sukonfigūruota.
- Neveikiantys USB prievadai:
- Confirm the USB 3.0 and USB Type-C front panel cables are correctly connected to their respective motherboard headers.
- Check your motherboard manual for correct header locations.
- For other component-specific issues, refer to the instruction manuals for your motherboard, CPU, GPU, and other installed hardware.
Specifikacijos
| Prekės ženklas | Vetroo |
| Modelio pavadinimas | AL800 |
| Prekės modelio numeris | VT-CASE-AL800-BK (FBA) |
| Atvejo tipas | Mid Tower |
| Pagrindinės plokštės suderinamumas | ATX, M-ATX, ITX |
| Spalva | Juoda |
| Medžiaga | Metalas, Grūdintas stiklas |
| Prekės svoris | 12.37 svaro (apie 5.61 kg) |
| Gaminio matmenys (IxPxH) | 18.4 x 8.6 x 17.9 colio (apytiksliai 46.7 x 21.8 x 45.5 cm) |
| Maksimalus GPU ilgis | 340 mm |
| Maksimalus procesoriaus aušintuvo aukštis | 165 mm |
| Maksimalus PSU ilgis | 200 mm |
| Priekinės įvesties / išvesties prievadai | 1x USB 3.2 Type-C, 2x USB 3.0, HD Audio (Mic/Headphone), Power, Reset |
| Ventiliatorių palaikymas | Front: 3x 120mm or 2x 140mm; Top: 2x 120mm or 2x 140mm; Rear: 1x 120mm; Bottom: 2x 120mm |
| Radiatoriaus palaikymas | Front: 120/140/240/280/360mm; Top: 120/140/240mm; Rear: 120mm |
| Iš anksto įdiegti ventiliatoriai | 1x 120mm PWM/ARGB (Rear) |
Garantija ir palaikymas
For warranty information, technical support, or to inquire about replacement parts, please visit the official Vetroo websvetainėje arba susisiekite tiesiogiai su jų klientų aptarnavimo tarnyba. Išsaugokite pirkimo įrodymą garantiniams reikalavimams.
Official Vetroo Store: „Vetroo“ „Amazon“ parduotuvė
Susiję dokumentai - AL800
 |
„Vetroo AL800“ kompiuterio korpuso naudotojo vadovas „Vetroo AL800“ kompiuterio korpuso naudotojo vadovas, kuriame išsamiai aprašomi tokių komponentų kaip pagrindinė plokštė, maitinimo šaltinis, ventiliatoriai, skysčio radiatoriai, HDD, SSD ir vaizdo plokštės montavimo veiksmai. Įeina įvesties/išvesties skydelio prijungimo vadovas ir priedų sąrašas. |
 |
„Vetroo AL800“ viso bokšto žaidimų korpuso naudojimo instrukcija Išsami „Vetroo AL800 Full Tower“ žaidimų kompiuterio korpuso naudojimo instrukcija. Sužinokite, kaip įdiegti maitinimo šaltinį, pagrindinę plokštę, atminties diskus (SSD / HDD), vaizdo plokštę ir suprasti ventiliatoriaus bei radiatoriaus palaikymo parinktis. Įtrauktas priedų sąrašas ir išsamios nuoseklios instrukcijos. |
 |
„Vetroo MESH-7C AL“ serijos kompiuterio korpuso naudotojo vadovas Išsamus „Vetroo MESH-7C AL SERIES“ kompiuterio korpuso naudotojo vadovas, kuriame pateikiamos specifikacijos, matmenys, priedai ir aparatinės įrangos diegimo veiksmai, reikalingi kompiuteriui surinkti. |
 |
„Vetroo M05 M-ATX“ kompiuterio korpuso naudojimo instrukcija Išsami „Vetroo M05 M-ATX“ kompiuterio korpuso surinkimo instrukcija, kurioje aprašomas komponentų montavimas, priedų naudojimas ir įvesties/išvesties skydelio jungtys. |
 |
„Vetroo AL900 ATX“ kompiuterio korpuso naudotojo vadovas „Vetroo AL900 ATX“ kompiuterinių žaidimų korpuso naudotojo vadovas, kuriame išsamiai aprašomas surinkimas, komponentų, tokių kaip maitinimo šaltinis ir įvesties/išvesties skydelio jungtys, montavimas. |
 |
„Vetroo U6“ procesoriaus aušintuvo naudotojo vadovas ir diegimo vadovas Išsamus „Vetroo U6“ procesoriaus aušintuvo naudotojo vadovas ir įrengimo vadovas, apimantis suderinamumą su „Intel LGA 1700/1200/115X“ ir „AMD AM5/AM4/AM3(+)/AM2(+)/FM2(+)/FM1“ lizdais. Į komplektą įeina dalių sąrašas ir nuoseklios surinkimo instrukcijos. |