1. Įvadas
This manual provides detailed instructions for the installation, operation, and maintenance of your DieseRC Smart Wireless Roller Shutter Controller Module. Please read this manual carefully before installation and use to ensure proper function and safety.
2. Produktas baigtasview
The DieseRC Smart Wireless Roller Shutter Controller Module is designed to upgrade traditional roller shutter switches, allowing for smart control via a mobile application, RF remote control, and voice commands. It integrates Wi-Fi and RF 433Mhz technologies for versatile control options.

Image: DieseRC Smart Wireless Roller Shutter Controller Module, showing the compact design of the receiver and the included RF remote control.
3. Pagrindinės savybės
- Keli valdymo metodai: Supports control via mobile application (Tuya/Smart Life), 433Mhz RF remote control, and traditional manual wall switch.
- Smart APP valdymas: Compatible with "Tuya" and "Smart Life" applications for unlimited wireless control via 2.4GHz Wi-Fi network from Android and iOS devices.
- Balso valdymo integravimas: Works with Amazon Alexa (Echo/Dot/Spot) and Google Home for convenient voice commands.
- RF Wireless Control: Features a 433Mhz RF remote control with stable performance and high reception sensitivity. Offers a control range of 30-50 meters in open areas, with signal penetration through walls and floors.
- Kompaktiškas dizainas: Module dimensions of 45x45x16 mm allow for easy concealment within most electrical boxes or junction boxes.
- Proctage Control & Timer Function: The mobile application allows for precise percentage control of shutter opening/closing and programmable timer functions.
- Platus pritaikymas: Suitable for controlling various AC motors, including roller blinds, electric curtains, awnings, and garage doors. Compatible with 4-wire AC motors (2 input phase wires, 1 neutral wire, 1 ground wire).
- Patvarūs komponentai: Equipped with a high-quality relay designed for over 400,000 operations, supporting a 10A current and a maximum inductive load of approximately 5A.
- Broad Voltage Suderinamumas: Receiver operates on AC 100V~240V.
- High-Quality Remote: The RF remote transmitter is designed for over 500,000 clicks, is removable from its base, and includes a replaceable 27A 12V battery with an approximate 3-year lifespan.
4. Pakuotės turinys
Į standartinį paketą įeina:
- 1 x DieseRC Smart Wireless Roller Shutter Controller Module (Receiver)
- 1 x RF Remote Control Transmitter
- 1 x Remote Control Base (for wall mounting)
- Mounting Screws / Double-sided Adhesive for remote base
- 1 x 27A 12V Battery (pre-installed in remote)
- Vartotojo vadovas (šis dokumentas)
5. Specifikacijos
| Parametras | Vertė |
|---|---|
| Prekės ženklas | DieseRC |
| Modelio numeris | 1 Receiver with 1 Transmitter Kit |
| Gaminio matmenys | 4.5 x 4.5 x 1.6 cm |
| Produkto svoris | 120 g |
| Veiklos ttage | AC 100V ~ 240V |
| Nominali srovė | 10 Amperes |
| Max Inductive Load | ~5 Amperes |
| Elektros galia | Up to 3520 Watts (depending on voltage) |
| Belaidis ryšys | Wi-Fi 2.4GHz, RF 433Mhz |
| RF Control Range | 30-50 meters (open area) |
| Programėlių suderinamumas | Tuya Smart, protingas gyvenimas |
| Padėjėjo balso suderinamumas | Amazon Alexa, Google Home |
| Variklio suderinamumas | 4-wire AC motors (2 phase, 1 neutral, 1 ground) |
| Nuotolinis akumuliatorius | 1 x 27A 12V Alkaline (included) |
| Medžiaga | Plastikiniai |
| Kilmės šalis | Kinija |
6. Saugos informacija
Prašome laikytis šių saugos priemonių:
- Installation should only be performed by a qualified electrician or in accordance with local electrical codes.
- Prieš atlikdami bet kokius laidus, įsitikinkite, kad maitinimas yra atjungtas nuo grandinės pertraukiklio.
- Do not exceed the maximum load ratings of the module (10A, ~5A inductive, 3520W).
- Šis prietaisas skirtas naudoti tik patalpose. Venkite drėgmės ar ekstremalių temperatūrų poveikio.
- Prietaisą laikykite vaikams nepasiekiamoje vietoje.
- Ensure proper grounding for the AC motor as specified.
7. Sąranka ir diegimas
7.1 Sujungimo schema
The module is compatible with 4-wire AC motors. Ensure your motor has two phase wires (for up/down), one neutral wire, and one ground wire. The module can be installed with or without an existing manual panel switch.

Image: Detailed wiring diagrams showing connections for the controller module with an existing panel switch (left) and without a panel switch (right). The diagrams illustrate connections for AC 100V-240V power, the AC motor, and the module's terminals (L, N, L1, L2, S1, S2, Earth).
Laidų sujungimo žingsniai:
- Atjunkite maitinimą: Prieš pradėdami bet kokius laidus, išjunkite pagrindinį maitinimo šaltinį grandinės pertraukikliu.
- Identifikuokite laidus: Identify the Live (L), Neutral (N), and motor control wires (L1 for one direction, L2 for the other direction) from your existing setup. Also, identify the Ground (E) wire from your AC motor.
- Connect Power to Module: Connect the Live (L) and Neutral (N) wires from your AC power supply to the corresponding 'L' and 'N' terminals on the module.
- Connect Motor to Module: Connect the motor's L1 and L2 wires to the 'L1' and 'L2' terminals on the module. Connect the motor's Neutral (N) wire to the 'N' terminal on the module. Ensure the motor's Ground (E) wire is properly connected to the electrical system's ground.
- Connect Panel Switch (Optional): If using a manual panel switch, connect its output wires to the 'S1' and 'S2' terminals on the module. Connect the Live (L) wire to the 'L' terminal of the panel switch.
- Saugūs ryšiai: Įsitikinkite, kad visos laidų jungtys yra sandarios ir saugios.
- Atkurti maitinimą: Once all connections are verified, restore power at the circuit breaker.
7.2 APP Pairing (Tuya Smart / Smart Life)
To control the module via your smartphone, you need to pair it with the Tuya Smart or Smart Life application.
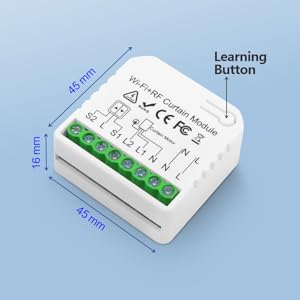
Image: QR code for downloading the Tuya Smart application. Scan this code to download the app.
Alternatively, download from Tuya Smart official websvetainę.
- Atsisiųsti programą: Download and install the "Tuya Smart" or "Smart Life" app from your smartphone's app store or by scanning the QR code above.
- Registruotis / Prisijungti: Atidarykite programėlę ir užregistruokite naują paskyrą arba prisijunkite naudodami esamą.
- Pridėti įrenginį: Norėdami pridėti naują įrenginį, palieskite piktogramą „+“ viršutiniame dešiniajame programėlės kampe.
- Pasirinkite įrenginio tipą: Choose "Curtain Switch" or "Curtain Module" from the device list.
- Įveskite „Wi-Fi“ informaciją: Įsitikinkite, kad jūsų telefonas prijungtas prie 2.4 GHz „Wi-Fi“ tinklo. Įveskite „Wi-Fi“ slaptažodį programėlėje.
- Įjungti poravimo režimą: Power on the module. The Wi-Fi indicator light on the module should blink rapidly. If not, press and hold the learning button on the module for 5-10 seconds until it blinks rapidly.
- Patvirtinkite mirksėjimą: In the app, confirm that the indicator light is blinking rapidly and proceed.
- Poravimas: The app will start searching for the device. Once found, add it to your account.
- Pervardyti įrenginį: You can rename the device for easier identification (e.g., "Living Room Blinds").
7.3 RF Remote Control Pairing
The RF remote control is typically pre-paired at the factory. If re-pairing is needed or you have additional remotes, follow these steps:
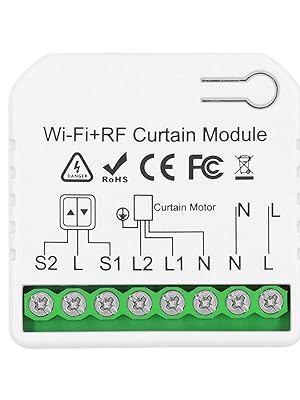
Image: Step-by-step visual guide on how to pair the 433Mhz RF remote control with the receiver module. It shows pressing the learning button on the receiver once, then pressing a button on the remote control.
- Įjunkite susiejimo režimą: Press the learning button on the receiver module 1 kartą. Wait for 3 seconds.
- Paspauskite nuotolinio valdymo pulto mygtuką: Press any button (e.g., "Up" or "Down") on the RF remote control 1 kartą. Wait for 3 seconds.
- Patvirtinimas: The module will indicate successful pairing (e.g., a beep or light flash).
7.4 Clearing RF Signals
To clear all paired RF remote controls from the module:

Image: Visual guide on how to clear all paired 433Mhz RF remote control signals from the receiver module. It shows pressing the learning button on the receiver 8 times.
- Clear Signals: Press the learning button on the receiver module 8 kartus.
- Patvirtinimas: The module will indicate that the data has been cleared successfully (e.g., a series of beeps or light flashes). After this, the previously paired transmitters will no longer work.
8. Operacija
8.1 APP Control (Tuya Smart / Smart Life)
Once paired, you can control your roller shutter from anywhere using the app.

Image: A smartphone screen showing the Tuya Smart app interface for controlling a roller shutter, with "Open", "Paused", and "Close" options, and a slider for percentage valdymas.
- Atidaryti Uždaryti: Tap the "Open" or "Close" buttons in the app to fully open or close the shutter.
- Pristabdyti: Tap the "Pause" button to stop the shutter at any desired position.
- Proctage Valdymas: Use the slider in the app to set the shutter to a specific opening percentage (pvz., 50 % atidaryta).
- Laikmačio funkcija: Nustatykite automatinio atidarymo ir uždarymo tvarkaraščius konkrečiu laiku.
- Scenos kūrimas: Create smart scenes to automate actions based on conditions (e.g., open at sunrise, close at sunset).
- Bendrinimo valdymas: Bendrinkite įrenginio valdymą su šeimos nariais per programėlę.
8.2 radijo dažnių nuotolinio valdymo pultas
Use the provided RF remote control for direct, local control of your roller shutter.

Image: A hand holding the RF remote control, with buttons for up, down, and stop functions. The image also illustrates the 50-meter control distance capability.
- Mygtukas aukštyn: Press to open the roller shutter.
- Žemyn mygtukas: Press to close the roller shutter.
- Stabdymo / pristabdymo mygtukas: Press to stop the roller shutter at its current position.
- The remote control base can be mounted on a wall using the included adhesive or screws for easy access.
8.3 Balso valdymas („Alexa“ / „Google Home“)
Integrate the module with Amazon Alexa or Google Home for hands-free voice control.

Image: An illustration showing Amazon Echo and Google Home devices, with a speech bubble indicating a voice command "Alexa, open the curtains!". This demonstrates the voice control capability of the module.
- Susieti paskyrą: In your Alexa or Google Home app, enable the "Tuya Smart" or "Smart Life" skill/service and link your account.
- Atraskite įrenginius: Ask your voice assistant to "Discover devices" or manually initiate device discovery in the app.
- Balso komandos: Naudokite tokias komandas kaip:
- "Alexa, open [Device Name]"
- "Hey Google, close [Device Name]"
- "Alexa, set [Device Name] to 50%" (for percentage valdymas)
- "Hey Google, stop [Device Name]"
8.4 Manual Switch Control
If connected to a traditional manual wall switch, you can continue to operate the roller shutter directly from the wall switch.
- Press the "Up" button on the wall switch to open the shutter.
- Press the "Down" button on the wall switch to close the shutter.
- Press the "Stop" button (if available) or press the opposite direction button briefly to stop the shutter.
9. Priežiūra
- Valymas: Wipe the module and remote control with a soft, dry cloth. Do not use liquid cleaners or aerosols.
- Baterijos keitimas: The RF remote control uses a 27A 12V battery. If the remote's range or responsiveness decreases, replace the battery. To replace, carefully open the remote casing, remove the old battery, and insert a new one with correct polarity.
- Firmware atnaujinimai: Periodically check the Tuya Smart or Smart Life app for available firmware updates for the module. Updates can improve performance and add new features.
10. Problemų sprendimas
| Problema | Galima priežastis | Sprendimas |
|---|---|---|
| Module not responding to APP. | No Wi-Fi connection, incorrect Wi-Fi password, module not paired, 2.4GHz/5GHz Wi-Fi conflict. |
|
| Module not responding to RF remote. | Remote battery low/dead, remote not paired, out of range. |
|
| Roller shutter does not move or moves incorrectly. | Incorrect wiring, motor issue, module malfunction. |
|
| Balso valdymas neveikia. | Alexa/Google Home account not linked, device not discovered, incorrect commands. |
|
11. Garantija ir palaikymas
DieseRC products are manufactured with high-quality standards. For warranty information and technical support, please refer to the seller's policy on the platform where you purchased the product or contact DieseRC customer service directly.
Išsaugokite pirkimo įrodymą, kad galėtumėte kreiptis dėl garantijos.
For further assistance, you may visit the DieseRC brand store on Amazon: DieseRC Store


