AquilaPro Laser Measuring Tool
Vartotojo vadovas
Modelis: KL02060
1. Įvadas
This manual provides comprehensive instructions for the safe and effective use of your AquilaPro Laser Measuring Tool. Designed for precision and ease of use, this compact device offers various measurement modes for both professional and home applications. Please read this manual thoroughly before operation and retain it for future reference.

Figure 1: AquilaPro Laser Measuring Tool
2. Saugos informacija
ĮSPĖJIMAS: Lazerio spinduliuotė
- Nežiūrėkite tiesiai į lazerio spindulį.
- Venkite tiesioginio lazerio spindulio poveikio akims.
- Nenukreipkite lazerio į žmones ar gyvūnus.
- Naudokite tik taip, kaip aprašyta šiame vadove.
- Laikyti vaikams nepasiekiamoje vietoje.
- Nebandykite ardyti ar modifikuoti įrenginio.
This device emits Class 2 laser radiation. Maximum output power is less than 1mW at 635nm.
3. Produktas baigtasview
The AquilaPro Laser Measuring Tool features a compact metal fuselage with an HD display for clear readings. Familiarize yourself with the device's components and controls:

Figure 2: Device Components and Controls
- Ekranas: Displays measurements, modes, and battery status.
- UNIT/Laser Button: Activates laser for measurement, short press for single measurement, long press to switch units.
- +/- mygtukas: For addition and subtraction measurements.
- PRESET/History Button: Accesses measurement history and preset values.
- FUNC/Reference Button: Cycles through measurement functions (Area, Volume, Pythagorean, etc.) and switches front/rear reference point.
- Power/Backlight Button: Long press to power on/off, short press to toggle backlight.
4. Sąranka
4.1 Įrenginio įkrovimas
The device is equipped with a rechargeable lithium-ion battery. Before first use, fully charge the device using the provided USB-C cable.
- Prijunkite USB-C laidą prie įkrovimo prievado įrenginio apačioje.
- Kitą laido galą prijunkite prie USB maitinimo adapterio (nepridedamas) arba kompiuterio USB prievado.
- Ekrane esantis akumuliatoriaus indikatorius rodys įkrovimo būseną.
- A full charge provides approximately 10,000 single measurements.

3 pav.: USB-C įkrovimo prievadas
4.2 Maitinimo įjungimas/išjungimas
- Maitinimas: Ilgai paspauskite mygtuką Galia mygtukas () 2 sekundes.
- Išjungti: Ilgai paspauskite mygtuką Galia button for 2 seconds. The device will also automatically power off after 45 seconds of inactivity to conserve battery.
5. Pagrindinė operacija
5.1 Vienkartinis matavimas
- Įjunkite įrenginį.
- Nukreipkite lazerio spindulį į taikinio paviršių.
- Trumpai paspauskite UNIT/Laser button. The measurement will be displayed on the screen.

Figure 4: Taking a Field Measurement
5.2 Įrenginių perjungimas
The device supports switching between meters (m), inches (in), and feet (ft).
- Ilgai paspauskite mygtuką UNIT/Laser button to cycle through the units.
- Atleiskite mygtuką, kai bus parodytas norimas matavimo vienetas.

Figure 5: Unit Conversion Display
5.3 Reference Point Switching (Datum)
You can set the measurement reference point to either the front or rear of the device.
- Trumpai paspauskite FUNC/Reference button to toggle between front and rear datum.
- The display will indicate the active reference point.

Figure 6: Front or Rear Measuring Reference
6. Advanced Measurement Modes
The AquilaPro Laser Measuring Tool offers several advanced modes for complex measurements:

Figure 7: Multiple Measurement Modes
- Nuolatinis matavimas: Provides real-time distance updates as you move the device. Useful for scanning and finding minimum/maximum distances.
- Ploto matavimas: Measures length and width to calculate the area of a surface.
- Tūrio matavimas: Measures length, width, and height to calculate the volume of a space.
- Pitagoro matavimas: Apskaičiuoja netiesioginius atstumus, naudodamas Pitagoro teoremą (pvz., pastato aukštį).
- Sudėtis / atimtis: Allows you to add or subtract measurements.
To select an advanced mode, short press the FUNC/Reference button repeatedly until the desired mode icon appears on the display. Follow the on-screen prompts to perform the measurements for each mode.
6.1 Addition/Subtraction Function
This function allows you to add or subtract consecutive measurements.
- Atlikę matavimą, paspauskite +/- mygtuką, kad įjungtumėte sudėties arba atimties režimą.
- Take the next measurement. The device will automatically add or subtract it from the previous value.
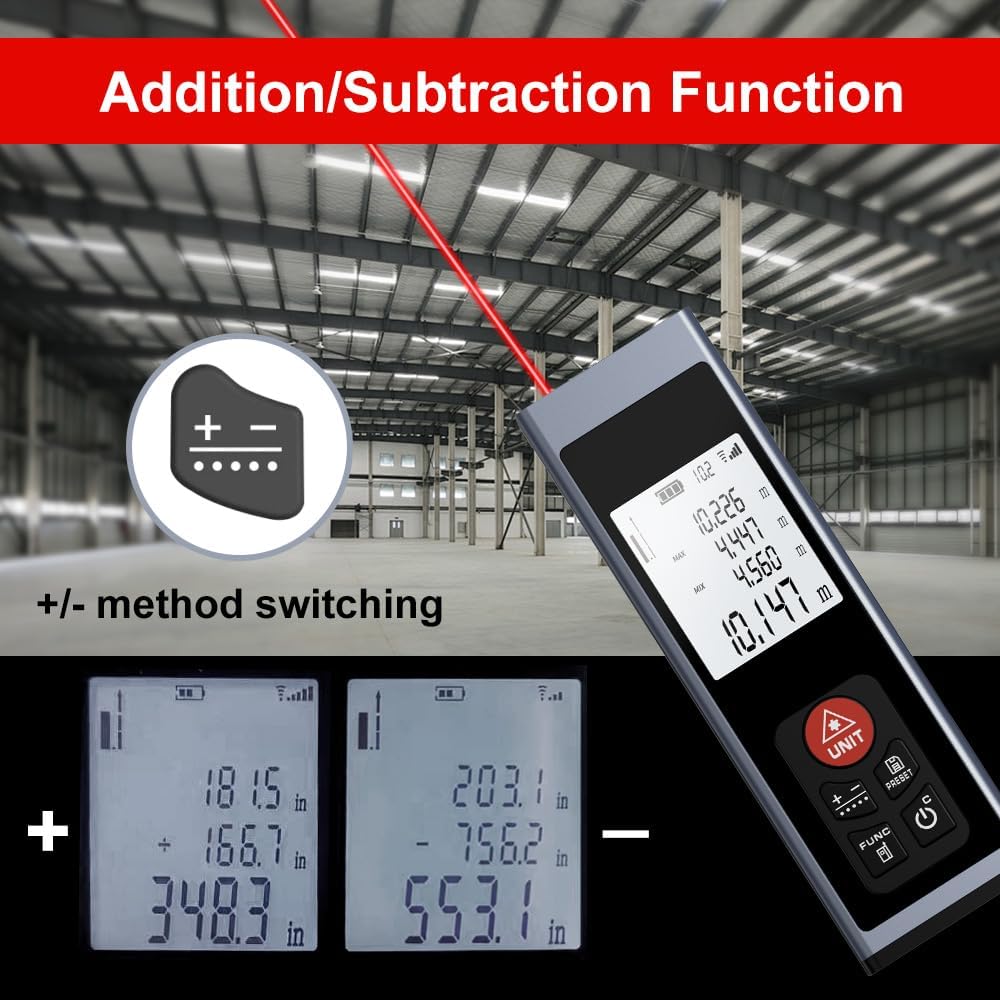
Figure 8: Addition/Subtraction Function
6.2 Memory Storage Function
Įrenginys gali saugoti iki 28 matavimo duomenų rinkinių.
- Į view stored data, short press the PRESET/History mygtuką.
- Use the arrow buttons (if available, or cycle through with PRESET) to navigate through the stored measurements.

Figure 9: Memory Storage Display
7. Oficialus produkto vaizdo įrašas
Watch this official video from the seller for a quick introduction to the AquilaPro Laser Measuring Tool.
Video 1: AquilaPro Laser Measuring Tool Introduction (Source: AQUILA OPTICS)
8. Priežiūra
- Valymas: Naudokite minkštą, damp šluoste įrenginiui valyti. Nenaudokite abrazyvinių valiklių ar tirpiklių.
- Saugykla: Prietaisą laikykite vėsioje, sausoje vietoje, toliau nuo tiesioginių saulės spindulių ir ekstremalių temperatūrų.
- Akumuliatoriaus priežiūra: If storing for extended periods, charge the battery every 3 months to prolong its lifespan.
- Atsparumas vandeniui: The device is rated IP54, meaning it is protected against dust and splashing water. Do not immerse in water.
9. Problemų sprendimas
| Problema | Galima priežastis | Sprendimas |
|---|---|---|
| Įrenginys neįsijungia. | Žemas akumuliatoriaus įkrovos lygis; įrenginys išjungtas. | Charge the battery; Long press the Power button. |
| Netikslūs rodmenys. | Unstable surface; Obstruction in laser path; Incorrect reference point. | Ensure stable surface; Clear laser path; Check and adjust reference point (front/rear datum). |
| Ekranas blankus arba neįskaitomas. | Backlight off; Low battery. | Short press Power button to toggle backlight; Charge the battery. |
| Laser not visible. | Bright ambient light; Laser not activated. | Use in lower light conditions; Short press UNIT/Laser button. |
10. Specifikacijos
| Funkcija | Detalė |
|---|---|
| Prekės ženklas | AquilaPro |
| Modelio pavadinimas | KL02060 |
| Matavimo diapazonas | 197 pėdos (60 m) |
| Tikslumas | ±0.078 inch (2mm) |
| Medžiaga | Aliuminis |
| Spalva | Juoda |
| Gaminio matmenys (IxPxH) | 1.1 colio ilgio x 0.6 colių pločio x 3.4 colio aukščio |
| Baterijos tipas | Įkraunamas ličio jonų |
| Tarptautinis apsaugos įvertinimas | IP54 (atsparus dulkėms ir vandens purslams) |
| Įtraukti komponentai | Virvelė |
11. Garantija ir palaikymas
This AquilaPro Laser Measuring Tool comes with a 1 metų gamintojo garantija nuo pirkimo datos. Prašome išsaugoti pirkimo įrodymą garantiniams reikalavimams.
For technical support or warranty inquiries, please contact AquilaPro customer service through the retailer's platform or visit the official AquilaPro store on Amazon: AquilaPro Amazon Store.