1. Saugos informacija
Please read this manual carefully before using the LEVENHUK Atom DNB200 Digital Night Vision Binoculars to ensure proper operation and to prevent damage. Keep this manual for future reference.
- Do not attempt to disassemble or repair the device yourself. Refer all servicing to qualified specialists.
- Avoid direct exposure to strong light sources, especially sunlight, as this can damage the internal components.
- Keep the device away from high temperatures, direct sunlight, and high humidity.
- Use only the specified battery type (18650 Li-ion) and charger. Improper use can lead to fire or explosion.
- Laikyti vaikams nepasiekiamoje vietoje.
2. Pakuotės turinys
Patikrinkite, ar jūsų pakuotėje yra visi toliau išvardyti daiktai:
- LEVENHUK Atom DNB200 Digital Night Vision Binoculars
- Dėklas nešiojimui
- Kaklo dirželis
- USB kabelis
- Valymo šluostė
- MicroSD Card (pre-installed or separate)
- Vartotojo vadovas

Image 2.1: All items included in the LEVENHUK Atom DNB200 package, including the binoculars, carrying case, neck strap, USB cable, cleaning cloth, and a microSD card.
3. Gaminio komponentai
Familiarize yourself with the main parts and controls of your digital night vision binoculars.

3.1 pav.: Viršus view of the binoculars, highlighting the control panel with various buttons.
- Maitinimo mygtukas: Įjungia/išjungia įrenginį.
- Režimo (M) mygtukas: Perjungia fotografavimo, vaizdo įrašymo ir atkūrimo režimus.
- IR Illuminator Button (Sun/Light icon): Adjusts the infrared illumination level.
- Gerai mygtukas: Confirms selections in the menu or takes a photo/starts video recording.
- Zoom In/Up Button (Magnifying glass with +): Increases digital zoom or navigates up in menus.
- Zoom Out/Down Button (Magnifying glass with -): Decreases digital zoom or navigates down in menus.
- Fokusavimo ratas: Located on the side, adjusts optical focus for clear viewing.
- Eyepiece/Display: Viewfinder for observing images.
- Objektyvas: Front lens for capturing light.
- IR šviesos diodas: Infrared light emitter for night vision.
- Baterijų skyrius: Located at the rear.
- USB-C prievadas: Įkrovimui ir duomenų perdavimui.
- MicroSD kortelės lizdas: Atminties kortelės įdėjimui.

3.2 vaizdas: priekis view of the binoculars, showcasing the display screen and objective lens.
4. Darbo pradžia
4.1. Akumuliatoriaus įdėjimas
The device uses one 18650 Li-ion rechargeable battery.
- Locate the battery compartment cover on the rear of the binoculars.
- Atidarykite dangtelį.
- Insert the 18650 battery according to the polarity markings (+/-) inside the compartment.
- Saugiai uždarykite akumuliatoriaus skyriaus dangtelį.
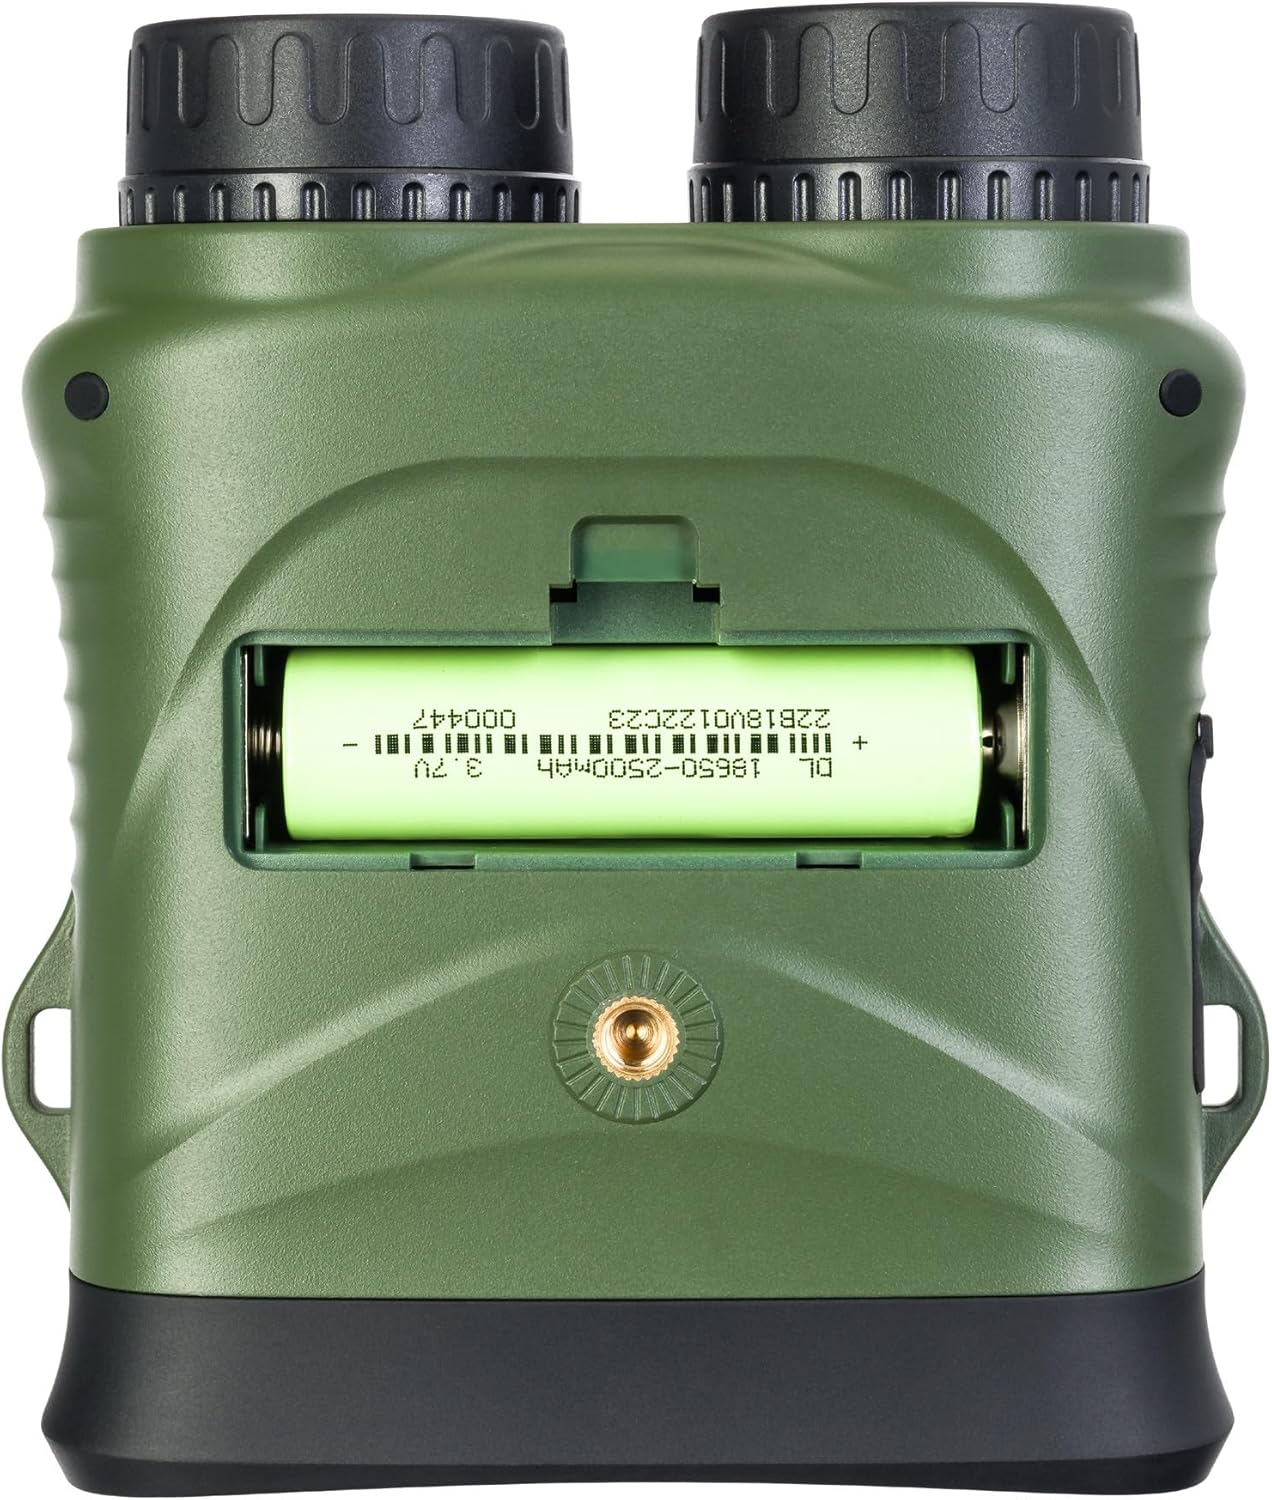
4.1 vaizdas: galinis view of the binoculars with the battery compartment open, illustrating correct battery insertion.
4.2. Atminties kortelės įdėjimas
A microSD card (up to 32GB, Class 10 recommended) is required to save photos and videos.
- Locate the microSD card slot on the side of the binoculars, usually protected by a rubber flap.
- Švelniai atidarykite guminį dangtelį.
- Įdėkite „microSD“ kortelę auksiniais kontaktais žemyn, kol ji spragtelės į vietą.
- Close the rubber flap to protect the port from dust and moisture.

4.2 paveikslėlis: Šonas view of the binoculars, showing the USB-C port and the microSD card slot under a protective cover.
4.3. Įjungimas/išjungimas
- Norėdami įjungti: Press and hold the Power button (⑁) for a few seconds until the display illuminates.
- Norėdami išjungti: Press and hold the Power button (⑁) again until the display turns off.
5. Naudojimo instrukcijos
5.1. Fokuso reguliavimas
To achieve a clear image, adjust the focus:
- Žiūrėkite pro okuliarą.
- Rotate the focus wheel (located on the side of the binoculars) until the image appears sharp.
5.2. Režimo pasirinkimas
Paspauskite Režimas (M) mygtuką, kad perjungtumėte galimus režimus:
- Nuotraukų režimas: Skirta fotografuoti nejudančius vaizdus.
- Vaizdo įrašo režimas: Vaizdo įrašymuitage.
- Atkūrimo režimas: Dėl reviewužfiksuotų nuotraukų ir vaizdo įrašų darymas.
5.3. Night Vision and IR Illumination
The device automatically switches to night vision mode in low light conditions. To enhance visibility in complete darkness:
- Fotografavimo arba filmavimo režimu paspauskite IR Illuminator button (Sun/Light icon).
- Each press will cycle through different IR illumination levels (e.g., Off, Level 1, Level 2, Level 3). Higher levels provide more illumination but consume more battery.
5.4. Skaitmeninis priartinimas
Naudokite Zoom In (+) ir Zoom Out (-) buttons to adjust the digital magnification of the image on the display.
5.5. Nuotraukų ir vaizdo įrašų fiksavimas
- Norėdami nufotografuoti: In Photo Mode, frame your subject and press the OK mygtuką.
- Norėdami įrašyti vaizdo įrašą: Vaizdo įrašo režimu paspauskite OK button once to start recording. Press it again to stop recording. A recording indicator will appear on the screen.
5.6. Meniu nustatymai
To access and adjust device settings:
- Paspauskite ir palaikykite Režimas (M) mygtuką, kad patektumėte į meniu.
- Naudokite Zoom In (+) ir Zoom Out (-) mygtukai, skirti naršyti meniu parinktis.
- Paspauskite OK button to select an option or enter a sub-menu.
- Paspauskite Režimas (M) mygtuką dar kartą, kad išeitumėte iš meniu.
Common settings include: Video Resolution, Photo Resolution, Date Stamp, Language, Auto Power Off, Format SD Card.
6. Priežiūra
6.1. Valymas
- Objektyvai: Use the included cleaning cloth or a soft, lint-free cloth specifically designed for optical surfaces. Breathe lightly on the lens or use a small amount of lens cleaning fluid if necessary.
- Korpusas: Wipe the body of the device with a soft, dry cloth. Do not use abrasive cleaners or solvents.
6.2. Sandėliavimas
- When not in use, store the binoculars in their carrying case in a cool, dry place.
- Jei prietaisas nebus naudojamas ilgesnį laiką, išimkite bateriją, kad išvengtumėte elektrolito nuotėkio.
7. Problemų sprendimas
| Problema | Galima priežastis | Sprendimas |
|---|---|---|
| Įrenginys neįsijungia. | Baterija išsikrovusi arba neteisingai įdėta. | Charge the battery or re-insert it with correct polarity. |
| Vaizdas neryškus. | Focus is not adjusted. | Sukite fokusavimo ratuką, kol vaizdas taps ryškus. |
| Nepavyksta išsaugoti nuotraukų / vaizdo įrašų. | No microSD card or card is full/corrupted. | Insert a microSD card, delete old filearba formatuokite kortelę (tai ištrins visus duomenis). |
| Prastas naktinio matymo našumas. | IR illuminator is off or set too low. | Increase the IR illumination level using the IR button. |
| Įrenginys užstringa. | Programinės įrangos triktis. | Press and hold the Power button for 10 seconds to force a shutdown, then restart. |
8. Techninės specifikacijos
| Funkcija | Specifikacija |
|---|---|
| Modelio numeris | 81702 |
| Gaminio matmenys | 3.94 x 1.97 x 0.5 colio |
| Prekės svoris | 3.53 uncijos |
| Prekės ženklas | Levenhukas |
| Ypatinga funkcija | Naktinis matymas |
| Spalva | Juoda |
| Atstumas iki akies | 5 milimetrų |
| Binocular Prism Description | Stogo prizmė |
| Maitinimo šaltinis | 18650 Li-ion Rechargeable Battery (included) |
| Sandėliavimas | MicroSD card (up to 32GB, Class 10 recommended) |
9. Garantija ir klientų aptarnavimas
LEVENHUK products are covered by a manufacturer's warranty. For detailed warranty terms and conditions, please refer to the warranty card included with your product or visit the official Levenhuk websvetainę.
If you encounter any issues or have questions regarding your LEVENHUK Atom DNB200 Digital Night Vision Binoculars, please contact our customer support team:
- Websvetainė: www.levenhuk.com
- El. paštas: Nurodykite websvetainė, skirta susisiekti su palaikymo tarnyba.
- Telefonas: Nurodykite websvetainė, skirta susisiekti su palaikymo tarnyba.
Please have your product model (DNB200) and serial number ready when contacting support.


