1. Saugos informacija
Prieš naudodami šį gaminį, atidžiai perskaitykite visas saugos instrukcijas. Nesilaikant šių instrukcijų, gali kilti elektros smūgis, gaisras ar kiti pavojai.
- Saugokite projektorių nuo lietaus ar drėgmės, kad išvengtumėte gaisro ar elektros smūgio.
- Neatidarykite projektoriaus casing. Viduje nėra dalių, kurias galėtų aptarnauti vartotojas. Visus techninės priežiūros darbus patikėkite kvalifikuotiems techninės priežiūros darbuotojams.
- Užtikrinkite tinkamą vėdinimą. Neužblokuokite ventiliacijos angų.
- Naudokite tik prie projektorijaus pridėtą maitinimo adapterį.
- Venkite tiesioginio projektoriaus objektyvo patekimo į akis, kai...amp yra įjungtas.
- Projektorių laikykite atokiau nuo šilumos šaltinių ir tiesioginių saulės spindulių.
2. Pakuotės turinys
Patikrinkite, ar pakuotėje yra visi toliau išvardyti daiktai:
- 1 x Jectse Mini LED Projector
- 1 x Remote Control (2 AAA batteries not included)
- 1 x AV Line (3-in-1 RCA cable)
- 1 x naudojimo instrukcija
- 1x maitinimo adapteris

Figure 2.1: Contents of the Jectse Mini LED Projector package.
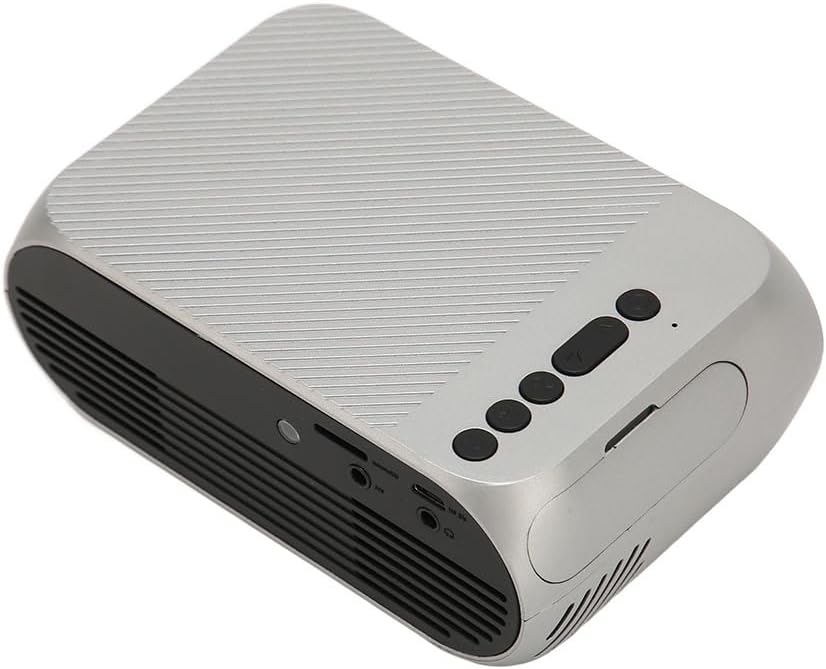
3. Produktas baigtasview
The Jectse Mini LED Projector is a compact and portable device designed for various multimedia applications. It features a 1080P resolution, LED light source, and multiple connectivity options.

3.1 pav.: Priekinė ir viršutinė dalys view of the Jectse Mini LED Projector.
3.1 Projektoriaus komponentai

Figure 3.2: Top panel controls of the Jectse Mini LED Projector.
- Objektyvas: Projektuoja vaizdą ekrane.
- Ventiliacijos grotelės: Užtikrina tinkamą oro srautą aušinimui.
- Valdymo mygtukai: (Refer to Figure 3.2) For basic navigation and power control.
- Fokusavimo ratas: Reguliuoja vaizdo aiškumą.
3.3 pav.: Galinė ir šoninė dalys view su įvesties / išvesties prievadais.
3.2 Įvesties / išvesties prievadai
- HD multimedijos sąsaja (HDMI): For connecting devices like laptops, gaming consoles, and media players.
- AV prievadas: Skirta senesniems įrenginiams prijungti naudojant pridedamą AV kabelį.
- USB prievadas: Skirta USB atmintinėms prijungti medijos atkūrimui files tiesiogiai.
- Maitinimo įvestis: Maitinimo adapterio prijungimui.
- Garso išvestis (3.5 mm lizdas): Skirta išoriniams garsiakalbiams arba ausinėms prijungti.
4. Sąranka
4.1 Įdėjimas
Place the projector on a stable, flat surface. Ensure there is adequate space around the projector for ventilation. The ideal projection distance is between 1.5 to 2 meters for optimal image size and clarity.

Figure 4.1: Recommended projection distance and screen sizes.
4.2 Maitinimo jungtis
- Prijunkite maitinimo adapterį prie projektoriaus maitinimo įvesties prievado.
- Prijunkite maitinimo adapterį į tinkamą elektros lizdą (100–240 V).
4.3 Įvesties šaltinių prijungimas
The projector supports HD Multimedia Interface, AV, and USB inputs.

Figure 4.2: Projector compatibility with various devices.
- HD Multimedia Interface: Connect an HD Multimedia Interface cable from your source device (e.g., laptop, game console) to the projector's HD Multimedia Interface port.
- APIE: Connect the included AV cable to the projector's AV port and the corresponding audio/video output ports on your source device.
- USB: Insert a USB flash drive into the projector's USB port.
4.4 Fokuso reguliavimas
After powering on the projector, rotate the focus wheel (usually located near the lens) until the projected image appears clear and sharp.
5. Naudojimo instrukcijos
5.1 Įjungimas / išjungimas
- Norėdami įjungti: Press the Power Switch button on the projector or the power button on the remote control.
- Norėdami išjungti: Press the Power Switch button again. The projector will shut down.
5.2 Šaltinio pasirinkimas
After powering on, use the "Signal Source Button" on the projector or the "Source" button on the remote control to cycle through available input sources (HD Multimedia Interface, AV, USB).
5.3 Meniu naršymas
Use the Direction Buttons and Confirm Button on the projector or the arrow keys and OK button on the remote control to navigate through the projector's on-screen menu for settings adjustments (e.g., picture mode, aspect ratio, sound settings).
5.4 Nuotolinio valdymo pulto naudojimas
Insert two AAA batteries (not included) into the remote control. Point the remote control towards the projector's IR receiver to operate functions such as power, source selection, volume, and menu navigation.
6. Priežiūra
6.1 Objektyvo valymas
Projektoriaus objektyvą švelniai nuvalykite minkštu, nepūkuotu audiniu, specialiai skirtu optiniams lęšiams. Nenaudokite abrazyvinių valiklių ar per didelės jėgos, nes tai gali subraižyti objektyvą.
6.2 Bendras valymas
Wipe the exterior of the projector with a soft, dry cloth. Do not use liquid cleaners or solvents. Ensure the ventilation grilles are free from dust and debris to maintain optimal cooling.
7. Problemų sprendimas
| Problema | Galima priežastis | Sprendimas |
|---|---|---|
| Neprojektuojamas vaizdas |
|
|
| Vaizdas neryškus |
|
|
| Nėra garso |
|
|
| Nuotolinio valdymo pultas neveikia |
|
|
8. Specifikacijos
| Funkcija | Detalė |
|---|---|
| Prekės ženklas | Jectse |
| Modelio numeris | Jectse3giz17bkpy |
| Rezoliucija | 1920*1080p |
| Šviesos šaltinis | LED |
| LED gyvenimas | 3000 valandos |
| Projekcijos atstumas | 1.5-2 m |
| Projekcijos santykis | 1.6:1 |
| Krašto santykis | 16:9 |
| Maitinimo įvestis | 100-240V |
| Produkto dydis | 13 x 8.5 x 5 cm (apytiksliai 5.1 x 3.3 x 2 colio) |
| Prekės svoris | 1.1 svaro |
| Ryšio technologija | HD Multimedia Interface, AV, USB |
| Ypatingos savybės | Adjustable, Portable Design |
9. Garantija ir palaikymas
For warranty information or technical support, please refer to the contact details provided with your purchase or visit the official Jectse websvetainėje. Išsaugokite pirkimo įrodymą garantiniams reikalavimams.