1. Įvadas
This manual provides comprehensive instructions for the safe and effective operation of the ZOYI ZT303 Digital Multimeter. The ZT303 is a high-precision, auto-ranging measurement tool designed for professionals and enthusiasts, capable of measuring voltage, current, resistance, capacitance, frequency, and duty cycle. Please read this manual thoroughly before use to ensure proper operation and to prevent potential hazards.
2. Saugos informacija
Norėdami užtikrinti saugų skaitiklio veikimą ir aptarnavimą, vadovaukitės šiomis instrukcijomis. Nesilaikant šių įspėjimų galima sunkiai susižeisti arba mirtis.
- Prieš atlikdami matavimus, visada įsitikinkite, kad matuoklis yra tinkamoje funkcijoje ir diapazone.
- Nenaudokite matuoklio, jei jis atrodo pažeistas arba jei pažeisti bandymo laidai.
- Netepkite daugiau nei vardinis tūristage, kaip pažymėta ant skaitiklio, tarp gnybtų arba tarp bet kurio gnybto ir įžeminimo.
- Būkite ypač atsargūs dirbdami su voltagesant didesnei nei 30 V AC RMS, 42 V pikinei vertei arba 60 V DC įtampai. Šie įtampų lygiaitagtai kelia šoko pavojų.
- Prieš keisdami funkcijas, atjunkite bandymo laidus nuo grandinės.
- Prieš atidarydami baterijų dangtelį, atjunkite bandymo laidus nuo matuoklio.
- Do not operate the meter with the battery cover removed.
- Laikykitės vietinių ir nacionalinių saugos taisyklių.
3. Produktas baigtasview
The ZOYI ZT303 Digital Multimeter features a clear display, a rotary switch for function selection, and various input jacks for test leads.

3.1 pav.: priekis view of the ZOYI ZT303 Digital Multimeter, showing the display, rotary switch, and input terminals.
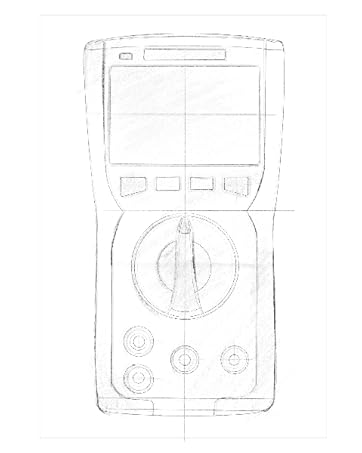
Figure 3.2: Technical drawing illustrating the internal layout or design elements of the ZOYI ZT303 Digital Multimeter.
3.1. Komponentai
- LCD ekranas: Rodo matavimo rodmenis, vienetus ir funkcijų indikatorius.
- Funkciniai mygtukai: For selecting specific modes (e.g., RANGE, REL, MAX/MIN, Hz, SELECT, HOLD).
- Sukamasis jungiklis: Used to select the desired measurement function (e.g., V~, V-, A~, A-, Ω, NCV).
- Įvesties lizdai:
- COM lizdas: Common terminal for all measurements. Connect the black test lead here.
- VHzΩCAP Diode Jack: Įvestis ttage, frequency, resistance, capacitance, and diode/continuity tests. Connect the red test lead here for these functions.
- mAµA Jack: Milimetrinių verčių įvestisampčia ir mikroampere current measurements. Connect the red test lead here for these functions.
- 10A lizdas: Įvestis 10 Ampere current measurements. Connect the red test lead here for high current measurements.
4. Sąranka
4.1. Akumuliatoriaus įdėjimas
- Įsitikinkite, kad multimetras yra išjungtas, ir atjunkite visus bandymo laidus.
- Įrenginio gale suraskite baterijų skyriaus dangtelį.
- Atsukite tvirtinimo varžtą (-us) ir nuimkite dangtelį.
- Insert new batteries (e.g., 2 x AAA or 9V, refer to the battery compartment for specific type) observing the correct polarity.
- Uždėkite akumuliatoriaus dangtelį ir pritvirtinkite jį varžtu (-ais).
4.2. Bandymo laidų prijungimas
Juodą bandymo laidą visada prijunkite prie COM lizdo. Raudoną bandymo laidą prijunkite prie atitinkamo įvesties lizdo, atsižvelgdami į matavimo funkciją:
- Dėl ttage, Resistance, Capacitance, Frequency, Diode, and Continuity: Connect the red lead to the VHzΩCAP Diode domkratas.
- For mA/µA Current: Connect the red lead to the mAµA domkratas.
- For 10A Current: Connect the red lead to the 10A domkratas.
5. Naudojimo instrukcijos
5.1. Maitinimo įjungimas/išjungimas
Turn the rotary switch from the "OFF" position to any desired measurement function to power on the meter. To power off, turn the rotary switch back to the "OFF" position.
5.2. Automatinis nuotolio nustatymas
The ZT303 features auto-ranging, which automatically selects the appropriate measurement range. For manual range selection, press the ASORTIMENTAS mygtuką.
5.3. DC/AC ttage matavimas (V)
- Pasukite sukamąjį jungiklį į padėtį V~ (Kintamosios srovės tūristage) arba V- (DC ttage) padėtis.
- Connect the black test lead to the COM jack and the red test lead to the VHzΩCAP Diode jack.
- Prijunkite bandymo zondus prie matuojamos grandinės arba komponento.
- Perskaitykite ttage reikšmė LCD ekrane.
5.4. DC/AC Current Measurement (A, mA, µA)
Atsargiai: Niekada nejunkite skaitiklio lygiagrečiai su įtampos matuokliutagMatuojant srovę, naudokite srovės šaltinį. Tai gali sugadinti matuoklį ir grandinę.
- Set the rotary switch to the appropriate current range (A~, A-, mAµA~, mAµA-).
- Connect the black test lead to the COM jack. Connect the red test lead to the mAµA jack for low current or the 10A jack for high current.
- Atidarykite grandinę, kurioje reikia matuoti srovę, ir prijunkite skaitiklį nuosekliai su apkrova.
- Skaitykite dabartinę vertę LCD ekrane.
5.5. Varžos matavimas (Ω)
Atsargiai: Prieš matuodami varžą, įsitikinkite, kad grandinėje nėra įtampos ir visi kondensatoriai yra iškrauti.
- Pasukite sukamąjį jungiklį į padėtį Ω padėtis.
- Connect the black test lead to the COM jack and the red test lead to the VHzΩCAP Diode jack.
- Prijunkite bandymo zondus prie matuojamo komponento.
- Nuskaitykite varžos vertę LCD ekrane.
5.6. Capacitance Measurement (F)
Atsargiai: Prieš matavimą įsitikinkite, kad kondensatorius yra visiškai išsikrovęs, kad nepažeistumėte matuoklio.
- Pasukite sukamąjį jungiklį į padėtį BŽŪP position (often shared with Ω or Diode, use SELECT button if needed).
- Connect the black test lead to the COM jack and the red test lead to the VHzΩCAP Diode jack.
- Prijunkite bandymo zondus prie kondensatoriaus gnybtų.
- LCD ekrane perskaitykite talpos vertę.
5.7. Frequency/Duty Cycle Measurement (Hz/%)
- Pasukite sukamąjį jungiklį į padėtį Hz/% position (often shared with voltage or other functions, use SELECT button if needed).
- Connect the black test lead to the COM jack and the red test lead to the VHzΩCAP Diode jack.
- Prijunkite bandymo zondus prie signalo šaltinio.
- LCD ekrane nuskaitykite dažnio arba darbo ciklo vertę.
5.8. Diode Test and Continuity Test
- Pasukite sukamąjį jungiklį į padėtį Diodas / tęstinumas padėtis. Naudoti PASIRINKTI button to toggle between diode test and continuity test.
- Connect the black test lead to the COM jack and the red test lead to the VHzΩCAP Diode jack.
- Diodo testas: Prijunkite raudoną zondą prie diodo anodo, o juodą – prie katodo. Tiesioginė įtampatage drop will be displayed. Reverse the probes; an "OL" (Overload) reading indicates a good diode.
- Tęstinumo testas: Connect the probes across the circuit or component. A continuous beep and a low resistance reading indicate continuity.
5.9. Nekontaktinis ttage (NCV) aptikimas
- Pasukite sukamąjį jungiklį į padėtį NCV padėtis.
- Move the top part of the meter close to the conductor or outlet.
- The meter will emit an audible beep and/or flash an LED indicator when AC voltagaptinkamas e.
5.10. Duomenų laikymo funkcija
Paspauskite LAIKYTI mygtuką, kad sustabdytumėte dabartinį rodmenį ekrane. Paspauskite jį dar kartą, kad atšauktumėte laikymo funkciją.
5.11. MAX/MIN Function
Paspauskite MAX/MIN button to enter MAX/MIN recording mode. The meter will display the maximum or minimum reading detected since the mode was activated. Press again to cycle between MAX, MIN, and current reading. Hold to exit.
5.12. Relative Measurement (REL)
Paspauskite REL button to store the current reading as a reference value. Subsequent measurements will be displayed as the difference from this reference value. Press again to exit relative mode.
6. Priežiūra
6.1. Valymas
Nuvalykite dėklą su skelbimuamp šluoste ir švelniu plovikliu. Nenaudokite abrazyvinių medžiagų ar tirpiklių. Prieš naudodami įsitikinkite, kad matuoklis yra visiškai sausas.
6.2. Baterijos keitimas
When the low battery indicator appears on the display, replace the batteries as described in Section 4.1. Prompt replacement ensures accurate readings and proper operation.
6.3. Saugiklio keitimas
If the current measurement function fails, the fuse may need replacement. Refer to the specific fuse ratings printed near the input jacks or inside the battery compartment. Fuse replacement typically involves opening the back case (after removing batteries) and carefully replacing the blown fuse with one of the identical type and rating. If unsure, consult a qualified technician.
7. Problemų sprendimas
| Problema | Galima priežastis | Sprendimas |
|---|---|---|
| Nėra ekrano arba ekranas yra pritemdytas | Išsikrovusios arba išsikrovusios baterijos | Pakeiskite baterijas (4.1 skyrius) |
| Rodoma „OL“ (perkrova) | Matavimas viršija pasirinktą diapazoną arba maksimalų matuoklio pajėgumą | Select a higher range (if in manual range) or ensure measurement is within meter's limits. |
| Neteisingi rodmenys | Incorrect function selected, poor test lead connection, or damaged test leads | Verify function, check lead connections, inspect and replace damaged leads. |
| Srovės matavimas neveikia | Perdegęs saugiklis | Pakeiskite saugiklį (6.3 skyrius) |
8. Specifikacijos
| Funkcija | Detalė |
|---|---|
| Prekės ženklas | ZOYI |
| Modelio numeris | ZT303 |
| Gaminio matmenys | 4.53 x 1.97 x 7.68 colio |
| Prekės svoris | 14.11 uncijos (399.98 gramų) |
| Maitinimo šaltinis | Maitinamas baterijomis |
| Spalva | Mėlyna |
| Ekranas | Digital LCD, 19999 Counts (typical for ZT303 series) |
| Range | Automatinis/rankinis nuotolio nustatymas |
| Ypatingos savybės | True RMS, NCV, Data Hold, Backlight, MAX/MIN, REL |
Note: Detailed electrical specifications (e.g., voltage/current ranges, accuracy) are typically printed on the device or included in a separate specification sheet.
9. Garantija ir palaikymas
Warranty information for the ZOYI ZT303 Digital Multimeter is typically provided at the point of purchase or within the product packaging. For specific warranty terms, technical support, or service inquiries, please refer to the official ZOYI websvetainėje arba susisiekite su įgaliotuoju pardavėju.
Dėl papildomos pagalbos apsilankykite: ZOYI Official Flagship Store on Amazon


