1. Įvadas
The Linkvil (Fanvil) W712 is a Radio over IP (RoIP) gateway designed to bridge analog/digital two-way radio systems with SIP communication devices. This device integrates a 400-470MHz radio module and a SIP module, facilitating interconnected communication across various platforms.
The W712 is compact, portable, and compatible with mainstream analog and DMR II digital two-way radios, including Motorola and Hytera. It supports easy deployment and management, enabling the creation of a unified communication system without requiring extensive changes to existing infrastructure. This gateway is suitable for internal communication in diverse environments such as community security, industrial parks, supermarkets, hospitality, and campmūsų saugumas.
Pagrindinės funkcijos:
- Integrated 400-470 MHz radio module for connecting analog/DMR II digital radios.
- SIP protocol compatibility for connecting SIP communication devices.
- High compatibility with Motorola, Hytera, and other mainstream analog/digital radios.
- Supports HD audio with G.722 and Opus codecs.
- Includes USB 2.0 and TF card interfaces for data storage or offline firmware upgrades.
- Supports call recording and call logs for both two-way radios and SIP phones.
- Dual Megabit Ethernet ports for network transmission.
- Power supply via DC 12V PSU and Power over Ethernet (PoE+).
- Web-based management interface for device configuration.
- Supports both desktop and wall-mounted installation.
2. Pakuotės turinys
Prašome patikrinti, ar pakuotėje yra visi reikalingi daiktai:
- Linkvil (Fanvil) W712 RoIP Gateway Unit
- Maitinimo adapteris (DC 12V)
- Antena
- Ethernet kabelis
- Greito montavimo vadovas
Note: The "Included Components" specification states "not apply", which is likely an error or refers to additional accessories not bundled. The above list is based on typical gateway packages.
3. Fizinis viršusview
Familiarize yourself with the ports and indicators on the W712 gateway.
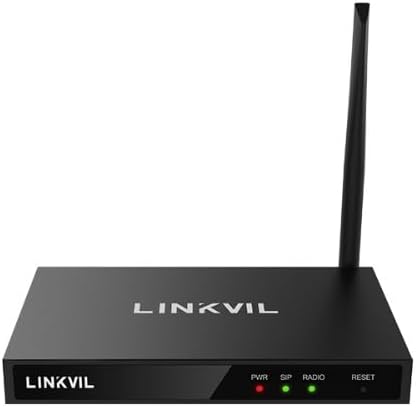
1 paveikslas: Priekyje view of the Linkvil W712 RoIP Gateway. Shows the device with its antenna attached, displaying the "LINKVIL" logo and indicator lights for PWR (Power), SIP, RADIO, and a RESET button.

2 paveikslas: Kampuotas view of the Linkvil W712 RoIP Gateway. This perspective highlights the compact design and the side ventilation, along with the front panel indicators.

3 paveikslas: Kitas kampuotas view of the Linkvil W712 RoIP Gateway, providing a slightly different perspective of the device's form factor and antenna placement.
Priekinio skydelio indikatoriai:
- PWR (galia): Nurodo maitinimo būseną.
- SIP: Indicates SIP module status and activity.
- RADIJAS: Indicates radio module status and activity.
- NUSTATYTI: Button to reset the device to factory defaults (press and hold).
Rear Panel Ports (Typical):
- DC 12V maitinimo įvestis: Maitinimo adapterio prijungimui.
- Ethernet prievadai (LAN/WAN): Dual Megabit Ethernet ports for network connection.
- USB 2.0 prievadas: For data storage or other peripherals.
- TF kortelės lizdas: For TF card insertion, used for data storage or offline firmware upgrades.
- Antenos jungtis: For attaching the external antenna.
4. Sąranka ir diegimas
4.1. Fizinis įrengimas
- Montavimas: The W712 supports both desktop and wall-mounted installation. Choose a stable location with good ventilation and away from direct heat sources or moisture. For wall mounting, use appropriate screws and anchors (not included) to secure the device.
- Prijunkite anteną: Carefully screw the provided antenna onto the antenna connector on the rear panel of the W712. Ensure it is securely fastened but do not overtighten.
- Maitinimo jungtis:
- Naudojant maitinimo adapterį: Connect the DC 12V power adapter to the power input port on the W712, then plug the adapter into a standard electrical outlet.
- Naudojant PoE+: If your network switch supports PoE+, connect an Ethernet cable from the PoE+ enabled port on your switch to one of the Ethernet ports on the W712. The device will power on automatically.
- Tinklo prisijungimas: Connect an Ethernet cable from your network router or switch to one of the Ethernet ports on the W712. The device features dual Megabit Ethernet ports.
- Įdėkite TF kortelę (neprivaloma): If you plan to use a TF card for data storage or offline firmware upgrades, insert it into the TF card slot.
- Prijunkite USB įrenginį (nebūtina): If needed, connect a USB device to the USB 2.0 port.
4.2. Pradinė konfigūracijos prieiga
Once powered on and connected to the network, the W712 can be configured via its web valdymo sąsaja.
- Gauti IP adresą: The W712 will typically obtain an IP address automatically via DHCP. You may need to check your router's DHCP client list to find the assigned IP address of the device. Alternatively, use a network scanning tool.
- Prieiga Web Sąsaja: Atidarykite a web browser on a computer connected to the same network as the W712. Enter the device's IP address into the browser's address bar and press Enter.
- Prisijungimas: You will be prompted for a username and password. Refer to the Quick Installation Guide for default login credentials. It is highly recommended to change the default password immediately after the first login for security purposes.
5. Naudojimo instrukcijos
The W712 gateway functions by integrating radio communication with SIP-based communication. Configuration is primarily done through the web valdymo sąsaja.
5.1. Radio Module Configuration
Per web interface, navigate to the radio settings to configure the 400-470MHz radio module. This includes:
- Dažnio nustatymai: Set the operating frequencies for communication with two-way radios.
- Kanalo konfigūracija: Define radio channels and associated parameters.
- Compatibility Settings: Adjust settings for compatibility with specific analog or DMR II digital radio models (e.g., Motorola, Hytera).
- Garso nustatymai: Configure audio input/output levels for the radio interface.
5.2. SIP Module Configuration
Access the SIP settings in the web interface to integrate the W712 with your SIP communication system:
- SIP paskyros registracija: Register the W712 with your SIP server by entering SIP account details (username, password, server address).
- Codec Preferences: Select preferred audio codecs, including G.722 and Opus for HD audio.
- Tinklo nustatymai: Configure network parameters relevant to SIP communication (e.g., NAT traversal).
5.3. RoIP Link Configuration
This section defines how radio channels are mapped to SIP extensions or groups, enabling cross-platform communication.
- Mapping Rules: Create rules to link specific radio channels to SIP endpoints or vice versa.
- Grupiniai skambučiai: Configure group call functionalities between radio users and SIP users.
- Prioriteto nustatymai: Assign priorities for different communication paths if necessary.
5.4. Call Recording and Logs
The W712 supports recording calls and maintaining call logs for both two-way radios and SIP phones. These features can be configured and accessed via the web interface. Ensure sufficient storage is available on the TF card or connected USB device if local storage is used for recordings.
6. Priežiūra
6.1. Firmware atnaujinimai
Reguliariai tikrinkite gamintojo website for firmware updates. Firmware updates can provide new features, performance improvements, and security enhancements. The W712 supports offline firmware upgrades via the TF card interface.
6.2. Valymas
Keep the device clean by wiping it with a soft, dry cloth. Do not use liquid cleaners or aerosols, as they may damage the device.
6.3. Gamyklinių nustatymų atkūrimas
If the device is not functioning correctly or you need to clear all configurations, you can perform a factory reset. Locate the RESET button on the front panel. With the device powered on, press and hold the RESET button for approximately 5-10 seconds until the indicator lights change, then release. The device will restart with factory default settings.
7. Problemų sprendimas
This section addresses common issues you might encounter with the W712 RoIP Gateway.
7.1. No Power Indicator
- Patikrinkite maitinimo jungtį: Ensure the DC 12V power adapter is securely connected to the device and a working power outlet.
- Check PoE+ (if applicable): Verify that the Ethernet cable is connected to a PoE+ enabled port on your switch and that the switch is providing power.
- Test Power Adapter: If possible, test the power adapter with another compatible device or use a multimeter to check its output.
7.2. Nepavyksta pasiekti Web Sąsaja
- Tinklo prisijungimas: Ensure the Ethernet cable is properly connected to both the W712 and your network. Check the network status indicators on the device and your switch.
- IP adresas: Verify that you are using the correct IP address for the W712. Check your router's DHCP client list.
- Tinklo konfigūracija: Ensure your computer is on the same network segment as the W712. Temporarily disable any firewalls on your computer that might be blocking access.
- Gamykliniai nustatymai: If all else fails, perform a factory reset to revert to default network settings, then try accessing again.
7.3. Radio Communication Issues
- Antena: Ensure the antenna is securely attached and positioned correctly.
- Dažnio nustatymai: Double-check that the radio module's frequency and channel settings in the web interface match those of your two-way radios.
- Suderinamumas: Verify that the W712's settings are configured for compatibility with your specific radio models (analog/DMR II).
- RADIJO indikatorius: Observe the RADIO indicator light for activity.
7.4. SIP Communication Issues
- SIP registracija: Confirm that the SIP account is successfully registered with your SIP server. Check the SIP status in the web sąsaja.
- Tinklo ryšys: Ensure stable network connectivity to the SIP server.
- SIP nustatymai: Verify all SIP account details, server addresses, and codec preferences are correctly configured.
- SIP Indicator: Observe the SIP indicator light for activity.
8. Specifikacijos
| Funkcija | Detalė |
|---|---|
| Modelio pavadinimas | W712 |
| Prekės ženklas | Fanvil (Linkvil) |
| Ypatinga funkcija | RoIP Gateway with Built-in Radio & SIP, UHF 400–470 MHz Radio Integration |
| Dažnių juostos klasė | Single-Band (UHF 400-470 MHz) |
| Belaidžio ryšio standartas | 802.11a (Note: This might refer to internal Wi-Fi for management or is a generic spec. The primary connectivity is Ethernet.) |
| Suderinami įrenginiai | Motorola, Hytera, and other mainstream analog/DMR II digital two-way radios |
| Ryšio technologija | Ethernet, USB |
| Ethernet prievadai | Dual Megabit Ethernet |
| USB sąsaja | USB 2.0 |
| TF kortelės sąsaja | Yes, for data storage or offline upgrade |
| Garso kodekai | G.722, Opus (HD Audio Support) |
| Maitinimo šaltinis | DC 12V PSU, PoE+ (802.3at) |
| Montavimas | Desktop, Wall-mounted |
| Spalva | Juoda |
| Prekės svoris | 2.02 svaro (apie 0.92 kg) |
| Pakuotės matmenys | 9.02 x 8.19 x 2.44 colio (apytiksliai 22.9 x 20.8 x 6.2 cm) |
| Gamintojas | Fanvilas |
| Pasiekiama pirmoji data | 1 m. kovo 2024 d |
9. Garantija ir palaikymas
For warranty information and technical support, please refer to the official Fanvil (Linkvil) websvetainėje arba susisiekite su įgaliotuoju pardavėju. Išsaugokite pirkimo kvitą kaip pirkimo įrodymą garantijos pretenzijoms.
Online resources, including FAQs, updated manuals, and firmware downloads, may be available on the manufacturer's support portal.