1. Įvadas
This manual provides detailed instructions for the installation, operation, and maintenance of your Stinger Audio MT-1000.1M 1-Channel Monoblock Marine Audio Subwoofer Amplifier. Please read this manual thoroughly before attempting installation or operation to ensure proper use and to prevent damage to the unit or your audio system. Keep this manual for future reference.
2. Produktas baigtasview
The Stinger Audio MT-1000.1M is a high-efficiency Class-D monoblock amplifier designed for marine environments. It delivers 1000 Watts RMS of power, optimized for subwoofer applications. Its robust, water-resistant design ensures reliable performance in challenging conditions.
Pagrindinės funkcijos:
- Digital Class-D Monoblock Ampgyvybingesnis: High efficiency and compact form factor.
- Kompaktiškas ir tvirtas dizainas: Built for lasting reliability.
- Robust Unregulated Power Supplies: Designed for superior performance and efficiency.
- Advanced HEXFET Power MOSFET: Features reduced on-resistance, faster switching speeds, and enhanced reliability.
- Direct Insert Power and Speaker Terminals: Decreased resistance for higher power transfer and efficiency.
- Vandeniui atsparus dizainas: Apsaugo amplifier against weather elements for uninterrupted performance.
- Bass Boost Q: Adjustable bass boost from 0dB to 12dB at a selected frequency.
- Remote Bass Knob Included: Flush-mount design for effortless bass level adjustment.

3. Saugos informacija
Visada laikykitės šių saugos priemonių:
- Disconnect the vehicle's negative battery terminal before any installation.
- Ensure proper grounding to the vehicle chassis.
- Use appropriate gauge wiring for power, ground, and speaker connections.
- Įdiekite amplifier in a well-ventilated area, away from direct heat sources.
- Venkite montuoti amplifier in locations where it may be submerged in water, despite its water-resistant rating.
- Jei nesate tikri dėl kurios nors montavimo proceso dalies, pasitarkite su profesionaliu montuotoju.
4. Kas yra dėžutėje
Prieš pradėdami diegti, patikrinkite, ar yra visi elementai:
- 1000 vatų monoblokas Amplifier (MT-1000.1M)
- Remote Level Control (Bass Knob)
- Montavimo įranga
- Instrukcijų vadovas
5. Komponento identifikavimas
Susipažinkite su amplifier's controls and connections.

5.1 Control Panel (Input Side)

- POWER/PRT/CLIP Indicators: LEDs indicating power status, protection mode, and signal clipping.
- REMOTE Port: RJ11 connection for the included remote bass level control.
- ĮVESTIS (RCA): Audio input from your head unit or source.
- BRIDGE IN/OUT (RCA): For linking multiple ampgelbėtojai.
- Perimti kontrolę: Reguliuoja įvesties jautrumą, kad jis atitiktų šaltinio įrenginio išvestį.
- LPF (Low-Pass Filter) Control: Adjusts the upper frequency limit for the subwoofer. Range: 40Hz - 180Hz.
- SUBSONIC Filter: Removes ultra-low frequencies below the audible range to protect the subwoofer. Range: OFF - 50Hz.
- FREQ (Bass Boost Frequency) Control: Selects the center frequency for the bass boost. Range: 30Hz - 80Hz.
- BOOST (Bass Boost Level) Control: Adjusts the level of bass boost. Range: 0dB - 12dB.
5.2 Terminal Panel (Output Side)

- GND (Ground) Terminal: Jungiamas prie transporto priemonės važiuoklės įžeminimo.
- REM (Remote) Terminal: Connects to the remote turn-on lead from your source unit.
- +12V (Power) Terminal: Connects to the positive terminal of the vehicle's battery via an inline fuse.
- MONO OUTPUT (Speaker Terminals): Connects to your subwoofer(s). Minimum impedance 1 Ohm.
6. Montavimas
Proper installation is crucial for optimal performance and safety. Ensure all connections are secure and correctly polarized.
6.1 Montavimo vieta
Choose a mounting location that is secure, provides adequate ventilation, and is protected from excessive moisture. While the amplifier is water-resistant, direct exposure to heavy water spray or submersion should be avoided.

6.2 Laidų jungtys
- Galia (B+): Connect a 4-gauge power cable from the +12V terminal of the amplifier directly to the positive terminal of the vehicle's battery. Install an appropriate inline fuse (100A recommended) within 18 inches of the battery.
- Įžeminimas (GND): Connect a 4-gauge ground cable from the GND terminal of the amplifier to a clean, bare metal point on the vehicle's chassis. Ensure a solid, low-resistance connection.
- Nuotolinis (REM): Connect a 18-gauge remote turn-on wire from the REM terminal of the amplifier to the remote output of your head unit.
- RCA įvestis: Connect RCA cables from the subwoofer output of your head unit to the INPUT RCA jacks on the ampgyvesnis.
- Garsiakalbio išvestis: Connect your subwoofer(s) to the MONO OUTPUT terminals. Ensure the total impedance is not below 1 Ohm. Observe correct polarity (+ to + and - to -).
- Nuotolinio boso rankenėlė: Connect the remote bass knob to the REMOTE port on the amplifier naudodami pridėtą laidą.
7. Operacija
After installation, follow these steps to configure and operate your ampgyvesnis.
7.1 Pradinė sąranka ir stiprinimo reguliavimas
- Pasukite GAIN valdiklį ant ampfiksatorių į minimalią padėtį (prieš laikrodžio rodyklę).
- Nustatykite pagrindinio įrenginio garsumą maždaug į 75 % maksimalaus lygio.
- Play a dynamic piece of music with strong bass content.
- Lėtai didinkite GAIN valdiklį ant amplifier until you hear distortion, then back it off slightly until the sound is clear. The CLIP indicator should not illuminate continuously.
7.2 Crossover and Filter Settings
- LPF (žemo dažnio filtras): Adjust the LPF control to set the upper frequency limit for your subwoofer. A common starting point is 80Hz-100Hz, but this may vary depending on your subwoofer and other speakers in your system.
- SUBSONIC Filter: Set the SUBSONIC filter to protect your subwoofer from playing frequencies below its resonant frequency. A common setting is 25Hz-30Hz, or slightly below your subwoofer's tuning frequency if it's in a ported enclosure. If you have a sealed enclosure, you may set it to OFF or a very low frequency.
7.3 Žemųjų dažnių stiprinimas
- FREQ (Bass Boost Frequency): Select the frequency at which you want the bass boost to be centered. This is typically between 30Hz and 80Hz, depending on the desired effect.
- BOOST (Bass Boost Level): Adjust the level of boost from 0dB to 12dB. Use this sparingly to avoid distortion and potential damage to your subwoofer.
7.4 Remote Bass Knob
The remote bass knob allows for convenient adjustment of the subwoofer output level from your listening position. It acts as a master volume for the subwoofer channel, allowing you to increase or decrease the bass intensity without affecting other ampkeltuvo nustatymai.
8. Priežiūra
Reguliarus techninis aptarnavimas padeda užtikrinti jūsų įrenginio ilgaamžiškumą ir našumą ampgyvesnis.
- Valymas: Periodiškai nuvalykite ampNuvalykite įrenginio išorę minkštu, sausu skudurėliu. Venkite naudoti stiprias chemines medžiagas ar abrazyvinius valiklius.
- Ryšio patikrinimas: Annually inspect all power, ground, remote, and speaker connections for corrosion or looseness. Tighten as necessary.
- Vėdinimas: Užtikrinkite, kad amp„Lifier“ aušinimo briaunos nėra užblokuotos, kad šiluma tinkamai išsisklaidytų.
9. Problemų sprendimas
Jei kyla problemų dėl savo amplifier, žr. toliau pateiktas dažniausiai pasitaikančias problemas ir sprendimus.
| Problema | Galima priežastis | Sprendimas |
|---|---|---|
| Nėra maitinimo / Maitinimo indikatorius išjungtas | Perdegęs saugiklis, atsilaisvinęs maitinimo / įžeminimo / nuotolinio valdymo laidas, nėra nuotolinio valdymo signalo. | Check inline fuse, verify all power connections, ensure head unit remote output is active. |
| Apsaugos šviesos diodas įjungtas | Garsiakalbio trumpasis jungimas, per maža varža, perkaitimas, nuolatinės srovės poslinkis. | Check speaker wiring for shorts, verify speaker impedance, ensure adequate ventilation, disconnect speakers and test. |
| Nėra garso išvesties | Nėra įvesties signalo, neteisingas stiprinimo nustatymas, atjungti garsiakalbių laidai. | Check RCA connections, adjust gain, verify speaker connections. |
| Iškraipytas garsas | Per didelis nustatytas stiprinimas, netinkami kryžminimo filtro nustatymai, blogas įžeminimo prijungimas. | Reduce gain, adjust LPF/Subsonic filters, check ground wire for secure connection. |
10. Specifikacijos
Detailed technical specifications for the Stinger Audio MT-1000.1M ampgyvesnis.
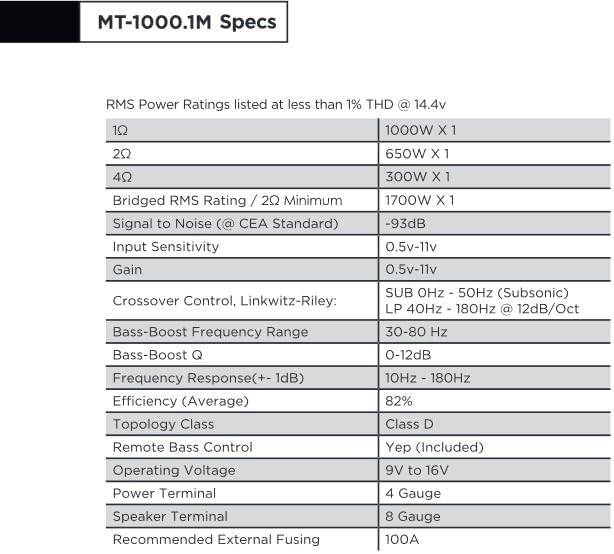
| Funkcija | Specifikacija |
|---|---|
| RMS galia (1Ω) | 1000W x 1 |
| RMS galia (2Ω) | 650W x 1 |
| RMS galia (4Ω) | 300W x 1 |
| Bridged RMS Rating (2Ω Minimum) | 1700W x 1 |
| Signal to Noise (CEA Standard) | -93 dB |
| Įvesties jautrumas | 0.5 V–11 V |
| Pelnas | 0.5 V–11 V |
| Crossover Control (Linkwitz-Riley) | SUB 0Hz - 50Hz (Subsonic), LP 40Hz - 180Hz @ 12dB/Oct |
| Žemųjų dažnių stiprinimo dažnių diapazonas | 30Hz - 80Hz |
| Bass-Boost Q | 0 - 12dB |
| Dažnio atsakas (+/- 1 dB) | 10Hz - 180Hz |
| Efektyvumas (vidutinis) | 82 % |
| Topologijos klasė | D klasė |
| Nuotolinis žemųjų dažnių valdymas | Taip (įtraukta) |
| Veiklos ttage | Nuo 9V iki 16V |
| Maitinimo terminalas | 4 matuoklis |
| Garsiakalbių terminalas | 8 matuoklis |
| Rekomenduojamas išorinis lydymas | 100A |
| Prekės svoris | 6.14 svaro |
| Pakuotės matmenys | 14.5 x 7.8 x 3.2 colio |
| Pasiekiama pirmoji data | 13 m. kovo 2024 d |
| Gamintojas | STINGER |
11. Garantija ir palaikymas
11.1 Informacija apie garantiją
The Stinger Audio MT-1000.1M ampkeltuvas ateina su a 1 metų garantija from the date of purchase. Please retain your proof of purchase for warranty claims. The warranty covers manufacturing defects and workmanship under normal use. It does not cover damage caused by improper installation, accident, misuse, abuse, neglect, or unauthorized modification.
11.2 Pagalba klientams
For technical assistance, troubleshooting, or warranty inquiries, please contact Stinger Audio customer support. You can find more information and contact details by visiting the official STINGER brand store:


