1. Įvadas
The Mastech MS8233B is a compact, handheld digital multimeter designed for measuring AC/DC voltage, DC current, resistance, diode, continuity, and temperature. It features a 2000-count display, data hold function, and low battery indication, making it suitable for various electrical testing applications in domestic and electronics environments.
2. Saugos informacija
To ensure safe operation and service of the meter, please read this manual thoroughly before use. Failure to observe safety warnings can result in severe injury or death.
- Prieš naudodami visada įsitikinkite, kad skaitiklis yra geros darbinės būklės.
- Netepkite daugiau nei vardinis tūristage, which is 600V CAT III.
- Būkite atsargūs dirbdami su voltagaukštesnėje nei 30 V kintamosios srovės RMS, 42 V maksimalios įtampos arba 60 V nuolatinės srovės įtampoje, nes kyla elektros smūgio pavojus.
- Prieš keisdami funkcijas, visada atjunkite bandymo laidus nuo grandinės.
- Kai pasirodys išsikrovusio akumuliatoriaus indikatorius, nedelsdami pakeiskite bateriją.
- Do not operate the meter if the battery cover is not properly closed.
- Laikykitės vietinių ir nacionalinių saugos taisyklių.
3. Produktas baigtasview
The Mastech MS8233B Digital Multimeter features a clear display, a rotary function switch, and dedicated input jacks for various measurements.

3.1 paveikslas: Priekyje view of the Mastech MS8233B Digital Multimeter. This image displays the LCD screen, rotary function switch, input jacks, and control buttons.
3.1 Komponentai
- LCD ekranas: Rodo matavimo rodmenis, vienetus ir funkcijų indikatorius.
- Funkcijos sukamasis jungiklis: Used to select the desired measurement function (e.g., V~, V-, A-, Ω, Diode, Continuity, Temp).
- LAIKYMO mygtukas: Įšaldo dabartinį rodmenį ekrane.
- Foninio apšvietimo mygtukas: Activates the display backlight for improved visibility in low-light conditions.
- VΩmA Input Jack: Teigiamas tūrio įėjimastage, resistance, diode, continuity, and current measurements up to 200mA.
- COM įvesties lizdas: Bendras (neigiamas) įėjimas visiems matavimams.
- 10A Input Jack: Teigiamas įėjimas didelės srovės matavimams (iki 10 A).
4. Sąranka
4.1 Akumuliatoriaus įdėjimas
The MS8233B requires 2 LR44 batteries for operation. Ensure the batteries are installed correctly before first use or when replacing them.
- Išjunkite multimetrą ir atjunkite visus bandymo laidus.
- Raskite baterijų skyrių matuoklio gale.
- Baterijų skyriaus dangteliui atidaryti naudokite atsuktuvą.
- Insert the 2 LR44 batteries, observing the correct polarity (+ and -).
- Uždėkite akumuliatoriaus skyriaus dangtelį ir pritvirtinkite jį varžtu.
5. Naudojimo instrukcijos
Prieš atlikdami bet kokius matavimus, įsitikinkite, kad bandymo laidai yra tinkamai prijungti prie matuoklio ir tiriamos grandinės.
5.1 Bendras veikimas
- Turn the rotary switch from the "OFF" position to the desired measurement function.
- Connect the test leads to the appropriate input jacks and the circuit.
- Nuskaitykite matavimo vertę LCD ekrane.
- To turn off the meter, rotate the switch back to the "OFF" position.
5.2 DC tomastagMatavimas (V-)
- Nustatykite sukamąjį jungiklį į norimą nuolatinės srovės įtampątage diapazonas (pvz., 200 mV, 2 V, 20 V, 200 V, 600 V).
- Raudoną bandymo laidą prijunkite prie VΩmA lizdo, o juodą – prie COM lizdo.
- Prijunkite bandymo laidus prie matuojamo komponento arba grandinės.
5.3 AC ttagMatavimas (V~)
- Nustatykite sukamąjį jungiklį į norimą kintamosios srovės garsumo lygį.tage range (e.g., 200V, 600V).
- Raudoną bandymo laidą prijunkite prie VΩmA lizdo, o juodą – prie COM lizdo.
- Prijunkite bandymo laidus prie kintamosios srovės įtampostage šaltinis.
5.4 DC Current Measurement (A-)
- Set the rotary switch to the desired DC Current range (e.g., 200µA, 2mA, 20mA, 200mA, 10A).
- For currents up to 200mA, connect the red test lead to the VΩmA jack. For currents up to 10A, connect the red test lead to the 10A jack. Always connect the black test lead to the COM jack.
- Connect the meter in series with the circuit to measure the current.
- Atsargiai: Do not attempt to measure currents exceeding 200mA through the VΩmA jack or 10A through the 10A jack.
5.5 Varžos matavimas (Ω)
- Nustatykite sukamąjį jungiklį į norimą varžos diapazoną (pvz., 200 Ω, 2 kΩ, 20 kΩ, 200 kΩ, 2 MΩ).
- Raudoną bandymo laidą prijunkite prie VΩmA lizdo, o juodą – prie COM lizdo.
- Connect the test leads across the resistor or component to be measured. Ensure the circuit is de-energized.
5.6 Diodų bandymas
- Set the rotary switch to the Diode symbol.
- Raudoną bandymo laidą prijunkite prie VΩmA lizdo, o juodą – prie COM lizdo.
- Prijunkite raudoną bandymo laidą prie diodo anodo, o juodą bandymo laidą – prie katodo. Ekrane bus rodoma tiesioginė įtampa.tage lašas.
- Reverse the leads. An open circuit (OL) reading indicates a good diode. A reading in both directions or no reading indicates a faulty diode.
5.7 Tęstinumo testas
- Set the rotary switch to the Continuity symbol.
- Raudoną bandymo laidą prijunkite prie VΩmA lizdo, o juodą – prie COM lizdo.
- Connect the test leads across the circuit or component. If the resistance is less than approximately 60Ω, the buzzer will sound, indicating continuity.
5.8 Temperatūros matavimas
While the product title mentions temperature, the MS8233B model's detailed specifications do not explicitly list a temperature function. If your specific unit includes this feature, typically you would:
- Set the rotary switch to the Temperature function (usually marked with °C or °F).
- Connect a K-type thermocouple (if included) to the VΩmA and COM jacks, observing polarity.
- Place the thermocouple probe at the point where temperature needs to be measured.
5.9 Duomenų sulaikymo funkcija
- Press the "HOLD" button to freeze the current reading on the display.
- Press the "HOLD" button again to release the reading and resume live measurements.
5.10 Foninio apšvietimo funkcija
- Press the backlight button (often marked with a sun symbol) to turn on the display backlight.
- Press the button again to turn off the backlight.
6. Priežiūra
6.1 Akumuliatoriaus keitimas
When the low battery indicator appears on the display, replace the batteries as described in Section 4.1. Always use 2 new LR44 batteries.
6.2 Valymas
Nuvalykite dėklą su skelbimuamp šluoste ir švelniu plovikliu. Nenaudokite abrazyvinių medžiagų ar tirpiklių. Prieš naudodami įsitikinkite, kad matuoklis yra visiškai sausas.
7. Problemų sprendimas
- Nėra ekrano / silpnas ekranas: Patikrinkite baterijų įdėjimą ir įkraukite jas. Jei reikia, pakeiskite baterijas.
- "OL" or "1" on Display: Indicates an over-range condition or open circuit. Select a higher range or check connections.
- Neteisingi skaitymai: Ensure correct function selection, proper lead connection, and that the circuit is de-energized for resistance/diode tests.
- Nėra tęstinumo signalo: Check if the resistance is above 60Ω or if the function is correctly selected.
8. Specifikacijos
The following table outlines the technical specifications for the Mastech MS8233B Digital Multimeter.
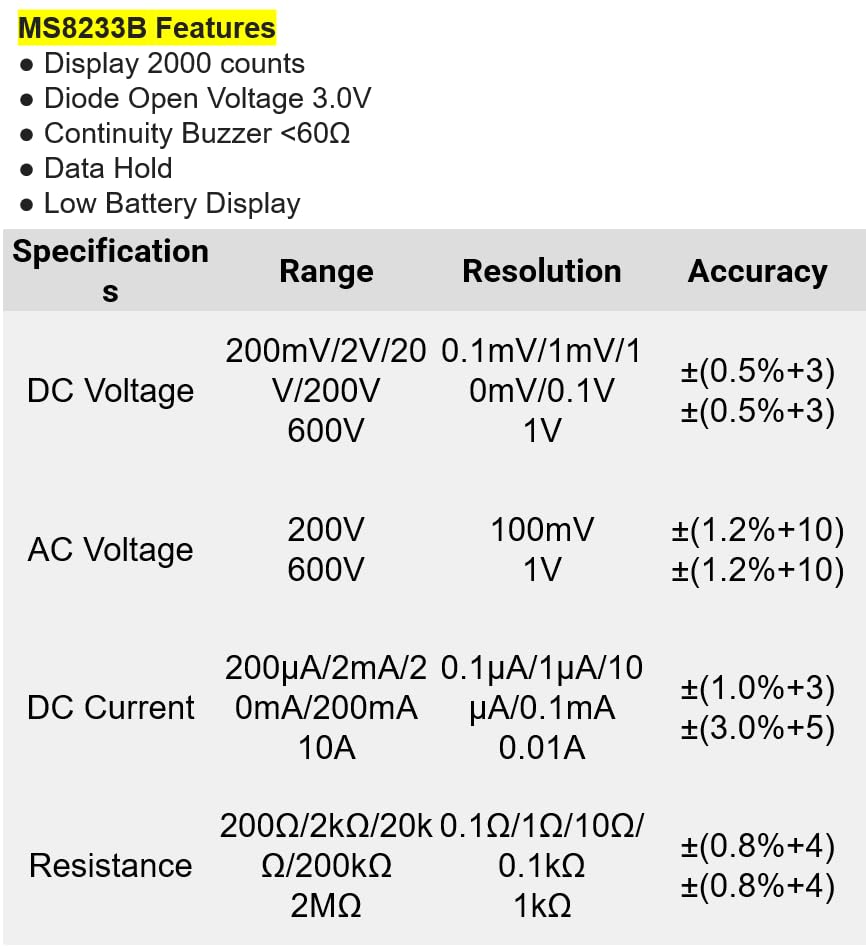
8.1 paveikslas: Detailed specifications for the Mastech MS8233B, including ranges, resolutions, and accuracies for various measurements.
| Specifikacija | Vertė |
|---|---|
| Ekranas | 2000 Skaičių |
| Diodo atvirojo tūriotage | 3.0 V |
| Tęstinumo garsinis signalas | <60Ω |
| Duomenų sulaikymas | Taip |
| Žemas akumuliatoriaus ekranas | Taip |
| DC ttage Diapazonas | 200mV, 2V, 20V, 200V, 600V |
| AC ttage Diapazonas | 200V, 600V |
| DC srovės diapazonas | 200 µA, 2 mA, 20 mA, 200 mA, 10 A |
| Atsparumo diapazonas | 200Ω, 2kΩ, 20kΩ, 200kΩ, 2MΩ |
| Saugos įvertinimas | CAT III 600V |
| Maitinimo šaltinis | 2 x LR44 Batteries (included) |
| Gaminio matmenys | 20 x 15 x 25 cm |
| Prekės svoris | 1 kilogramai |
| Gamintojas | MASTECH |
| Prekės modelio numeris | YQ-MS8233B |
| Kilmės šalis | Taivanas |

8.2 paveikslas: A comparison table showing features across various Mastech digital multimeter models, including the MS8233B.
9. Garantija ir palaikymas
For warranty information, technical support, or service inquiries, please refer to the documentation provided with your purchase or contact your retailer. Keep your purchase receipt as proof of purchase for any warranty claims.