1. Įvadas
The Mastech MS8250D is a high-performance digital multimeter designed for accurate measurement of AC/DC voltage, AC/DC current, resistance, capacitance, frequency, and temperature. It features a 6600-count display, auto/manual ranging, True RMS, Non-Contact Voltage (NCV) detection, diode and continuity testing, and a USB interface for PC connectivity. This manual provides detailed instructions for safe and effective use of the device.
Pagrindinės funkcijos:
- 6600-count digital display
- Automatic and Manual Ranging
- Tikras RMS matavimas
- Nekontaktinis ttage (NCV) aptikimas
- Diode and Continuity Tester (buzzer < 50Ω)
- MAX/MIN value recording
- Duomenų laikymo funkcija
- Ekrano foninis apšvietimas
- Automatinis išjungimas
- Santykinio matavimo režimas
- Išsikrovusio akumuliatoriaus indikatorius
- USB Interface for Windows OS
2. Saugos informacija
ĮSPĖJIMAS: To avoid electric shock or personal injury, and to avoid damage to the meter or to the equipment under test, read all safety information carefully before using the meter. This device complies with CE, RoHS, and UL safety standards.
- Visada įsitikinkite, kad bandymo laidai yra geros būklės ir tinkamai prijungti.
- Netepkite daugiau nei vardinis tūristage, kaip pažymėta ant skaitiklio, tarp gnybtų arba tarp bet kurio gnybto ir įžeminimo.
- Būkite atsargūs dirbdami su voltagesant didesnei nei 30 V AC RMS, 42 V pikinei vertei arba 60 V DC įtampai. Šie įtampų lygiaitagtai kelia šoko pavojų.
- Before measuring current, ensure the circuit is de-energized and the meter is connected in series.
- Prieš keisdami funkcijas ar diapazonus, visada atjunkite bandymo laidus nuo grandinės.
- Nenaudokite matuoklio, jei jis atrodo pažeistas arba jei korpusas yra atidarytas.
- Kad rodmenys būtų tikslūs, pakeiskite bateriją, kai tik pasirodys išsikrovusios baterijos indikatorius.
- Adhere to the specified measurement categories (CAT III 1000V / CAT IV 600V) for safe operation.
3. Produktas baigtasview
Familiarize yourself with the components of your Mastech MS8250D Digital Multimeter.

3.1 vaizdas: Priekyje view of the Mastech MS8250D Digital Multimeter, showing the display, function dial, and input jacks. The display shows "1.987 V", indicating a voltage measurement. The function dial is set to T-RMS. Input jacks are labeled for µA mA, A, VΩHz%, and COM.
Pagrindiniai komponentai:
- LCD ekranas: Rodo matavimo rodmenis, vienetus ir funkcijų indikatorius.
- Funkcinis ratukas: Used to select the desired measurement function (e.g., Voltage, Current, Resistance, Diode, Continuity, Temperature).
- Funkciniai mygtukai:
- LAIKYTI: Įšaldo dabartinį rodmenį.
- DIAPAZONAS: Switches between auto and manual ranging.
- REL: Įjungia santykinio matavimo režimą.
- MAX/MIN: Įrašo maksimalias ir minimalias vertes.
- FUNC.: Selects sub-functions within a dial position (e.g., AC/DC, Diode/Continuity).
- T-RMS: (Indicated on dial) True RMS measurement.
- NCV: Nekontaktinis ttage aptikimas.
- Foninio apšvietimo mygtukas: Activates display backlight.
- Įvesties lizdai:
- COM: Common terminal for all measurements (negative lead).
- VΩHz%: Įvestis ttage, resistance, frequency, capacitance, and diode/continuity measurements (positive lead).
- µA mA: Input for microampere ir milliampere current measurements (positive lead). Fused for protection.
- A: Įvestis, skirta ampere current measurements (positive lead). Fused for protection.
Įtraukti komponentai:
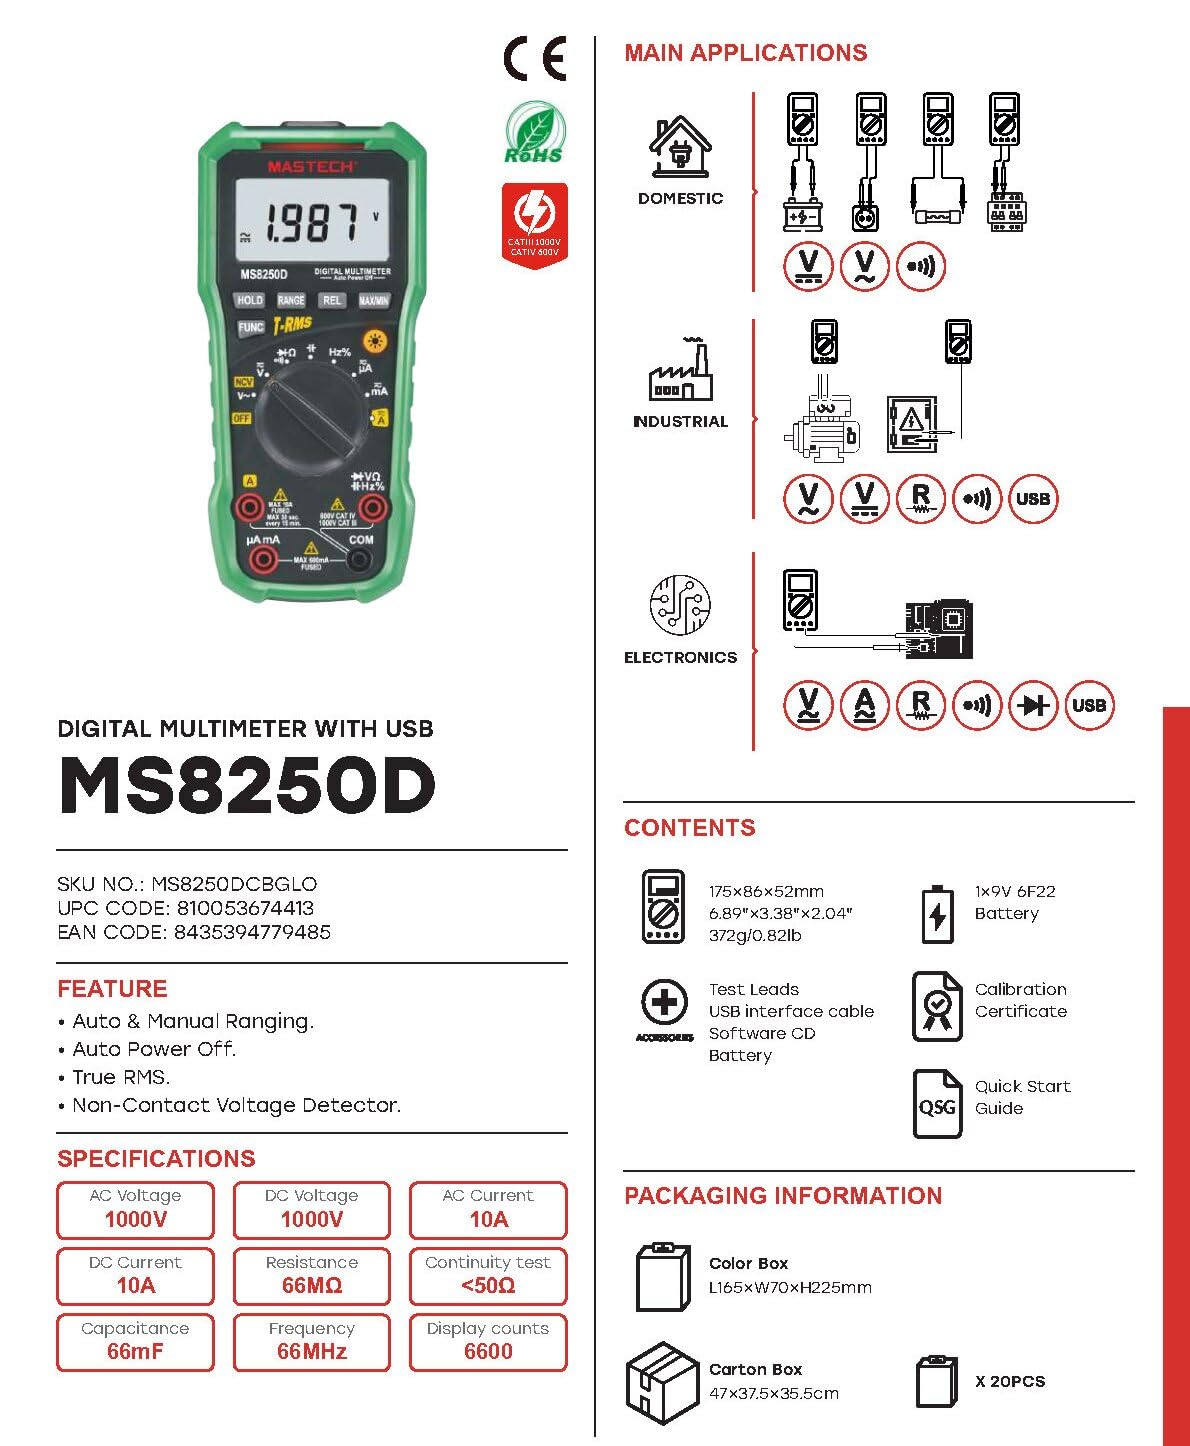
3.2 vaizdas: Diagram showing the Mastech MS8250D Multimeter and its included accessories. The image also illustrates typical applications in domestic, industrial, and electronics settings.
- Mastech MS8250D Digital Multimeter
- Bandymo laidai (raudoni ir juodi)
- 1x 9V 6F22 Battery (pre-installed or included separately)
- USB sąsajos kabelis
- Software CD (for Windows OS)
- Kalibravimo sertifikatas
- Greitas pradmenų gidas
4. Sąranka
4.1 Akumuliatoriaus įdėjimas
The MS8250D requires one 9V 6F22 battery for operation. Two LR44 batteries are also mentioned in specifications, likely for a different internal component or an error in data. For the main power, use the 9V battery.
- Įsitikinkite, kad multimetras yra IŠJUNGTAS.
- Suraskite baterijų skyriaus dangtelį matuoklio gale.
- Atsuktuvu atlaisvinkite dangtelį tvirtinantį (-čius) varžtą (-us).
- Nuimkite dangtelį.
- Connect the 9V battery to the battery clips, observing correct polarity (+ and -).
- Įdėkite bateriją į skyrių.
- Uždėkite baterijų skyriaus dangtelį ir pritvirtinkite jį varžtu (-ais).
Pastaba: The meter also uses 2 LR44 batteries, which are typically included and pre-installed for specific functions like the backlight or non-contact voltage detection. Refer to the quick-start guide for specific details on these smaller batteries if replacement is needed.
4.2 Bandymo laidų prijungimas
Always connect the black test lead to the COM jack. Connect the red test lead to the appropriate input jack based on the measurement type:
- Dėl ttage, Resistance, Capacitance, Frequency, Diode, and Continuity measurements: Connect the red lead to the VΩHz % domkratas.
- For Current measurements (µA or mA): Connect the red lead to the µA mA domkratas.
- For High Current measurements (A): Connect the red lead to the A domkratas.
Ensure the test leads are fully inserted into the jacks.
5. Naudojimo instrukcijos
5.1 Maitinimo įjungimas/išjungimas
To turn the meter ON, rotate the function dial from the "OFF" position to any desired measurement function. To turn the meter OFF, rotate the function dial back to the "OFF" position.
The meter features an Automatinis išjungimas function to conserve battery life. It will automatically power off after a period of inactivity. To disable or re-enable this feature, refer to the quick-start guide or the full user manual provided on the software CD.
5.2 Auto Ranging and Manual Ranging
The MS8250D defaults to Automatinis diapazonas, which automatically selects the best measurement range. Press the ASORTIMENTAS mygtuką, norėdami įjungti Rankinis atstumas. In manual ranging, each press of the ASORTIMENTAS button cycles through available ranges. To return to auto ranging, press and hold the ASORTIMENTAS mygtuką.
5.3 AC/DC matavimas Voltage (V)
- Nustatykite funkcijų ratuką į V~ (Kintamosios srovės tūristage) arba V- (DC ttage) padėtis.
- Prijunkite juodą bandymo laidą prie COM lizdą ir raudoną bandymo laidą prie VΩHz % domkratas.
- Prijunkite bandymo zondus prie matuojamos grandinės arba komponento.
- Perskaitykite ttage value on the display. The meter will automatically detect AC or DC if the dial is set to the combined V position, or you can use the FUNKCIJA button to toggle between AC and DC if available on your model.
5.4 Measuring AC/DC Current (A, mA, µA)
ĮSPĖJIMAS: Niekada nejunkite skaitiklio lygiagrečiai su įtampos matuokliutagMatuojant srovę, naudokite elektros šaltinį. Tai gali perdegti saugiklis arba sugadinti skaitiklį.
- IŠJUNKITE grandinės maitinimą.
- Nustatykite funkcijų ratuką į A~ (AC Current), A- (DC Current), mA~, mA-, µA~, arba µA- padėtis.
- Prijunkite juodą bandymo laidą prie COM domkratas.
- Prijunkite raudoną bandymo laidą prie A jack for high current, or µA mA jack for low current.
- Open the circuit where the current is to be measured and connect the meter in series with the load.
- Prijunkite grandinei maitinimą.
- Read the current value on the display. Use the FUNKCIJA mygtuką, jei reikia, perjungti kintamąją ir nuolatinę srovės režimus.
5.5 Varžos (Ω) matavimas
- Nustatykite funkcijų ratuką į Ω padėtis.
- Prijunkite juodą bandymo laidą prie COM lizdą ir raudoną bandymo laidą prie VΩHz % domkratas.
- Ensure the circuit or component under test is de-energized.
- Prijunkite bandymo zondus prie komponento.
- Perskaitykite pasipriešinimo vertę ekrane.
5.6 Diodų ir tęstinumo bandymai
- Nustatykite funkcijų ratuką į Diodas / tęstinumas position (often shared with resistance or capacitance).
- Prijunkite juodą bandymo laidą prie COM lizdą ir raudoną bandymo laidą prie VΩHz % domkratas.
- Naudokite FUNKCIJA button to select between Diode Test and Continuity Test.
- Diodų bandymui: Prijunkite raudoną zondą prie diodo anodo, o juodą zondą – prie katodo. Ekrane bus rodomas tiesioginis srovės stipris.tage drop (typically 0.5V to 0.8V for silicon diodes). Reversing the probes should show "OL" (Open Loop).
- Tęstinumo bandymui: Connect the probes across the circuit or component. If resistance is less than approximately 50Ω, the buzzer will sound, indicating continuity.
5.7 Measuring Capacitance (F)
- Nustatykite funkcijų ratuką į Talpa position (often shared with resistance or diode).
- Prijunkite juodą bandymo laidą prie COM lizdą ir raudoną bandymo laidą prie VΩHz % domkratas.
- Ensure the capacitor is fully discharged before testing to avoid damage to the meter.
- Prijunkite bandymo zondus prie kondensatoriaus gnybtų.
- Ekrane perskaitykite talpos vertę.
5.8 Measuring Frequency (Hz) and Duty Cycle (%)
- Nustatykite funkcijų ratuką į Hz % position (often shared with voltagir).
- Prijunkite juodą bandymo laidą prie COM lizdą ir raudoną bandymo laidą prie VΩHz % domkratas.
- Prijunkite bandymo zondus prie signalo šaltinio.
- The display will show the frequency. Press the FUNKCIJA button to toggle to Duty Cycle measurement if available.
5.9 Nekontaktinis ttage (NCV) aptikimas
- Nustatykite funkcijų ratuką į NCV padėtis.
- Hold the meter with the NCV sensor (usually at the top of the meter) near a live AC voltage šaltinis.
- Matuoklis rodys kintamosios srovės įtampos buvimątage through an audible beep and/or visual indicator (e.g., LED).
5.10 USB Interface (Windows OS)
The MS8250D includes a USB interface for connecting to a computer running Windows OS. This allows for data logging and real-time monitoring of measurements. Install the provided software from the CD and follow the on-screen instructions for driver installation and software usage.
6. Priežiūra
6.1 Valymas
Nuvalykite skaitiklio korpusą reklamaamp šluoste ir švelniu plovikliu. Nenaudokite abrazyvinių medžiagų ar tirpiklių. Prieš naudodami įsitikinkite, kad matuoklis yra visiškai sausas.
6.2 Akumuliatoriaus keitimas
When the low battery indicator appears on the display, replace the 9V battery immediately to ensure accurate readings. Follow the steps in Section 4.1 Battery Installation.
6.3 Saugiklio keitimas
If the meter fails to measure current, the fuse may be blown. Fuses are located inside the meter. To replace a fuse:
- Ensure the meter is turned OFF and all test leads are disconnected.
- Atidarykite baterijų skyriaus dangtelį (ir galbūt pagrindinį korpusą, priklausomai nuo konstrukcijos).
- Atsargiai išimkite seną saugiklį.
- Replace with a fuse of the exact same type and rating (e.g., F600mA/250V for mA/µA range, F10A/250V for A range). Refer to the meter's internal markings or the full manual for specific fuse ratings.
- Reassemble the meter, ensuring all screws are tightened.
ĮSPĖJIMAS: Never use a fuse with a different rating or bypass the fuse. This can damage the meter and pose a serious safety hazard.
7. Problemų sprendimas
| Problema | Galima priežastis | Sprendimas |
|---|---|---|
| Matuoklis neįsijungia. | Išsikrovęs akumuliatorius. | Pakeiskite 9 V akumuliatorių. |
| Rodomas užrašas „OL“ (perkrova). | Matavimas viršija pasirinktą diapazoną arba maksimalią matuoklio talpą. | Switch to a higher range (if in manual ranging) or ensure the measurement is within the meter's limits. |
| No current reading. | Blown fuse; incorrect lead connection; open circuit. | Check and replace fuse if necessary. Ensure leads are connected correctly (in series). Verify circuit continuity. |
| Netikslūs rodmenys. | Low battery; poor lead contact; external interference. | Replace battery. Ensure leads are firmly connected. Move away from strong electromagnetic fields. |
| Display shows "USB" but no PC connection. | Drivers not installed; incorrect software settings. | Install drivers from the provided CD. Refer to software manual for connection instructions. |
8. Specifikacijos
The following table details the technical specifications of the Mastech MS8250D Digital Multimeter.

8.1 vaizdas: Detailed specifications table for the Mastech MS8250D, outlining ranges, resolutions, and accuracies for various measurement functions.
| Funkcija | Diapazonas | Rezoliucija | Tikslumas |
|---|---|---|---|
| DC ttage | |||
| 660mV | 0.1mV | ± (0.8 %+3) | |
| 6.6V/66V/660V/1000V | 1mV/10mV/0.1V/1V | ± (0.5 %+5) | |
| AC ttage (tikroji RMS) | |||
| 660mV | 0.1mV | ± (1.5 %+5) | |
| 6.6V/66V | 1 mV / 10 mV | ± (1.2 %+5) | |
| 660V/1000V | 0.1V/1V | ± (1.0 %+3) | |
| DC srovė | |||
| 660 µA/6600 µA/66 mA/660 mA | 0.1µA/1µA/10µA/0.1mA | ± (1.0 %+5) | |
| 10A | 10 mA | ± (2.0 %+5) | |
| Kintamosios srovės srovė (tikroji RMS) | |||
| 660 µA/6600 µA/66 mA/660 mA | 0.1 µA/1 µA/0.01 mA/0.1 mA | ± (1.5 %+5) | |
| 10A | 10 mA | ± (3.0 %+5) | |
| Atsparumas | |||
| 660Ω / 6.6kΩ / 66kΩ / 660kΩ / 6.6MΩ | 0.1Ω / 1Ω / 10Ω / 100Ω / 1kΩ | ± (0.8 %+5) | |
| 66MΩ | 10kΩ | ± (1.5 %+5) | |
| Talpa | |||
| 6.6nF/66nF/660nF/6.6µF/66µF | 1pF/10pF/0.1nF/1nF/10nF | ± (4.0 %+5) | |
| 600 XNUMXµF | 1 XNUMXµF | ± (3.0 %+5) | |
| 6.6 mF / 66 mF | 1µF/10µF | ± (4.0 %+5) | |
| Dažnis | |||
| 66Hz/660Hz/6.6kHz/66kHz | 0.01Hz/0.1Hz/1Hz/10Hz | ± (1.5 %+5) | |
| 660kHz/6.6MHz/66MHz | 0.1 kHz / 1 kHz / 10 kHz | ± (1.5 %+5) | |
| Darbo ciklas | |||
| 0.1 % ~ 99.9 % | 0.1 % | ± (2.0 %+5) | |
Bendrosios specifikacijos:
- Ekranas: 6600 Skaičių
- Maitinimo šaltinis: 1x 9V 6F22 Battery (main power), 2x LR44 batteries (auxiliary, e.g., backlight)
- Automatinis išjungimas: Taip
- Tikrasis RMS: Taip
- Nekontaktinis ttage (NCV) Detector: Taip
- Diodo atvirojo tūriotage: 3.2 V
- Tęstinumo signalizatorius: < 50Ω
- MAX/MIN: Taip
- Duomenų sulaikymas: Taip
- Žemo akumuliatoriaus įkrovos rodymas: Taip
- Ekrano foninis apšvietimas: Taip
- USB sąsaja: Yes (Windows OS)
- Saugos įvertinimas: CAT III 1000V / CAT IV 600V
- Matavimo tikslumas: 0.4% (general, specific accuracies per function in table)
- Veiklos ttage (min.): 3.2 voltų
- Viršutinės temperatūros įvertinimas: 50 laipsniai Celsijaus
- Matmenys (P x P x A): 20 x 15 x 25 cm
- Prekės svoris: 1 kg
- Medžiaga: Akrilnitrilo butadieno stirenas (ABS)
- Spalva: Mėlyna
- Gamintojas: MASTECH
- Kilmės šalis: Taivanas
- Sertifikatai: CE, RoHS, UL
9. Garantija ir palaikymas
Mastech products are designed for reliability and durability. For specific warranty information, please refer to the warranty card included with your product or contact Mastech customer support directly. Typically, Mastech offers a limited warranty against defects in materials and workmanship.
For technical support, troubleshooting assistance, or warranty claims, please contact your authorized Mastech dealer or visit the official Mastech websvetainė kontaktinei informacijai.
ES atsarginių dalių prieinamumo trukmė: 1 metai


