1. Įvadas
This manual provides essential information for the safe and effective operation of your Mastech MS8301A Digital Multimeter. Please read this manual thoroughly before using the device to ensure proper functionality and to prevent potential hazards. Keep this manual for future reference.
2. Saugos informacija
Always adhere to the following safety precautions to avoid electric shock or personal injury, and to prevent damage to the multimeter or the equipment under test.
- Skaitykite instrukcijas: Understand all instructions and safety information before use.
- Įvertintas ttage: Netepkite daugiau nei vardinis tūristage, kaip pažymėta ant multimetro, tarp gnybtų arba tarp bet kurio gnybto ir įžeminimo.
- Bandymo laidai: Patikrinkite bandymo laidus, ar nėra pažeistos izoliacijos arba atviro metalo. Jei pažeista, pakeiskite.
- Circuit Disconnection: Atjunkite grandinės maitinimą ir iškraukite visus didelės įtampos krūvius.tage kondensatoriai prieš išbandydami varžą, tęstinumą, diodus ar talpą.
- Funkcijų pasirinkimas: Įsitikinkite, kad funkcijų jungiklis yra teisingoje padėtyje, kad būtų atliekamas matavimas.
- Įtampos grandinės: Do not measure current on a live circuit with the test leads connected in parallel.
- Veikimo aplinka: Do not operate the multimeter in explosive gas, vapor, or damp aplinkos.
- Asmeninės apsaugos priemonės: Always wear appropriate personal protective equipment, such as safety glasses, when working with electrical circuits.
- Saugos įvertinimas: This device is rated for CAT III 600V. Do not exceed this rating.
3. Produktas baigtasview
3.1 Savybės
The Mastech MS8301A Digital Multimeter offers a range of features for various electrical measurements:
- Ekranas: 2000 Skaičių
- Duomenų sulaikymas: Freezes the displayed reading for convenient recording.
- Battery Tester: For 1.5V and 9V batteries.
- Kompaktiškas dizainas: Product Size: 150mm x 74mm x 48mm (5.9" x 2.9" x 1.7")
- Lengvas: Product Weight: 220g (0.48lb)

Image: Detailed features and specifications of the Mastech MS8301A multimeter, including display count, data hold, battery test function, and physical dimensions.
3.2 Komponentai
The Mastech MS8301A package typically includes the following components:
- Mastech MS8301A Digital Multimeter Unit
- Bandymo laidai (raudoni ir juodi)
- AAA Batteries (2x1.5V)
- Calibration Certificate (if applicable)
- Greitos pradžios vadovas
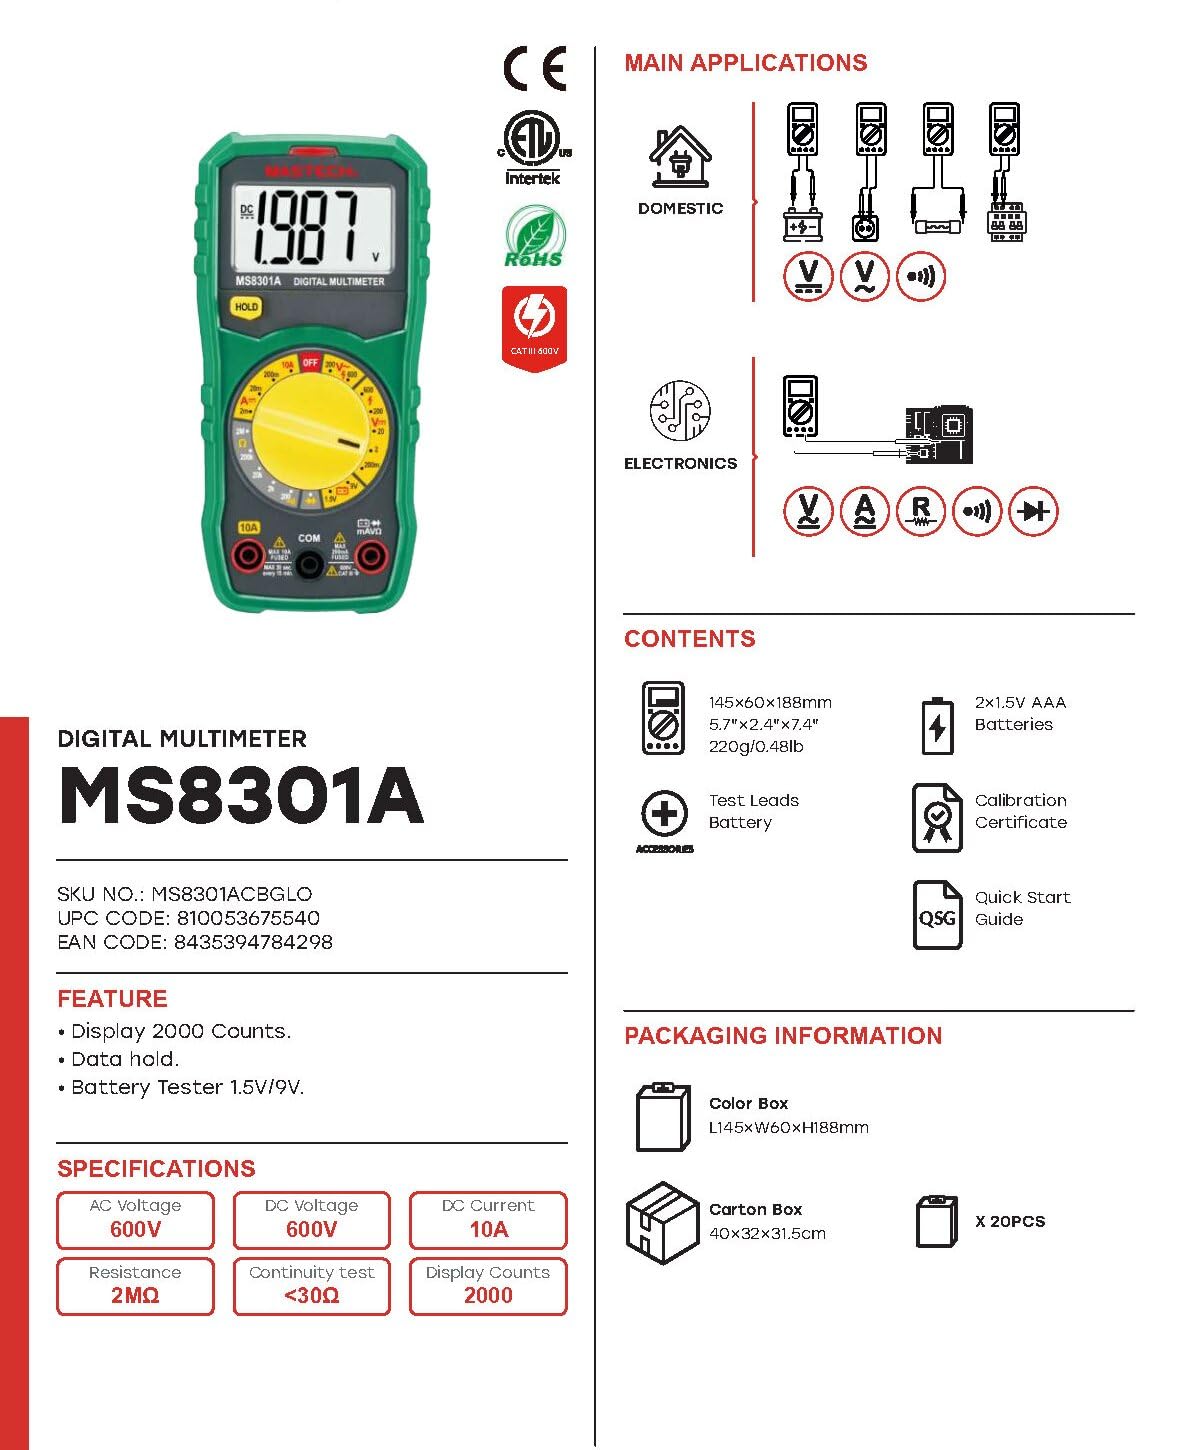
Image: The Mastech MS8301A Digital Multimeter showing its front panel, rotary switch, display, input jacks, and a list of included accessories such as test leads and batteries.
4. Sąranka
4.1 Akumuliatoriaus įdėjimas
- Įsitikinkite, kad multimetras yra išjungtas, ir atjunkite visus bandymo laidus.
- Raskite baterijų skyriaus dangtelį multimetro gale.
- Atsukite tvirtinimo varžtą (-us) ir nuimkite dangtelį.
- Įdėkite dvi 1.5 V AAA baterijas, laikydamiesi teisingo poliškumo (+ ir -), kaip nurodyta skyrelio viduje.
- Uždėkite baterijų skyriaus dangtelį ir pritvirtinkite jį varžtu (-ais).
4.2 Bandymo laidų prijungimas
Prijunkite bandymo laidus prie atitinkamų multimetro įvesties lizdų:
- Įdėkite juodas bandymo laidas į COM (įprastas) domkratas.
- Daugumai matavimų (tūr.tage, Resistance, Diode, Continuity, Temperature, Battery Test), insert the raudona bandymo laidas į VΩmA domkratas.
- For high current measurements (up to 10A), insert the raudona bandymo laidas į 10A domkratas.
5. Naudojimo instrukcijos
Prieš atlikdami bet kokį matavimą, įsitikinkite, kad bandymo laidai yra tinkamai prijungti, o sukamasis jungiklis yra nustatytas į norimą funkciją.
5.1 DC matavimas Voltage (V=)
- Nustatykite sukamąjį jungiklį į norimą padėtį V= range (e.g., 20V for measuring up to 20V DC).
- Prijunkite raudoną bandymo laidą prie teigiamos (+) grandinės pusės, o juodą bandymo laidą – prie neigiamos (-) pusės.
- Perskaitykite ttage reikšmė ekrane.
5.2 AC matavimas, ttage (V~)
- Nustatykite sukamąjį jungiklį į norimą padėtį V~ range (e.g., 200V for measuring up to 200V AC).
- Prijunkite bandymo laidus prie kintamosios srovės įtampostage šaltinis.
- Perskaitykite ttage reikšmė ekrane.
5.3 Measuring DC Current (A=)
- Svarbu: Disconnect power to the circuit before connecting the multimeter in series.
- Nustatykite sukamąjį jungiklį į norimą padėtį A= range (e.g., 200mA or 10A). Remember to move the red lead to the 10A jack for high current.
- Open the circuit where current is to be measured.
- Connect the multimeter in series with the circuit, ensuring the current flows through the multimeter.
- Įjunkite grandinę ir ekrane nuskaitykite srovės vertę.
5.4 Varžos (Ω) matavimas
- Svarbu: Prieš matuodami varžą, įsitikinkite, kad grandinėje nėra įtampos ir visi kondensatoriai yra iškrauti.
- Nustatykite sukamąjį jungiklį į norimą padėtį Ω diapazonas.
- Prijunkite bandymo laidus prie matuojamo komponento.
- Perskaitykite pasipriešinimo vertę ekrane.
5.5 Diodų bandymas (→|)
- Svarbu: Įsitikinkite, kad diodas yra atjungtas nuo grandinės.
- Pasukite sukamąjį jungiklį į padėtį Diodo testas padėtis.
- Prijunkite raudoną bandymo laidą prie diodo anodo, o juodą bandymo laidą – prie katodo. Ekrane bus rodoma tiesioginė įtampa.tage lašas.
- Apkeiskite laidus vietomis. Ekrane turėtų būti rodoma „OL“ (atvira kilpa), tai reiškia, kad diodas veikia gerai.
5.6 Tęstinumo bandymas ())))
- Svarbu: Įsitikinkite, kad grandinėje nėra įtampos.
- Pasukite sukamąjį jungiklį į padėtį Tęstinumo testas padėtis.
- Connect the test leads across the component or wire to be tested.
- If the resistance is below approximately 30Ω, the buzzer will sound, indicating continuity. The display will also show the resistance value.
5.7 Battery Test (1.5V/9V)
- Pasukite sukamąjį jungiklį į padėtį 1.5 V or 9V battery test position, corresponding to the battery type.
- Prijunkite raudoną bandymo laidą prie teigiamo (+) akumuliatoriaus gnybto, o juodą bandymo laidą – prie neigiamo (-) gnybto.
- Perskaitykite akumuliatoriaus talpątage ekrane.
5.8 Duomenų sulaikymas
Paspauskite mygtuką „HOLD“, kad sustabdytumėte dabartinį rodmenį ekrane. Paspauskite dar kartą, kad atšauktumėte laikymo funkciją ir tęstumėte tiesioginius rodmenis.
6. Specifikacijos
| Matavimas | Diapazonas | Rezoliucija |
|---|---|---|
| DC ttage | 200 mV / 2 V / 20 V / 200 V / 600 V | 100µV / 1mV / 10mV / 100mV / 1V |
| AC ttage | 200V / 600V | 100mV / 1V |
| DC srovė | 2 mA / 20 mA / 200 mA / 10 A | 1µA / 10µA / 100µA / 10mA |
| Atsparumas | 200Ω / 2kΩ / 20kΩ / 200kΩ / 2MΩ | 0.1Ω / 1Ω / 10Ω / 100Ω / 1kΩ |
| Tęstinumo testas | Buzzer sounds at <30Ω | — |
| Diodo testas | Pirmyn ttage lašas | — |
| Akumuliatoriaus testas | 1.5V / 9V | — |
Bendrosios specifikacijos
- Ekranas: 2000 Skaičių
- Maitinimas: 2 x 1.5 V AAA baterijos
- Matmenys: 150 mm x 74 mm x 48 mm (5.9 x 2.9 x 1.7 colio)
- Svoris: 220 g (0.48 svaro)
- Saugos įvertinimas: CAT III 600V
- Medžiaga: Akrilnitrilo butadieno stirenas (ABS)
- Spalva: Mėlyna

Image: A table detailing manual ranging specifications for various Mastech digital multimeters, including the MS8301A, showing display counts, safety ratings, and measurement capabilities.
7. Priežiūra
7.1 Akumuliatoriaus keitimas
When the battery low indicator appears on the display, replace the batteries immediately to ensure accurate readings. Follow the steps outlined in Section 4.1 for battery installation.
7.2 Valymas
Nuvalykite dėklą su skelbimuamp šluoste ir švelniu plovikliu. Nenaudokite abrazyvinių medžiagų ar tirpiklių. Prieš naudodami įsitikinkite, kad multimetras yra visiškai sausas.
7.3 Saugykla
If the multimeter is not used for an extended period, remove the batteries to prevent leakage and damage to the device. Store in a cool, dry place away from direct sunlight.
8. Problemų sprendimas
| Problema | Galima priežastis | Sprendimas |
|---|---|---|
| Nėra ekrano arba ekranas yra pritemdytas | Dead or low batteries; incorrect battery polarity. | Pakeiskite baterijas; patikrinkite baterijų orientaciją. |
| Rodoma „OL“ (perkrova) | Measurement exceeds selected range; open circuit. | Select a higher range; check for open circuit in the component or leads. |
| Neteisingi rodmenys | Pasirinkta neteisinga funkcija; blogas bandymo laido prijungimas; pažeisti bandymo laidai. | Verify function switch position; ensure secure lead connection; inspect and replace damaged leads. |
| Nėra tęstinumo pyptelėjimo | Open circuit; resistance too high. | Check for breaks in the circuit; ensure resistance is below 30Ω. |
9. Garantija ir palaikymas
Mastech products are designed for reliability and performance. For specific warranty information, please refer to the warranty card included with your product or contact Mastech customer support. Keep your purchase receipt as proof of purchase.
For technical support or service inquiries, please visit the official Mastech websvetainėje arba kreipkitės į jų įgaliotuosius techninės priežiūros centrus.


