1. Įvadas
This manual provides detailed instructions for the installation, operation, and maintenance of your TESmart USB 3.0 HDMI+DP+USB C KVM Switch (Model HDC403-P23). This device allows you to control up to four computers (three desktops and one USB-C laptop) from a single set of keyboard, mouse, and three monitors, supporting 4K@60Hz resolution. It integrates KVM functionality with a USB 3.0 docking station, offering enhanced connectivity and display management.
2. Saugos informacija
Please read and understand the following safety precautions before operating the device:
- Įsitikinkite, kad maitinimo adapteris yra tinkamai prijungtas ir atitinka nurodytą įtampątage.
- Saugokite įrenginį nuo vandens, drėgmės ar ekstremalių temperatūrų.
- Nedėkite ant įrenginio sunkių daiktų.
- Nebandykite patys atidaryti ar taisyti įrenginio. Visus techninės priežiūros darbus patikėkite kvalifikuotiems specialistams.
- Use only the provided power adapter and cables to prevent damage.
- Disconnect power before cleaning the device. Use a soft, dry cloth.
3. Pakuotės turinys
Patikrinkite, ar pakuotėje yra visi reikalingi daiktai:

Image: A diagram illustrating the contents of the product package, including the KVM switch, various cables, power adapter, and accessories.
- 1x TESmart 4x3 KVM Switch (Model HDC403-P23)
- 1x DC 20V maitinimo adapteris
- 2x KVM Cables (USB-B to USB-A, HDMI, DP)
- 4x HDMI laidai
- 1x DisplayPort kabelis
- 1x USB-C kabelis
- 1x Naudotojo vadovas (šis dokumentas)
- 1x IR nuotolinio valdymo pultas
- 1x USB 3.0 Type-A to Type-B Cable
- 2x Rack-Ears
4. Produktas baigtasview ir specifikacijos
4.1. Pagrindinės savybės
- 4-Port Triple Monitor KVM Switch: Manages up to four computers (3 desktops + 1 USB-C laptop) with three monitors.
- Integrated USB 3.0 Docking Station: Features 4x USB 3.0 ports (two with power delivery), 2x USB 2.0 ports, 1x LAN port, 1x 3.5mm headphone jack, and 3 HDMI outputs.
- Ultra HD 4K Visuals: Supports resolutions up to 3840x2160 (4K) @60Hz, 3440x1440@100Hz, and 2560x1440@144Hz. Compatible with 3D, HDR, HDCP, and Dolby Vision, delivering clear and authentic video.
- EDID emuliatoriai: Ensures consistent display settings across all connected computers, preventing resolution changes or window rearrangement during switching.
- MST Mode Support: For Windows laptops, a single USB-C cable can transmit audio, video, and USB data.
- Wired Network Sharing: Allows all four connected PCs to share a single wired network connection via the built-in USB Ethernet adapter.
- Multiple Switching Modes: Switch between computers using keyboard hotkeys, IR remote control, or front panel buttons.
- K&M Pass-through Mode: Ensures compatibility with various keyboard and mouse types, including wired, wireless, mechanical, and gaming peripherals.
4.2. Techninės specifikacijos
| Funkcija | Specifikacija |
|---|---|
| Modelio numeris | HDC403-P23 |
| Gaminio matmenys | 16.5 x 8.7 x 4.7 colio |
| Svoris | 6.94 svaro |
| Vaizdo įrašų įėjimai | HDMI, DisplayPort, USB-C |
| Vaizdo išvestys | 3x HDMI |
| Maksimali skiriamoji geba | 4K@60Hz (3840x2160), 3440x1440@100Hz, 2560x1440@144Hz |
| USB prievadai | 4x USB 3.0 (2 with power delivery), 2x USB 2.0 |
| Tinklo prievadas | 1x LAN (RJ45) |
| Garso prievadas | 1 x 3.5 mm ausinių lizdas |
| Veiklos ttage | 20V DC |
| Dabartinis reitingas | 5 Amps |
| Veikimo režimas | ĮJUNGTI IŠJUNGTI |
5. Sąranka ir prijungimas
5.1. Sujungimo schema
Refer to the diagram below for a visual guide on connecting your computers and monitors to the KVM switch.
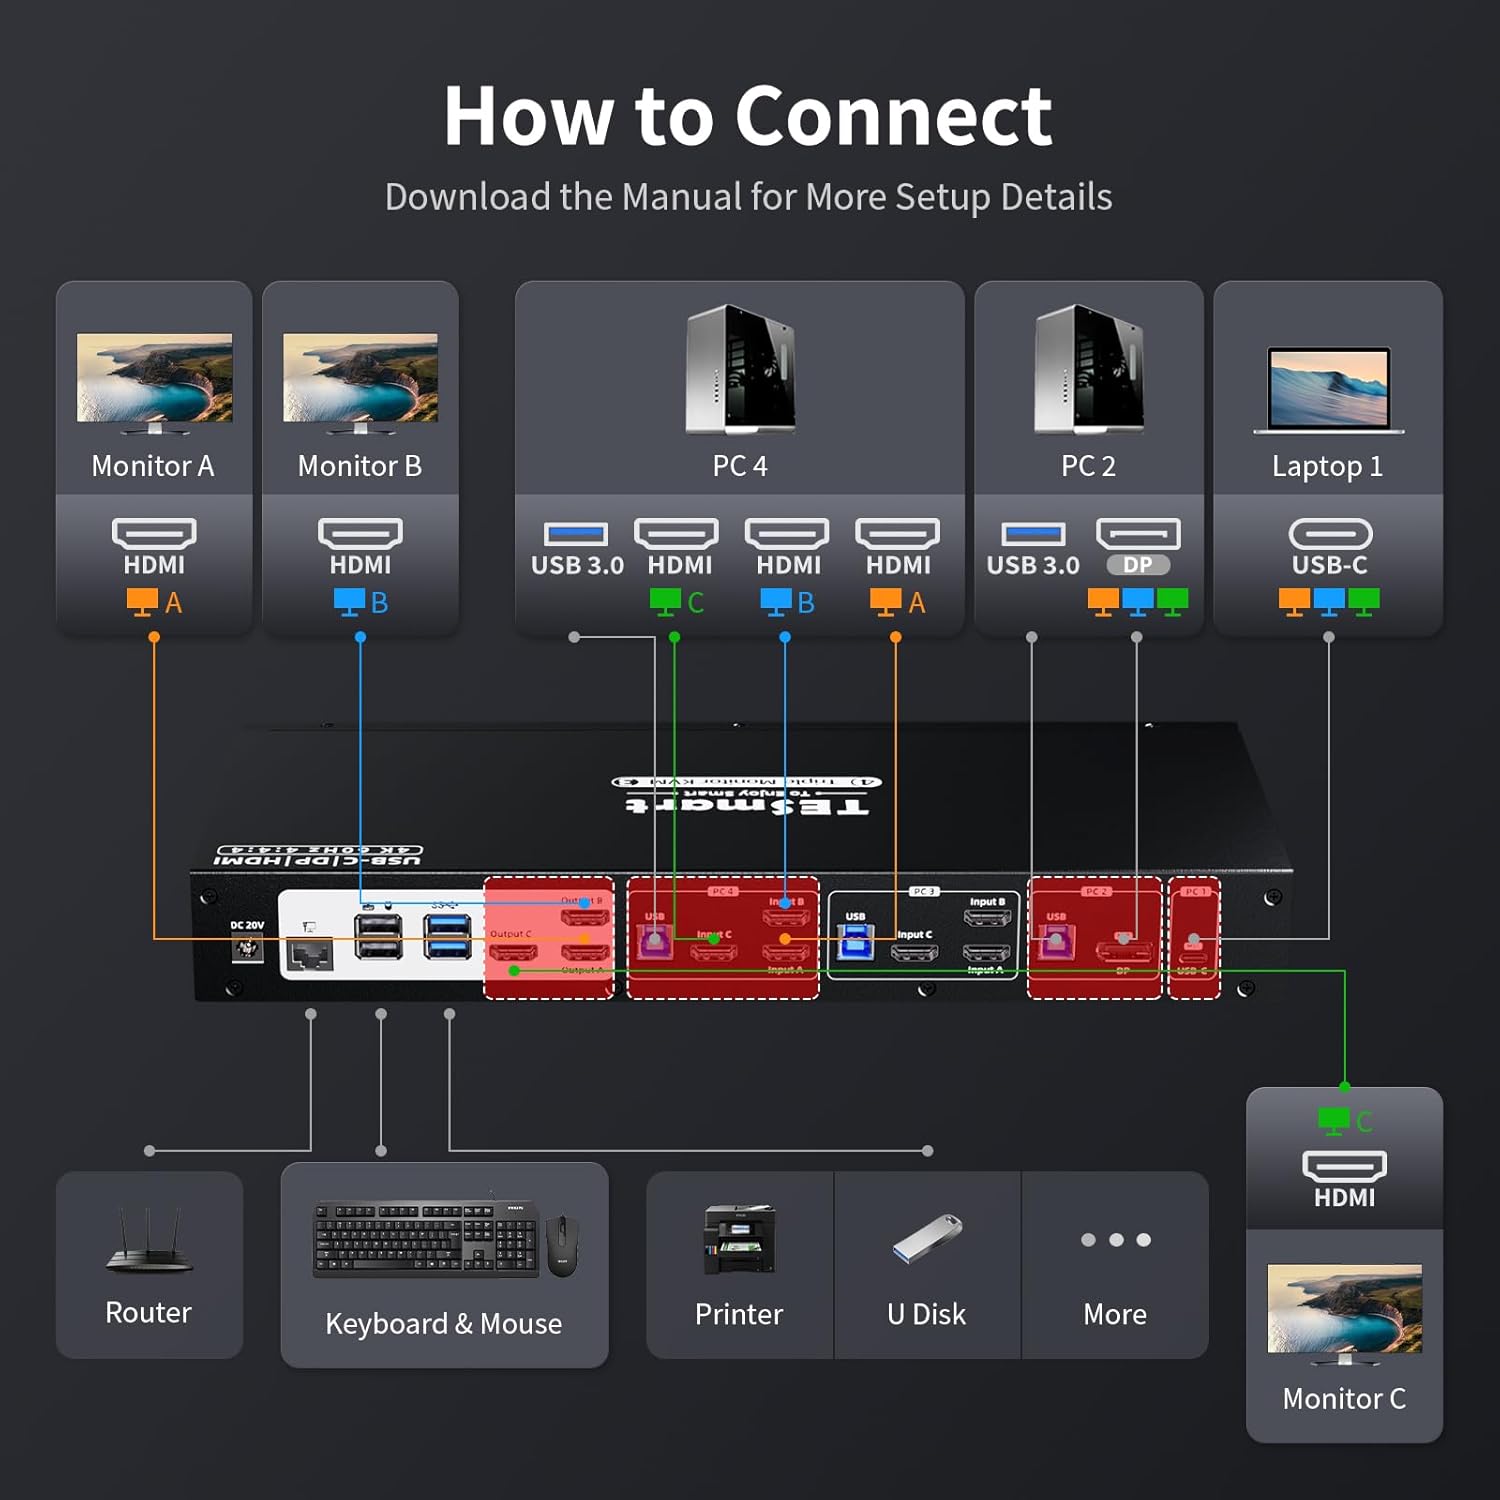
Image: A detailed diagram illustrating how to connect monitors (A, B, C) and various PCs (PC4, PC2, Laptop1) to the KVM switch, along with peripherals like keyboard, mouse, printer, and router.
5.2. Step-by-Step Connection
- Išjungimo įrenginiai: Prieš jungdami bet kokius įrenginius, įsitikinkite, kad visi kompiuteriai ir monitoriai yra išjungti.
- Monitorių prijungimas: Connect your three monitors to the KVM switch's HDMI Output A, B, and C ports using the provided HDMI cables.
- Prijunkite kompiuterius:
- For each desktop PC, connect the video outputs (HDMI, DisplayPort) and a USB 3.0 cable from the PC to the corresponding Input A, B, C, and USB ports on the KVM switch.
- For a USB-C laptop, connect a USB-C cable from the laptop to the USB-C input on the KVM switch. This single cable can handle video, audio, and USB data for Windows systems supporting MST.
- Prijunkite išorinius įrenginius:
- Prijunkite klaviatūrą ir pelę prie specialių USB 2.0 prievadų KVM komutatoriuje.
- Connect other USB devices (e.g., printer, USB drive) to the USB 3.0 ports.
- Prijunkite ausines arba garsiakalbius prie 3.5 mm garso lizdo.
- Connect an Ethernet cable from your router to the LAN port on the KVM switch to enable wired network sharing for all connected PCs.
- Maitinimas: Connect the DC 20V power adapter to the KVM switch and then plug it into a power outlet. Power on the KVM switch, followed by your monitors and computers.
5.3. EDID Emulators
The KVM switch features built-in EDID emulators. These emulators store the display information of your monitors, ensuring that your computers always receive the correct display settings. This prevents issues like resolution changes or window rearrangement when switching between inputs.

Image: A comparison showing how display settings can change without EDID emulators, and how they remain stable with EDID emulators enabled.
5.4. MST Mode and Wired Network
The KVM switch supports Multi-Stream Transport (MST) mode, particularly beneficial for Windows notebooks. With MST, a single USB-C connection to the KVM switch can transmit audio, video, and USB data, simplifying cable management.

Image: An illustration of MST mode, demonstrating how a single USB-C connection from a laptop to the KVM can manage multiple monitors.
Additionally, the integrated USB Ethernet adapter allows all connected PCs to share a single wired network connection, eliminating the need for separate network cables for each computer.

Image: A diagram showing a router connected to the KVM switch's LAN port, providing network access to all connected PCs.
6. Naudojimo instrukcijos
6.1. Perjungimas tarp kompiuterių
The KVM switch offers three methods for switching between connected computers:
- Spartieji klaviatūros klavišai: Use predefined key combinations on your connected keyboard to switch inputs. Refer to the specific hotkey commands in the full user manual for details (e.g., Right-Ctrl + Scroll Lock).
- Priekinio skydo mygtukai: Press the corresponding input button on the front panel of the KVM switch to select a computer.
- IR nuotolinis valdymas: Use the included IR remote control to switch between inputs. Ensure the remote has a clear line of sight to the KVM switch's IR receiver.

Image: Visual representation of the three switching methods: keyboard hotkeys, front panel buttons, and IR remote control.
6.2. Ekrano režimai
The KVM switch supports two primary display modes for managing your triple monitors:
- Shared Display Mode (Display Mode 1): All three monitors display content from the currently selected PC, extending the desktop across them or duplicating content as configured on the PC.
- Independent PC Views (Display Mode 2): Each monitor can display content from a different PC, allowing for a multi-computer, multi-monitor setup where you can view outputs from various sources simultaneously.

Image: Illustrations of Display Mode 1 (all monitors showing one PC) and Display Mode 2 (monitors showing different PCs).
6.3. USB 3.0 Docking Station Functionality
The integrated USB 3.0 docking station allows you to share various USB peripherals across all connected computers. This includes:
- Duomenų perdavimas: Connect USB drives, external hard drives, and other storage devices for shared access.
- Įkrovimas: Two USB 3.0 ports offer power delivery for charging devices like smartphones.
- Išoriniai įrenginiai: Connect printers, scanners, webkameros ir kiti USB priedai.

Image: A visual guide to the KVM's docking station capabilities, showing connections for phone, hard disk drive, printer, USB driver, headset, audio splitter, speaker, and microphone.
The K&M pass-through mode ensures broad compatibility with various keyboard and mouse types, including specialized gaming or mechanical keyboards, by directly passing through their signals.
7. Priežiūra
Norėdami užtikrinti KVM komutatoriaus ilgaamžiškumą ir optimalų veikimą, laikykitės šių priežiūros gairių:
- Valymas: Regularly wipe the device with a soft, dry, anti-static cloth. Avoid using liquid or aerosol cleaners, as they may damage the casing arba vidiniai komponentai.
- Vėdinimas: Įsitikinkite, kad KVM jungiklis yra gerai vėdinamoje vietoje, kad neperkaistų. Neužblokuokite jokių ventiliacijos angų.
- Kabelių valdymas: Keep cables organized and free from kinks or excessive bending to prevent signal degradation or damage.
- Maitinimo ciklas: Jei įrenginys nereaguoja, atjunkite maitinimo adapterį, palaukite kelias sekundes ir vėl jį prijunkite.
8. Problemų sprendimas
Jei kyla problemų dėl KVM jungiklio, žr. šias dažniausiai pasitaikančias problemas ir sprendimus:
| Problema | Galima priežastis / sprendimas |
|---|---|
| No display on monitors after switching. |
|
| Klaviatūra arba pelė nereaguoja. |
|
| Display resolution or arrangement changes after switching. |
|
| USB devices (e.g., external drive, printer) not detected. |
|
| Tinklo ryšio problemos. |
|
| MacBook Pro/Air second monitor not working. |
|
9. Garantija ir palaikymas
9.1. Informacija apie garantiją
The TESmart KVM Switch (Model HDC403-P23) comes with a standard 1 metų garantija, which can be extended by an additional 2 metai upon product registration, totaling a 3-year warranty period. Please refer to the warranty card included in your package or visit the official TESmart websvetainėje, kur rasite išsamias sąlygas.
9.2. Techninė pagalba
For any technical assistance, troubleshooting, or inquiries regarding your TESmart KVM switch, please contact TESmart customer support. 24/7 techninė pagalba yra pasirengusi jums padėti.
Contact information can typically be found on the TESmart official websvetainėje arba produkto pakuotėje.
10. Teisės aktų laikymasis
This device complies with relevant regulatory standards. For specific compliance details, please refer to the product packaging or the official TESmart websvetainę.


