Įvadas
This instruction manual provides detailed information on the setup, operation, and maintenance of your PlusAcc Battery Base. This portable charging dock is designed to enhance the mobility and functionality of your Echo Dot (4th and 5th Generation) and other USB-powered devices.
Suderinamumas
The PlusAcc Battery Base is compatible with:
- „Echo Dot“ 5-osios kartos
- „Echo Dot“ 4-osios kartos
- Other USB-powered devices such as smartphones, earbuds, smartwatches, and tablets via the USB-C output port.
Note: Not compatible with Echo 4th Gen (full-size Echo) or Dot Max. Please use the original Echo Dot adapter for charging the battery base.

Image: Visual guide to compatible and incompatible Echo devices with the battery base.

Image: The battery base supports various devices including Echo Dot (newest model), Dot Kids (newest model), smartphones, and earbuds.
Kas yra dėžutėje
- 1 x PlusAcc Battery Base (Model: E02-A)
- 1 x naudojimo instrukcija
Note: The Echo Dot device, power adapter, and cables are NOT included.

Image: The package includes the battery base and an instruction manual. Echo Dot, adapter, and cables are sold separately.
Sąranka
1. Installing the Echo Dot into the Battery Base
- Align the bottom of your Echo Dot with the battery base, ensuring the edges match the tabs on the base.
- Gently press down on the back of the Echo Dot until you hear a "click" sound, indicating it is securely in place.
- Double-check that the buckle is settled and the Echo Dot is firmly attached.
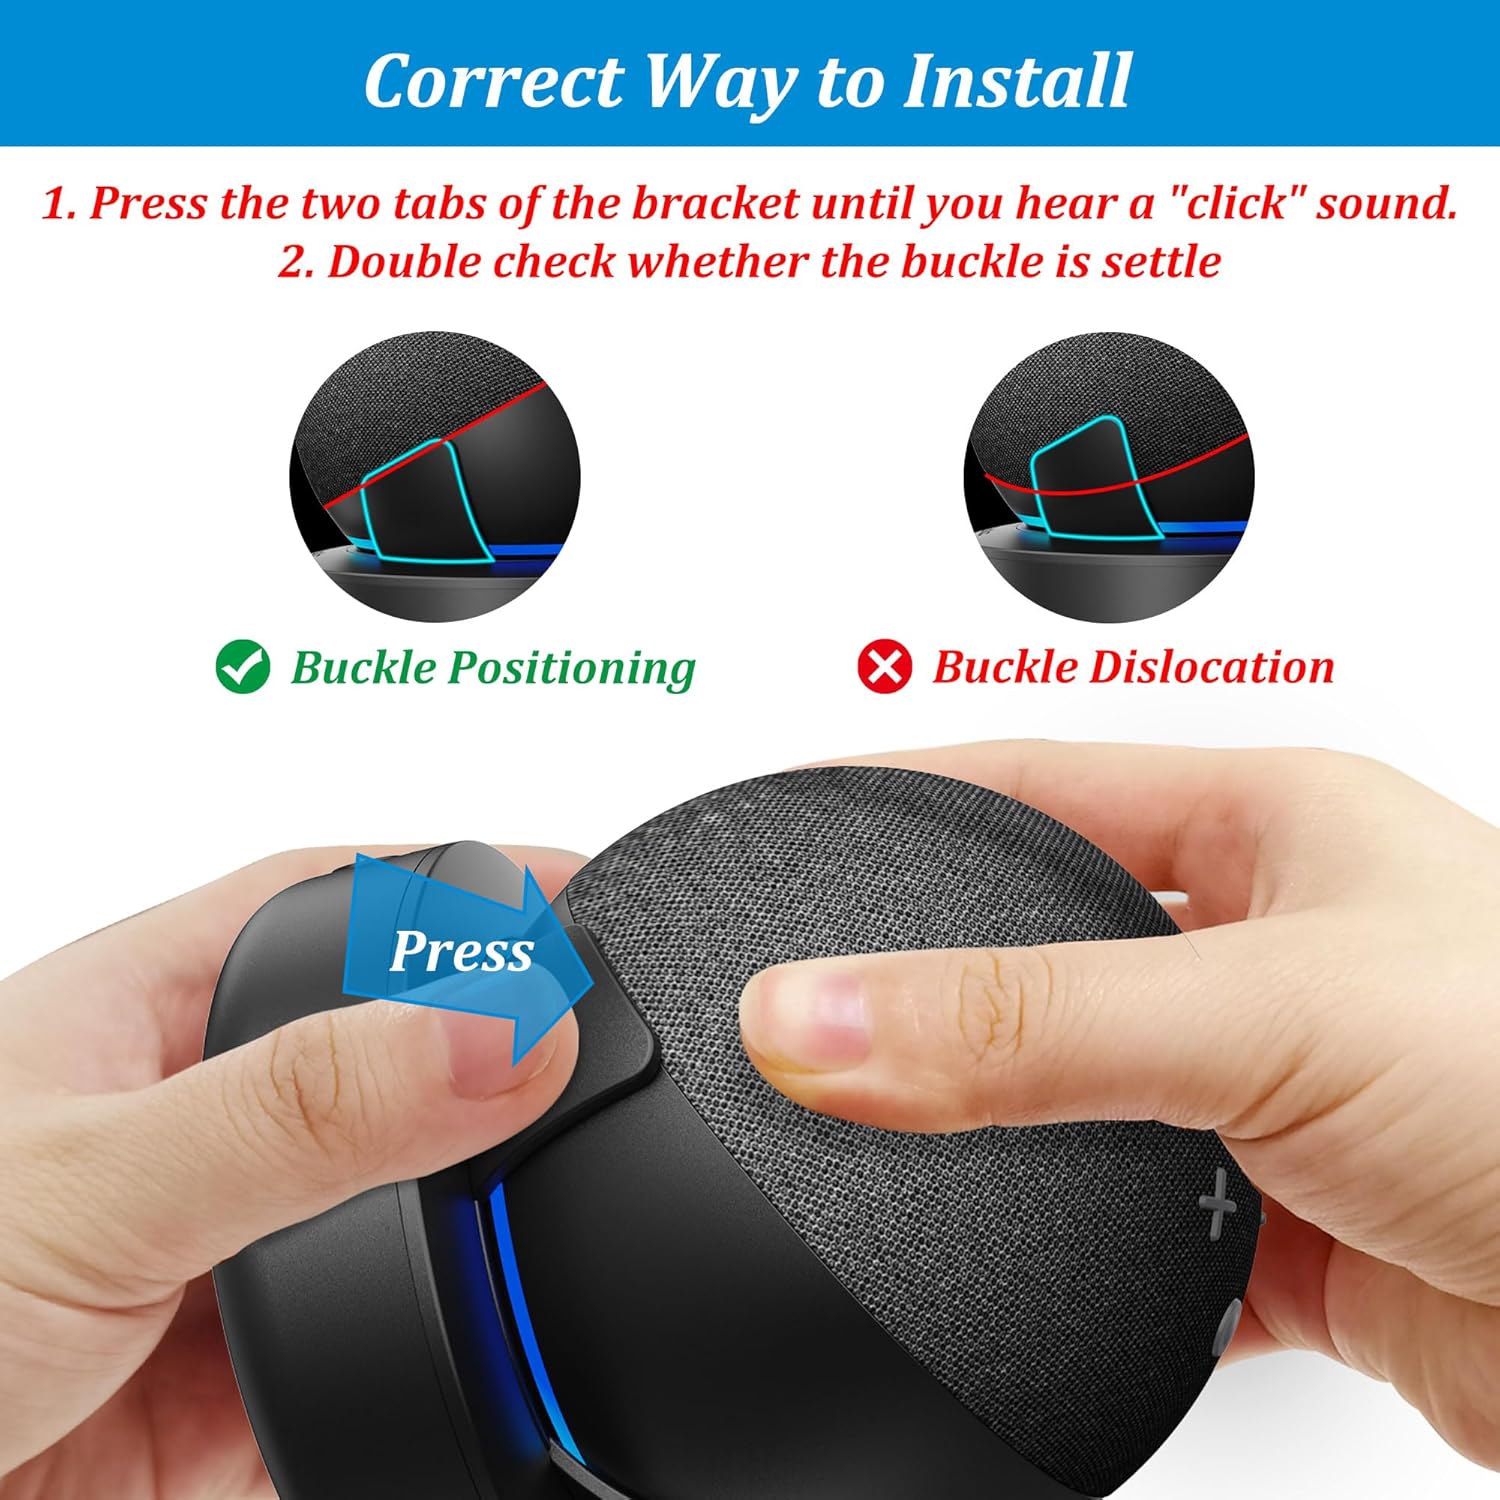
Image: Step-by-step visual guide for correctly installing the Echo Dot into the battery base, ensuring proper alignment and secure buckling.
Video: Demonstrates the process of installing the Echo Dot onto the battery base and removing it.
2. Maitinimo adapterio prijungimas
Once the Echo Dot is installed, connect its original power adapter to the input port on the back of the battery base. This will charge the internal battery of the base and power your Echo Dot.

Image: The battery base with Echo Dot is shown connected to a wall outlet using the original adapter, indicating the charging process.
3. Removing the Echo Dot from the Battery Base
To remove your Echo Dot, gently release one tab on one side of the battery base. Your Echo Dot can then be easily lifted out from the base.
Naudojimo instrukcijos
1. Įjungimas/išjungimas
Press the power button located on the front of the battery base to turn the unit on or off. The LED indicators will illuminate to show the battery status.
2. Baterijos lygio tikrinimas
The battery base features LED indicators on the front that display the current charge level. Observe the number of illuminated LEDs to gauge the remaining battery power.
3. Baterijos pagrindo įkrovimas
Connect the original Echo Dot power adapter to the input port on the battery base. The LED indicators will show charging progress. A full charge typically takes approximately 3 hours.
4. Using the USB-C Output Port
The battery base is equipped with a USB-C output port on the back, allowing you to charge other USB-powered devices such as smartphones, earbuds, or smartwatches. Simply connect your device's charging cable to this port.
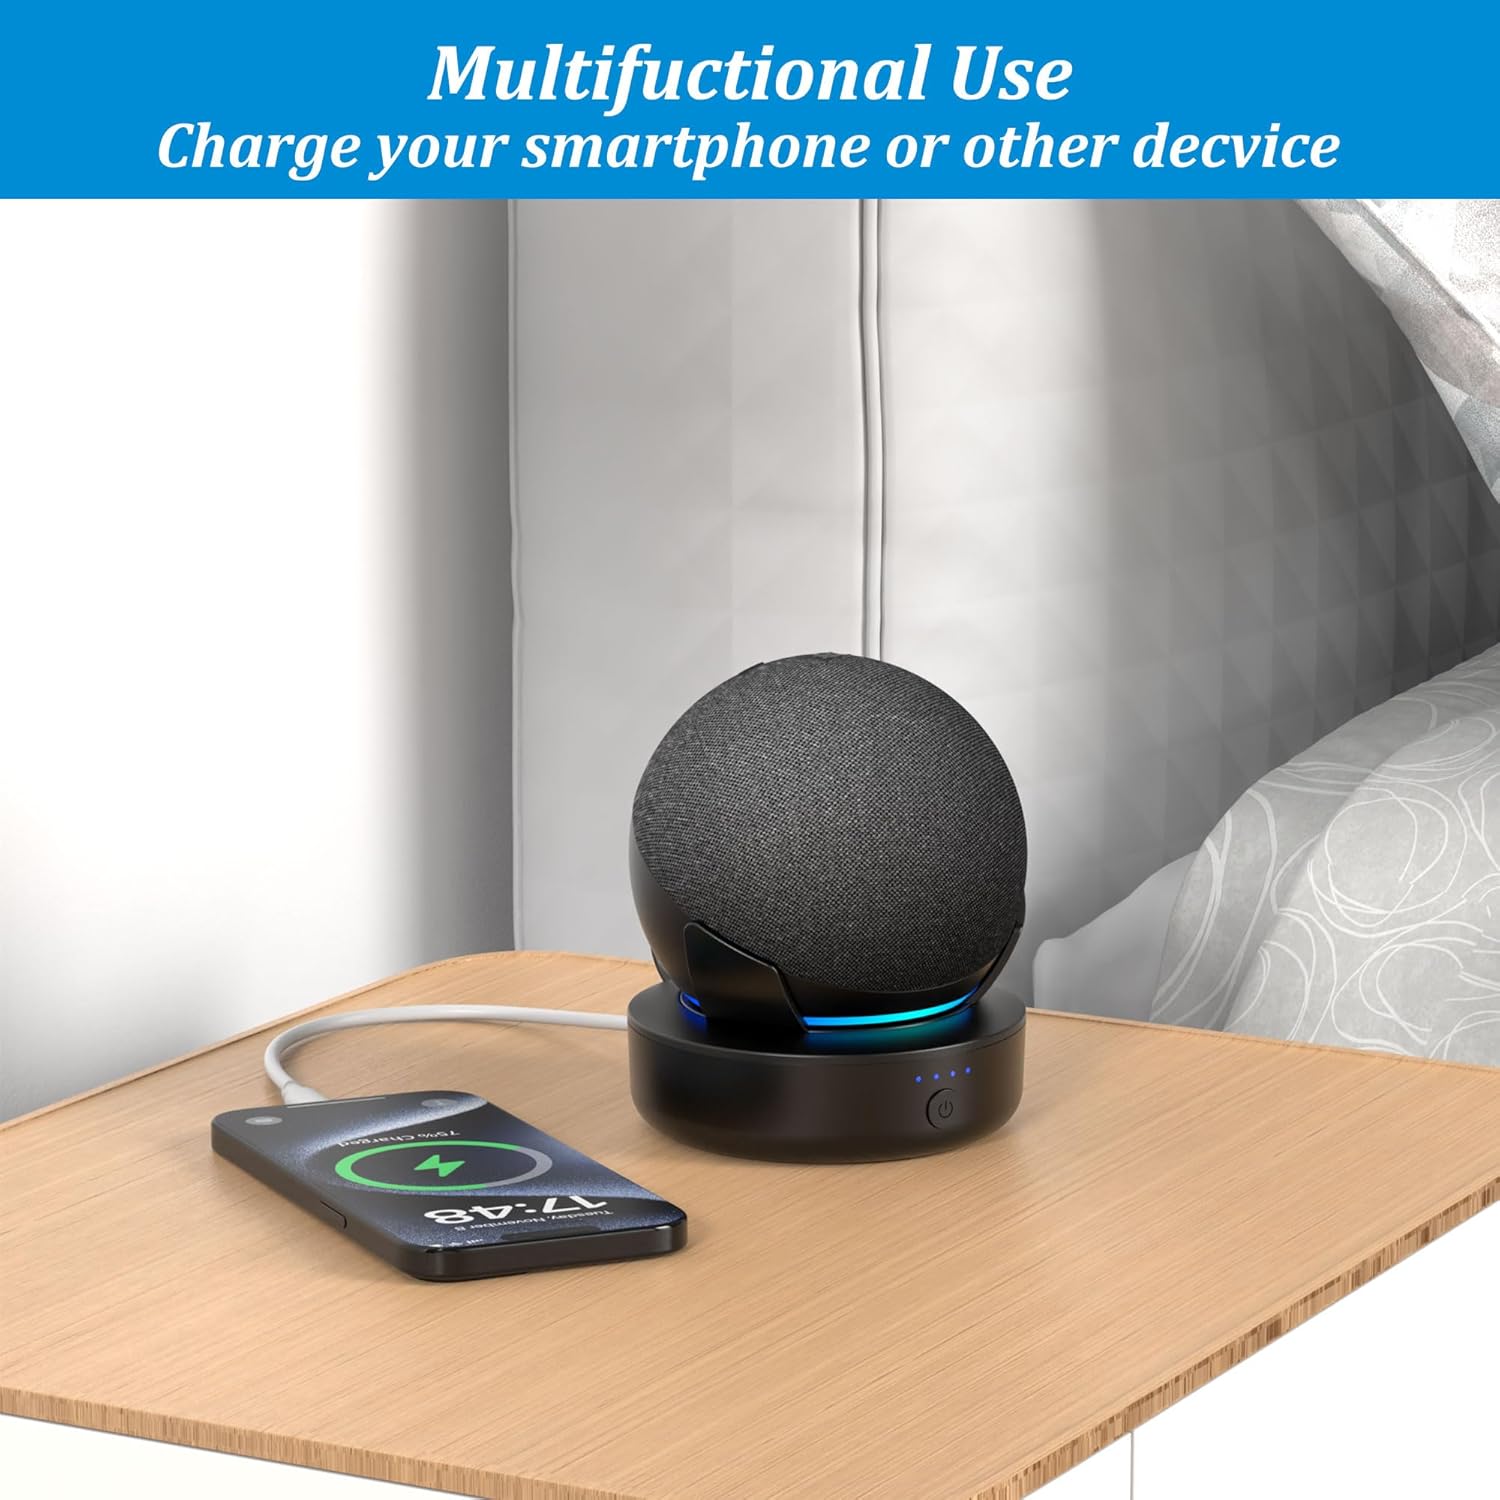
Image: The battery base is shown charging a smartphone, demonstrating its multifunctional use beyond just powering the Echo Dot.
5. Baterijos veikimo laikas
The 5000 mAh battery capacity provides:
- Up to 6 hours of portable playtime at 100% volume.
- Up to 9 hours of portable playtime at 50% volume.
- Budėjimo laikas iki 13 valandų.

Image: A visual representation of the battery base's performance, showing its 5000 mAh capacity and corresponding usage times.
Savybės
1. Enhanced Portability
The lightweight and compact design allows you to easily move your Echo Dot from room to room, or even outdoors, without being tethered to a power outlet. Enjoy your music or smart assistant anywhere in your home, patio, or garage.

Image: The battery base makes the Echo Dot portable, allowing it to be used in different locations around the house.

Image: A user carrying the Echo Dot and battery base, highlighting the ease of moving the device.
Video: Demonstrates the PlusAcc Battery Base making the Echo Dot portable for use in various indoor and outdoor settings.
Vaizdo įrašas: reklaminis vaizdo įrašasasing the portability and multi-device charging capabilities of the PlusAcc Battery Base.
2. Optimized Sound Performance
The ring sound guide design of the rechargeable station helps the Echo Dot pick up voice commands more readily and projects sound more effectively, ensuring no loss in sound quality while enhancing your listening experience.
3. Non-slip Base
The base is equipped with non-slip rubber pads on the bottom to ensure stability and safety, protecting your furniture surfaces from scratches and preventing accidental movement.
Priežiūra
- Keep the battery base clean by wiping it with a soft, dry cloth.
- Venkite įrenginio laikymo ekstremaliose temperatūrose, tiesioginiuose saulės spinduliuose ar drėgmėje.
- Nebandykite patys išardyti ar taisyti įrenginio.
Trikčių šalinimas
| problema | Galima priežastis | Sprendimas |
|---|---|---|
| Battery base not charging. | Neteisingas adapteris arba atsilaisvinęs prijungimas. | Ensure you are using the original Echo Dot adapter and that it is securely connected to both the wall outlet and the battery base. |
| Echo Dot not powering on when docked. | Echo Dot not properly installed or battery base is off/drained. | Verify the Echo Dot is securely clicked into the base. Press the power button on the base. Check if the battery base needs charging. |
| Other devices not charging via USB-C port. | Cable issue or battery base is drained. | Try a different USB-C cable. Ensure the battery base has sufficient charge. |
Specifikacijos
- Gaminio matmenys: 4.01 x 3.94 x 2.4 colio
- Prekės svoris: 9.6 uncijos
- Prekės modelio numeris: E02-A
- Baterijos tipas: 1 ličio polimero baterija (pridedama)
- Baterijos talpa: 5000 mAh
- Jungties tipas: USB Type C (output)
- Išėjimo srovė: 5 Amps
- Ypatingos savybės: Non-slip base, Travel-friendly, USB charging port
- Spalva: Juoda
Garantija ir palaikymas
For warranty information and customer support, please refer to the contact details provided on the product packaging or visit the official PlusAcc websvetainę. Išsaugokite pirkimo čekį garantiniams reikalavimams.


