1. Įvadas
This manual provides essential information for setting up, operating, maintaining, and troubleshooting your HP Pro Mini 400 G9 MFF Mini PC. Please read this manual thoroughly before using your device to ensure proper functionality and longevity.
2. Kas yra dėžutėje
Patikrinkite, ar pakuotėje yra visi daiktai:
- HP Pro Mini 400 G9 MFF Mini PC
- Maitinimo adapteris (90 W)
- HP laidinė darbalaukio 320K klaviatūra
- HP 125 laidinė pelė
- Vertical Stand (optional, may vary by region)
- Dokumentacija (greito paleidimo vadovas, garantijos informacija)
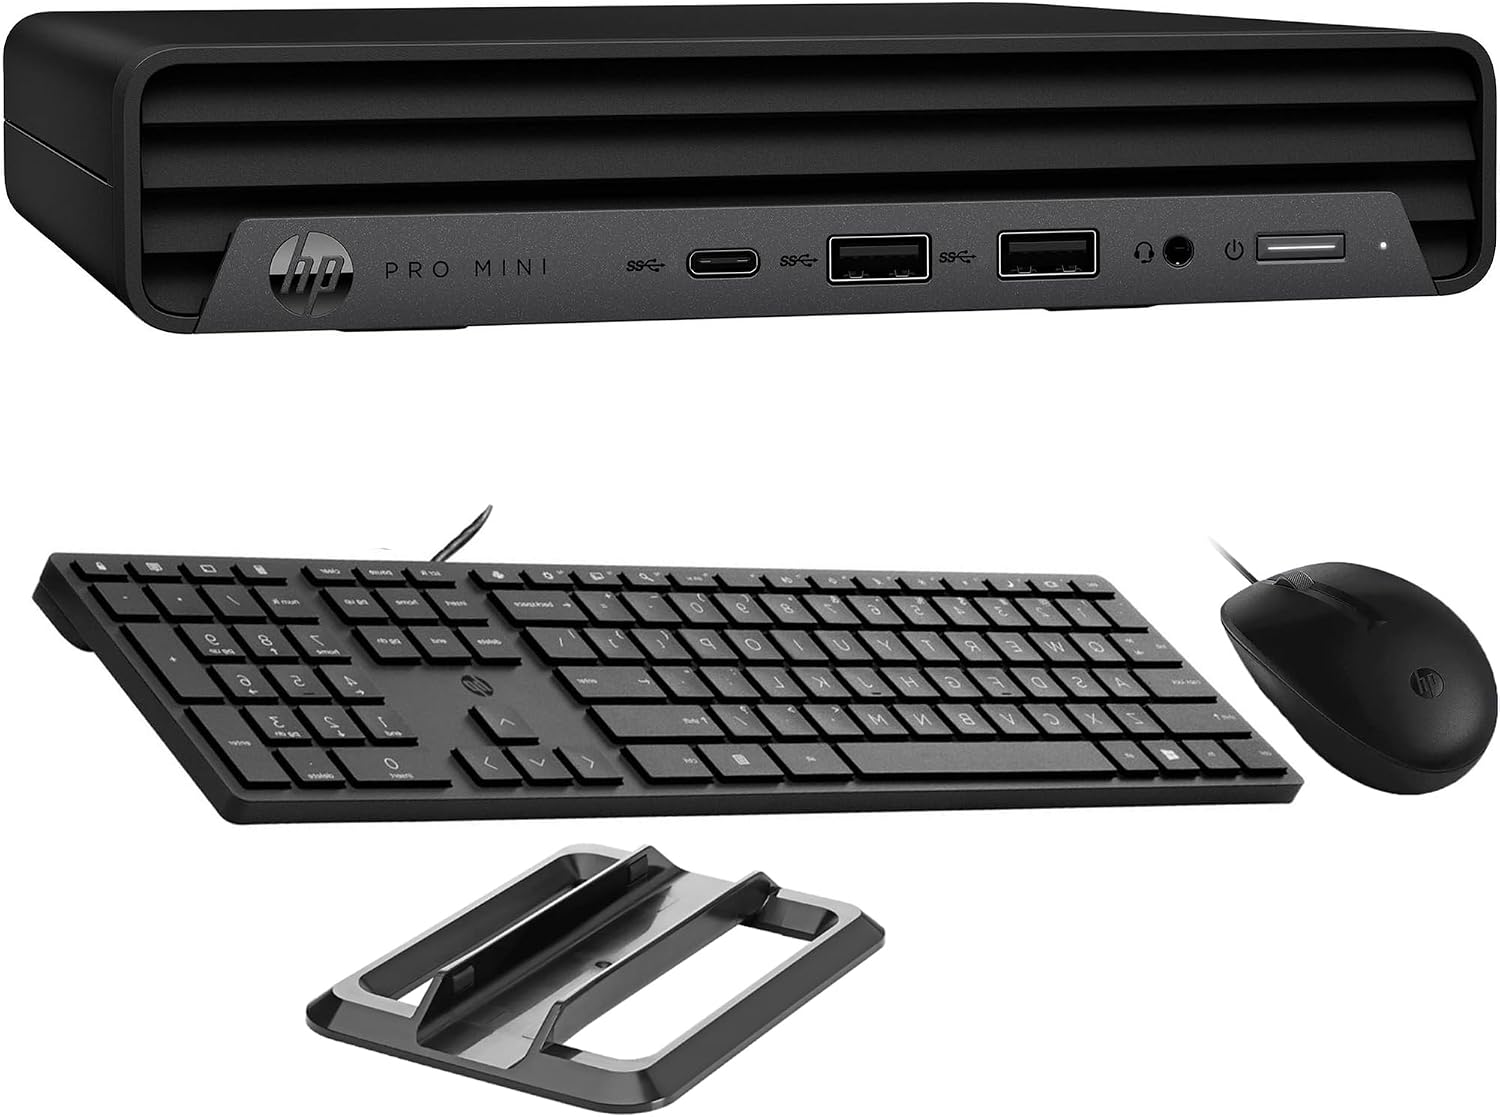
Image: HP Pro Mini 400 G9 Mini PC shown with its wired keyboard, wired mouse, and a vertical stand.
3. Fizinis viršusview
3.1 Priekinis skydelis
The front panel provides easily accessible ports for common peripherals and power control.
- Maitinimo mygtukas: To turn the PC on or off.
- Ausinių / mikrofono jungtis: Garso įvesties ir išvesties jungtims.
- SuperSpeed USB Type-A 10Gbps (Charging): For high-speed data transfer and charging devices.
- SuperSpeed USB Type-A 10Gbps: Dėl didelės spartos duomenų perdavimo.
- SuperSpeed USB Type-C 20Gbps: For ultra-high-speed data transfer and display output.

Vaizdas: priekis view of the HP Pro Mini 400 G9, highlighting the power button, USB Type-A ports, USB Type-C port, and headphone/microphone combo jack.
3.2 Galinis skydelis
The rear panel contains ports for display, network, and additional USB devices.
- Maitinimo jungtis: Jungiamas prie išorinio maitinimo adapterio.
- RJ-45 (Ethernet) Port: Laidinio tinklo ryšiui.
- SuperSpeed USB Type-A 10Gbps: Dėl didelės spartos duomenų perdavimo.
- SuperSpeed USB Type-A 5Gbps (x2): For standard data transfer.
- DisplayPort 1.4 (x2): Skirta išoriniams ekranams prijungti.
- HDMI 2.1: Skirta išoriniams ekranams prijungti.

Vaizdas: Galinis view of the HP Pro Mini 400 G9, detailing the power connector, RJ-45 Ethernet port, various USB Type-A ports, two DisplayPort 1.4 ports, and one HDMI 2.1 port.
3.3 Prievado diagrama
A comprehensive diagram illustrating all available ports on the HP Pro Mini 400 G9.
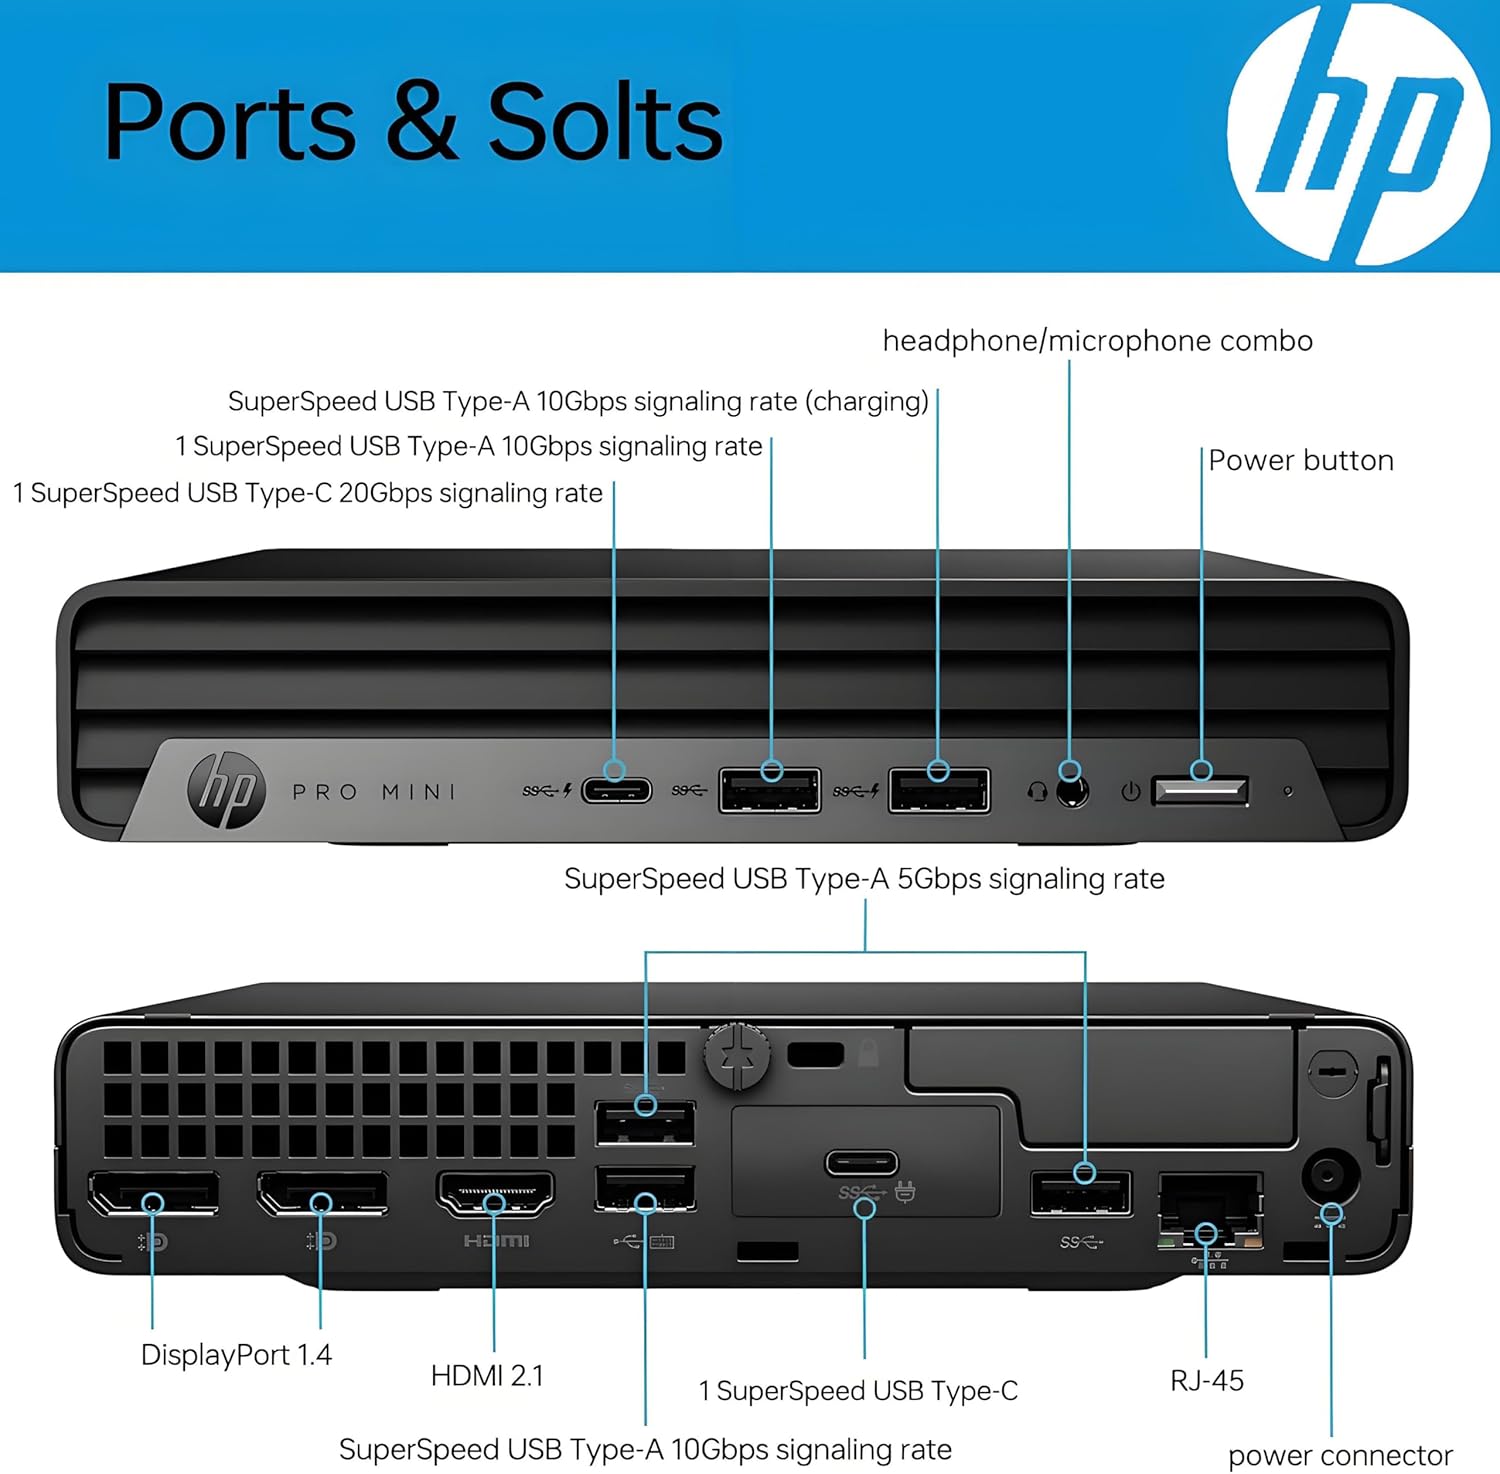
Image: Detailed diagram labeling each port on both the front and rear panels of the HP Pro Mini 400 G9 for easy identification.
3.4 Matmenys ir svoris
The HP Pro Mini 400 G9 is designed for a compact footprint.
- Matmenys (P x G x A): 6.97 x 6.89 x 1.34 colio (17.7 x 17.5 x 3.4 cm)
- Svoris: Maždaug 3.13 svaro (1.42 kg)

Image: The HP Pro Mini 400 G9 with its physical dimensions (width, depth, height) and weight clearly indicated.
4. Pradinė sąranka
Follow these steps to set up your HP Pro Mini 400 G9:
- Išpakuokite kompiuterį: Atsargiai išimkite mini kompiuterį ir visus priedus iš pakuotės.
- Prijunkite išorinius įrenginius:
- Connect the wired keyboard and mouse to any available USB Type-A ports on the front or rear panel.
- Prijunkite monitorių (-ius) prie DisplayPort arba HDMI prievadų, esančių galiniame skydelyje.
- Prisijungimas prie tinklo (neprivaloma):
- For a wired connection, connect an Ethernet cable from your router/modem to the RJ-45 port on the rear panel.
- For wireless (Wi-Fi), the PC will prompt you to connect during Windows setup.
- Prijunkite maitinimą: Connect the power adapter cable to the power connector on the rear panel of the PC, then plug the power adapter into a wall outlet.
- Pirmasis paleidimas: Press the power button on the front panel. The PC will start, and you will be guided through the Windows 11 Pro initial setup process.
5. Naudojimo instrukcijos
5.1 Maitinimo įjungimas/išjungimas
- Norėdami įjungti: Paspauskite maitinimo mygtuką priekiniame skydelyje.
- Norėdami išjungti: „Windows“ sistemoje spustelėkite mygtuką „Pradėti“, tada pasirinkite „Maitinimas“ > „Išjungti“.
- Norėdami paleisti iš naujo: „Windows“ sistemoje spustelėkite mygtuką „Pradėti“, tada pasirinkite „Maitinimas“ > „Paleisti iš naujo“.
- Miegoti: „Windows“ sistemoje spustelėkite mygtuką „Pradėti“, tada pasirinkite „Maitinimas“ > „Miego režimas“.
5.2 Prisijungimas prie belaidžio tinklo („Wi-Fi“)
- Sistemos dėkle (apatiniame dešiniajame ekrano kampe) spustelėkite „Wi-Fi“ piktogramą.
- Iš sąrašo pasirinkite norimą „Wi-Fi“ tinklą.
- Spustelėkite „Prisijungti“ ir, jei būsite paraginti, įveskite tinklo saugos raktą (slaptažodį).
5.3 Using USB and Display Ports
- USB prievadai: Connect USB devices such as external hard drives, flash drives, printers, or other peripherals. The USB Type-C port supports data transfer and can also be used for display output with an appropriate adapter (sold separately).
- Display Ports (HDMI, DisplayPort): Connect up to three external monitors simultaneously for extended desktop or mirrored display configurations.
6. Priežiūra
Regular maintenance helps ensure optimal performance and extends the life of your Mini PC.
- Valymas: Kompiuterio išorę valykite minkšta, sausa šluoste. Ventiliacijos angose susikaupusioms dulkėms valyti naudokite suslėgtą orą. Prieš valydami įsitikinkite, kad kompiuteris yra išjungtas ir atjungtas nuo elektros tinklo.
- Programinės įrangos atnaujinimai: Regularly check for and install Windows updates and HP driver updates to maintain system security and performance.
- Duomenų atsarginė kopija: Periodiškai kurkite svarbių duomenų atsargines kopijas išoriniame diske arba debesies saugykloje, kad išvengtumėte duomenų praradimo.
- Vėdinimas: Ensure the PC's vents are not obstructed to allow for proper airflow and prevent overheating.
7. Problemų sprendimas
Šiame skyriuje aptariamos dažniausiai pasitaikančios problemos, su kuriomis galite susidurti.
| Problema | Galimas sprendimas |
|---|---|
| Kompiuteris neįsijungia | Ensure the power adapter is securely connected to both the PC and a working power outlet. Test the outlet with another device. |
| Monitoriuje nėra vaizdo | Check that the monitor is powered on and the video cable (HDMI/DisplayPort) is securely connected to both the PC and the monitor. Try a different video port or cable if available. |
| Nėra interneto ryšio | For wired connection, check the Ethernet cable and router/modem status. For Wi-Fi, ensure Wi-Fi is enabled and you are connected to the correct network with the correct password. Restart your router/modem. |
| Klaviatūra arba pelė nereaguoja | Ensure the USB cables for the keyboard and mouse are securely plugged into the PC. Try different USB ports. |
| Sistema lėta arba nereaguoja | Close unnecessary applications. Check Task Manager for high resource usage. Ensure Windows and drivers are up to date. Restart the PC. |
8. Techninės specifikacijos
Key technical specifications for the HP Pro Mini 400 G9 MFF Mini PC (configuration may vary).
| Funkcija | Specifikacija |
|---|---|
| Operacinė sistema | Windows 11 Pro |
| Procesorius | Intel 6-Core i5-12500T (up to 4.20 GHz) |
| Grafika | Integruota Intel UHD Graphics 770 |
| RAM | 8 GB DDR4 RAM (plečiama) |
| Sandėliavimas | 256GB PCIe NVMe TLC SSD (M.2) |
| Belaidis ryšys | Intel AX201 Wi-Fi 6 (2x2) and Bluetooth 5.2 combo |
| Priekiniai prievadai | 1x Headphone/Microphone combo, 1x SuperSpeed USB Type-A 10Gbps (charging), 1x SuperSpeed USB Type-A 10Gbps, 1x SuperSpeed USB Type-C 20Gbps |
| Galiniai uostai | 1x Power connector, 1x RJ-45, 1x SuperSpeed USB Type-A 10Gbps, 2x SuperSpeed USB Type-A 5Gbps, 2x DisplayPort 1.4, 1x HDMI 2.1 |
| Maitinimo šaltinis | 90 W external power adapter |
| Matmenys (P x G x A) | 6.97 x 6.89 x 1.34 colio (17.7 x 17.5 x 3.4 cm) |
| Svoris | apytiksliai 3.13 svaro (1.42 kg) |
9. Garantija ir palaikymas
Your HP Pro Mini 400 G9 MFF Mini PC comes with a standard limited warranty. Please refer to the warranty documentation included in your product packaging for specific terms and conditions.
For technical support, driver downloads, and additional product information, please visit the official HP support websvetainė:
You may also find helpful resources and community forums on the HP websvetainę.