1. Įvadas
This manual provides detailed instructions for the installation, operation, and maintenance of your MAIMEIMI OBD2 Digital Speedometer. This device projects essential driving data onto your car's windshield, enhancing driving safety and convenience by keeping critical information within your line of sight. It is designed for vehicles equipped with OBDII/EUOBD interfaces manufactured after 2008.
2. Produktas baigtasview
2.1 Pagrindinės savybės
- Windshield Projection: Projects real-time data directly onto the windshield in large, clear fonts.
- Daugiafunkcinis ekranas: Shows RPM, mileage, water temperature, time, driving time, voltage, L/h (liters per hour), and L/100KM (liters per 100 kilometers).
- 4 Alarm Functions: Includes overspeeding alarm, fatigue driving alarm, speed alarm, and engine failure alarm.
- Automatinis ryškumo reguliavimas: Built-in light sensor automatically adjusts display brightness for optimal visibility day or night.
- OBDII/EUOBD Interface: Provides accurate real-time data from compatible vehicles.
2.2 Ekrano funkcijos
The MAIMEIMI OBD2 Digital Speedometer displays various parameters to keep you informed about your vehicle's status. These include speed, RPM, water temperature, voltage, and fuel consumption metrics.
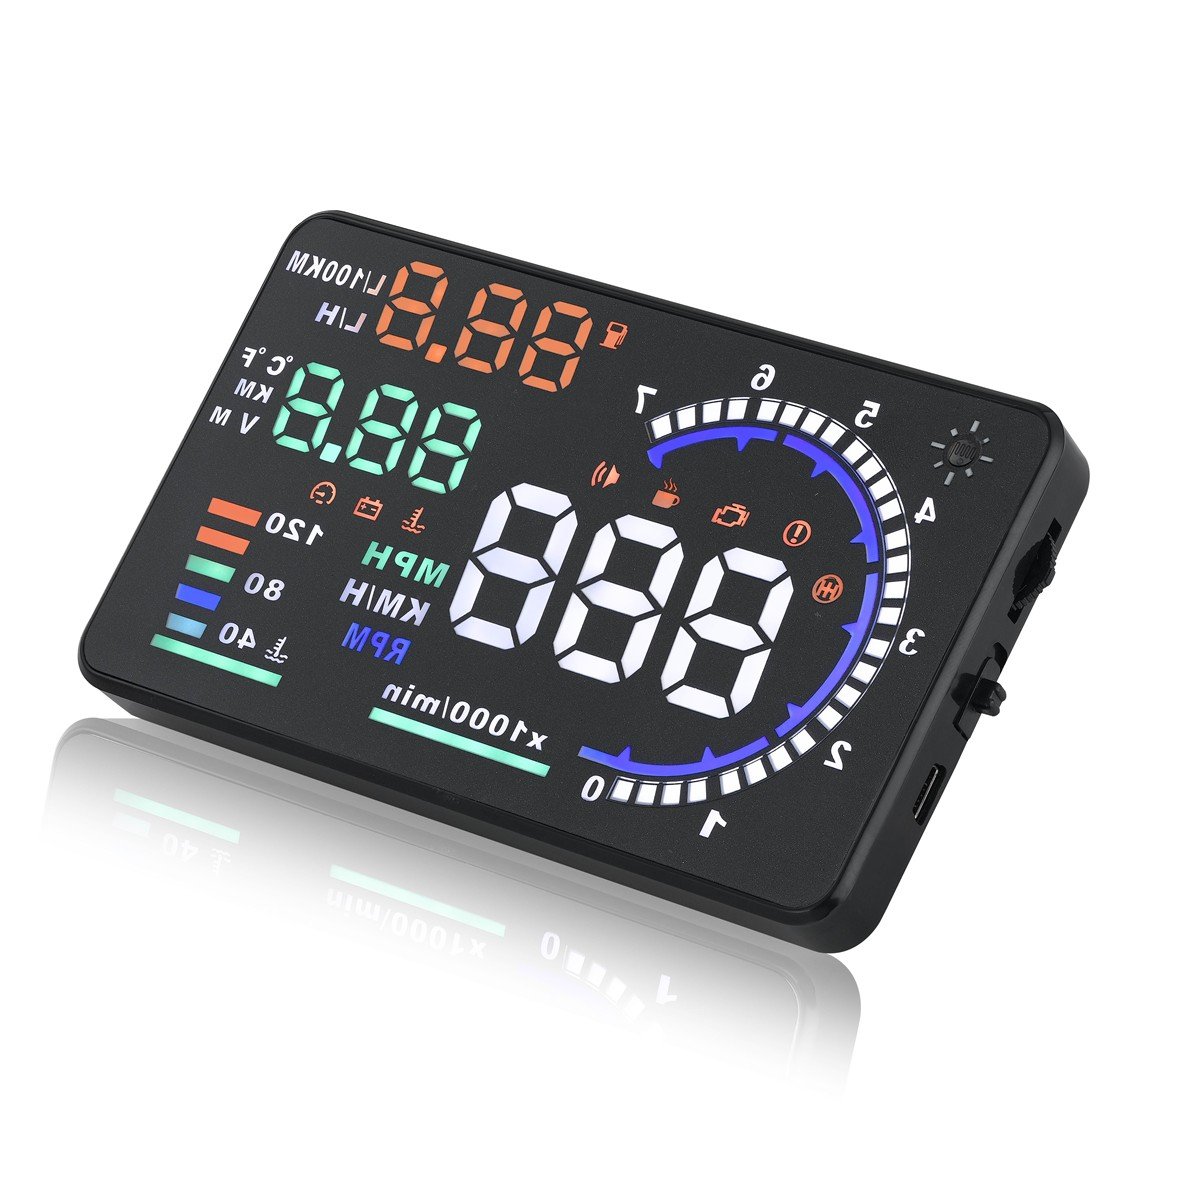
Image: Illustration of the MAIMEIMI OBD2 Digital Speedometer's projection functions, showing speed, RPM, water temperature, voltage, and fuel consumption indicators.
3. Pakuotės turinys
Prašome patikrinti, ar pakuotėje yra visi reikalingi daiktai:
- MAIMEIMI OBD2 Digital Speedometer Unit
- OBD kabelis
- Neslystantis kilimėlis
- Atspindintis filmas
- Mounting Bracket
- Vartotojo vadovas
Vaizdo įrašas: išpakavimas ir viskasview of the MAIMEIMI OBD2 Digital Speedometer, showing the unit, cables, and accessories included in the package.
4. Sąranka ir diegimas
4.1 Suderinamumo pastabos
This HUD car speedometer is compatible with most fuel and hybrid cars equipped with an OBD2/EUOBD interface, specifically those produced after 2008. It does ne support OBDI and JOBD protocols. Incompatible brands include, but are not limited to: Dodge, JEEP, Sail, Chrysler, French models, Italian models, Suzuki, Mazda 6, Infiniti (QX50, Q50, Q501), Toyota Avanza (2013 model), Lexus (IS250, EX250, ES300H), Honda (Jazz, CRV), Kia, hybrid and diesel vehicles, pickups, RVs, and vehicles with modified automotive computers.
4.2 Įrenginio diegimas
Follow these steps to install your MAIMEIMI OBD2 Digital Speedometer:
- Connect the OBD cable to the HUD unit's OBD interface.
- Route the OBD cable through a suitable seam in your vehicle's interior to conceal it.
- Plug the OBD cable into your vehicle's OBD2 interface, typically located under the dashboard near the steering wheel.
- Place the HUD unit on the dashboard using the anti-slip mat or mounting bracket, ensuring a clear view projekcijai.
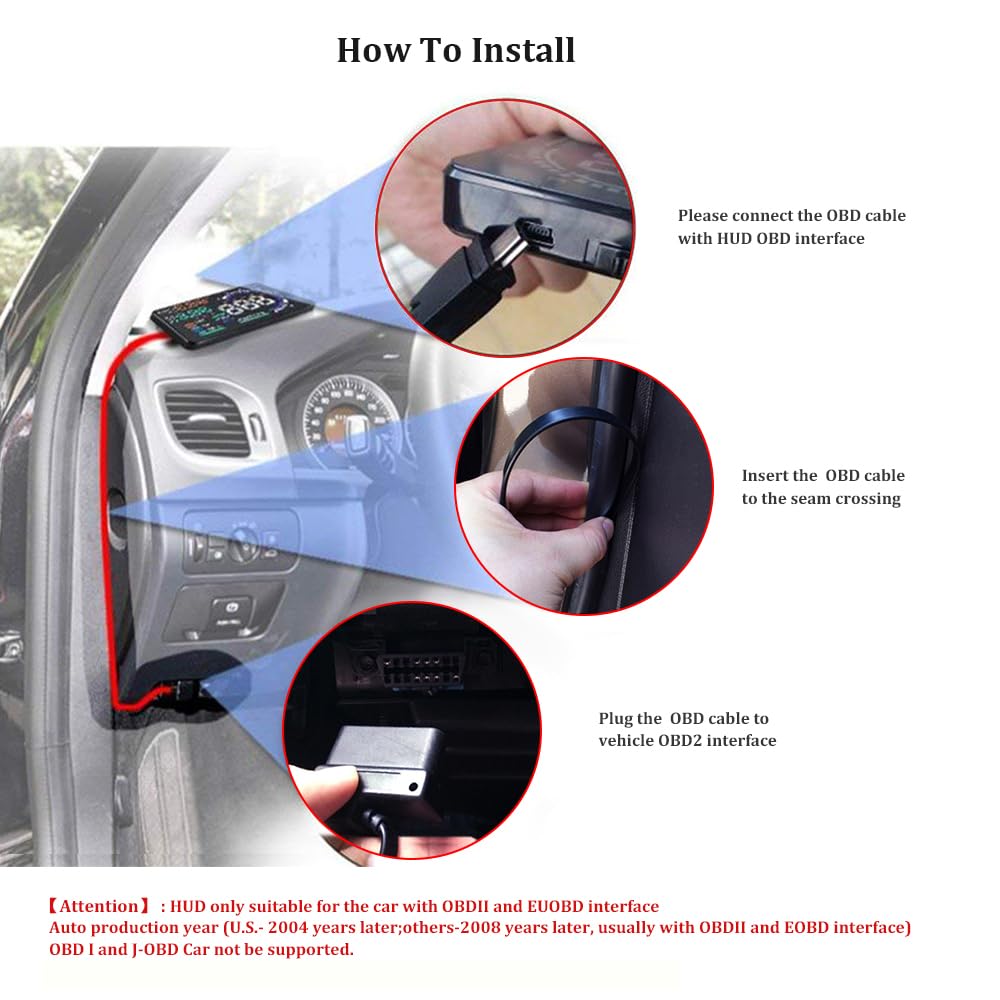
Image: Visual guide demonstrating the connection of the OBD cable to the HUD unit, routing the cable, and plugging it into the vehicle's OBD2 interface.
4.3 Reflective Film Application (Optional)
For optimal projection clarity, especially in bright conditions, apply the reflective film to your windshield:
- Clean the projection area on your windshield thoroughly.
- Tear off half of the No.1 protective film from the reflective film.
- Apply the reflective film to the cleaned projection area.
- Tear off the protective film completely; it will automatically adhere.
- Gently exhaust any air bubbles from underneath the film.
- Tear off the No. 2 protective film.

Image: Step-by-step visual instructions for applying the reflective film to the car windshield for improved HUD display visibility.
5. Naudojimo instrukcijos
5.1 Maitinimo įjungimas/išjungimas
The device will automatically power on when the vehicle starts and power off when the vehicle is turned off, provided it is correctly connected to the OBD2 port.
5.2 Ekrano režimai
The MAIMEIMI HUD offers multiple display modes to suit your preferences, showing various combinations of speed, RPM, water temperature, voltage, and driving distance.

Vaizdas: pvzamples of different display modes available on the MAIMEIMI HUD, illustrating various data layouts such as standard mode and simple mode.
5.3 Automatinis ryškumas
The built-in light sensor automatically adjusts the display brightness to ensure data is clearly visible in varying light conditions, from bright daylight to nighttime driving. Manual adjustment options are also available through the settings menu.

Image: Comparison of the HUD display's visibility during daytime and nighttime driving conditions, showcasing its automatic brightness adjustment feature.
5.4 Signalizacijos funkcijos
The device includes four critical alarm functions to enhance driving safety:
- Overspeeding Alarm: Įspėja, kai jūsų transporto priemonė viršija iš anksto nustatytą greičio apribojimą.
- Vairavimo nuovargio signalizacija: Reminds you to take a break after a prolonged period of driving.
- Greičio signalas: Notifies you if your speed deviates from a set value.
- Engine Failure Alarm: Indicates potential issues with your vehicle's engine.
Initial default alarm values are set, but you can adjust them according to your needs or local regulations.

Image: Visual representation of the four alarm functions: RPM alarm, Overspeed alarm, Engine failure alarm, and Fatigued driver reminder.
5.5 Language and System Settings
The device allows you to select your preferred language and customize various system settings, including alarm thresholds, display units, and brightness. Refer to the on-screen menu for navigation.
Video: Demonstrates the initial setup of the MAIMEIMI OBD2 Digital Speedometer, including language selection and navigating through various system settings.
6. Calibration and Adjustment
6.1 Manual Speed Correction
If you observe a discrepancy between the HUD's speed display and your car's speedometer, you can manually fine-tune the speed:
- 1 veiksmas: Confirm your speed unit is MPH. If not, enter setting mode 10 to switch the unit (refer to the user manual for entering the setting menu). Once set to MPH, proceed to Step 2.
- 2 veiksmas: Enter setting mode 0 for speed fine-tuning. The initial value is typically 107. If your car's meter reads 100 MPH and the HUD displays 105 MPH (a 5 MPH difference), you need to subtract 5 from the initial value 107, setting it to 102. The adjustment involves adding or subtracting the difference between your meter and the HUD from the initial value 107.
- 3 veiksmas: If the speed cannot be matched after the above steps, enter setting mode 16 to restore factory settings. Then, re-measure the speed and repeat the adjustment process.
- 4 veiksmas: If you encounter any issues during adjustment or the HUD does not meet expectations, please contact customer support for assistance.

Image: Detailed instructions for manually correcting the speed display on the MAIMEIMI HUD to match the vehicle's speedometer.
7. Problemų sprendimas
If you experience issues with your MAIMEIMI OBD2 Digital Speedometer, consider the following:
- Nėra ekrano / maitinimo: Ensure the OBD cable is securely connected to both the HUD unit and the vehicle's OBD2 port. Verify vehicle compatibility (OBDII/EUOBD after 2008).
- Neteisingas greičio rodmuo: Perform the manual speed correction as described in Section 6.1. Ensure the correct speed unit (MPH/KM/H) is selected in the settings.
- Pertraukiamas ekranas: Check for loose cable connections. Ensure the vehicle's OBD2 port is functioning correctly.
- Ekranas neaiškus: Adjust the brightness settings. Ensure the reflective film is applied correctly and the projection area on the windshield is clean. Avoid using polarized sunglasses, which can affect visibility.
- Alarms Not Functioning: Check alarm settings in the system menu to ensure they are enabled and thresholds are set appropriately.
- Device Freezes/Responds Slowly: Disconnect and reconnect the OBD cable to restart the device. If the issue persists, consider restoring factory settings (refer to the system settings menu).
Jei šiais veiksmais nepavyksta išspręsti nuolatinių problemų, susisiekite su klientų aptarnavimo tarnyba.
8. Specifikacijos
| Funkcija | Specifikacija |
|---|---|
| Modelio numeris | MA-A8 |
| Gamintojas | MAIMEIMI |
| Prekės svoris | 227 g |
| Gaminio matmenys (I x P x A) | 12.5 x 7.49 x 1.5 cm |
| Medžiaga | Metalas, Plastikas |
| Ekrano stilius | LED |
| Sąsaja | OBD2 / EUOBD |
| Maitinimo šaltinis | Transporto priemonės OBD prievadas |
9. Garantija ir palaikymas
For warranty information or technical support, please refer to the contact details provided with your purchase or visit the official MAIMEIMI websvetainę. Išsaugokite pirkimo čekį garantiniams reikalavimams.


