1. Įvadas
This manual provides detailed instructions for the safe and effective use of your KKnoon Digital Multimeter, specifically focusing on the FY128 model. This compact and intelligent electrical tester is designed for accurate measurements of various electrical parameters, making it suitable for professionals, educational institutions, and home users. It adheres to the safety requirements of the International Electrotechnical Safety Standard (IEC-61010) for electronic measuring instruments.
The multimeter features a 5999-count backlit LCD for clear readings, along with functions for AC/DC voltage, resistance, frequency, continuity, live wire checking, and Non-Contact Voltage (NCV) aptikimas.

1 pav.: priekis view of the KKnoon Digital Multimeter (Model FY128) showing the display and control buttons.
2. Saugos informacija
To ensure safe operation and prevent damage to the meter, please read and follow all safety instructions carefully. Improper use can result in electric shock or damage to the instrument.
- Always verify the meter's functionality before use by testing a known voltage arba srovės šaltinis.
- Neviršykite kiekvienam matavimo diapazonui nurodytų didžiausių įvesties verčių.
- Ensure test leads are in good condition, free from cracks or damaged insulation, before connecting them to any circuit.
- Never use the meter if it appears damaged or if the casing yra atidarytas.
- Būkite ypač atsargūs dirbdami su ttagesant didesnei nei 30 V AC RMS, 42 V pikinei vertei arba 60 V DC įtampai. Šie įtampų lygiaitagtai kelia šoko pavojų.
- Remove test leads from the circuit before changing functions or ranges.
- Kad užtikrintumėte tikslius rodmenis, nedelsdami pakeiskite baterijas, kai pasirodys išsikrovusių baterijų indikatorius.
- Nenaudokite matuoklio sprogiose dujų, garų ar dulkėtose aplinkose.
3. Produkto ypatybės
The KKnoon Digital Multimeter offers a range of features designed for convenience and accuracy:
- Daugiafunkciškumas: Priemonės AC/DC Voltage, Resistance, Frequency, Continuity, Live Wire Checking, and NCV (Non-Contact Voltagir).
- Two Measurement Modes:
- Auto Identification: Automatically detects and measures AC/DC voltage, frequency, resistance, and continuity.
- Rankinis perjungimas: Allows selection of specific functions including AC/DC voltage, frequency, resistance, continuity, diode, capacitance (FY129C only), and LIVE NCV.
- Duomenų sulaikymas: Lock the current measurement reading on the display with a single button press.
- Didelis LCD ekranas: Provides clear and easy-to-read values with a 5999-count resolution.
- Flashlight & Screen Backlight: Pagerina matomumą prasto apšvietimo sąlygomis.
- Compact Design with Bracket: Portable and includes a built-in support bracket for hands-free operation.
- Saugos laikymasis: Designed and produced according to IEC-61010 safety standards.

Figure 2: The multimeter's large LCD display clearly shows various measurement functions.

Figure 3: The integrated support bracket allows for convenient hands-free use.
4. Pakuotės turinys
Atidarę pakuotę, patikrinkite, ar yra visi toliau išvardyti daiktai ir ar jie yra geros būklės:
- 1 x KKnoon Digital Multimeter (Model FY128)
- 1 x bandymo laidų pora (raudona ir juoda)
- 1 x Naudotojo vadovas (anglų kalba)
5. Sąranka
5.1 Akumuliatoriaus įdėjimas
Multimetrui reikalingos 2 x 1.5 V AAA baterijos (nepridedamos). Norėdami įdėti arba pakeisti baterijas:
- Įsitikinkite, kad multimetras yra išjungtas, o bandymo laidai atjungti.
- Suraskite baterijų skyriaus dangtelį įrenginio gale.
- Atsuktuvu atidarykite akumuliatoriaus skyrių.
- Įdėkite dvi 1.5 V AAA baterijas, laikydamiesi teisingo poliškumo (+/-), kaip nurodyta skyriaus viduje.
- Uždėkite akumuliatoriaus skyriaus dangtelį ir pritvirtinkite jį varžtu.
5.2 Bandymo laidų prijungimas
The multimeter comes with a pair of test leads (red and black). Connect them as follows:
- Įkiškite juodą bandymo laidą į „COM“ (bendrosios) įvesties lizdą.
- Insert the red test lead into the 'INPUT' jack for most measurements (Voltage, Resistance, Frequency, Continuity, Diode, Capacitance).

Figure 4: Labeled diagram of the multimeter's functions and input jacks.
6. Naudojimo instrukcijos
6.1 Maitinimo įjungimas/išjungimas
Paspauskite raudoną maitinimo mygtuką (Įjungimo mygtukas) to turn the multimeter on or off. The device features an auto-shutdown function to conserve battery life after a period of inactivity.
6.2 Matavimo režimai
The multimeter offers two primary measurement modes:

Figure 5: The multimeter supports both auto identification and manual switching modes.
- Auto Identification Mode: When powered on, the meter defaults to auto identification. In this mode, it automatically detects and measures AC/DC voltage, frequency, resistance, and continuity. Simply connect the test leads to the circuit, and the meter will display the relevant measurement.
- Rankinis perjungimo režimas: To access specific functions not covered by auto identification or to manually select a range, press the 'NCV/LIVE' button (or other function buttons if available on your specific model, e.g., FY129C for Diode/Capacitance). This allows you to cycle through AC/DC voltage, frequency, resistance, continuity, LIVE, and NCV.
6.3 AC/DC matavimas Voltage
- Connect the black test lead to the 'COM' jack and the red test lead to the 'INPUT' jack.
- If in auto identification mode, the meter will automatically detect voltage. If in manual mode, select the appropriate AC or DC voltage funkcija.
- Prijunkite bandymo laidus lygiagrečiai prie matuojamo komponento arba grandinės.
- Perskaitykite ttage reikšmė LCD ekrane.
6.4 Atsparumo matavimas
- Prieš matuodami varžą, įsitikinkite, kad grandinė yra atjungta nuo įtampos.
- Connect the black test lead to 'COM' and the red test lead to 'INPUT'.
- If in auto identification mode, the meter will automatically detect resistance. If in manual mode, select the resistance function (Ω).
- Connect the test leads across the component whose resistance you wish to measure.
- Nuskaitykite varžos vertę LCD ekrane.
6.5 Matavimo dažnis
- Connect the black test lead to 'COM' and the red test lead to 'INPUT'.
- If in auto identification mode, the meter will automatically detect frequency. If in manual mode, select the frequency function (Hz).
- Connect the test leads to the circuit where frequency is to be measured.
- Skaitykite dažnio reikšmę LCD ekrane.
6.6 Tęstinumo testas
- Įsitikinkite, kad grandinėje nėra įtampos.
- Connect the black test lead to 'COM' and the red test lead to 'INPUT'.
- If in auto identification mode, the meter will automatically detect continuity. If in manual mode, select the continuity function (★)).
- Touch the test leads to the two points of the circuit or component you want to test.
- A continuous beep indicates a low resistance path (continuity). The display will show the resistance value.
6.7 Fazės srovės laidų tikrinimas
This function helps identify live AC wires.
- Connect the black test lead to 'COM' and the red test lead to 'INPUT'.
- Press the 'NCV/LIVE' button until 'LIVE' is indicated on the display.
- Insert the red test lead into the socket or touch it to the wire you suspect is live.
- The meter will beep and the display will indicate 'LIVE' if a live wire is detected.
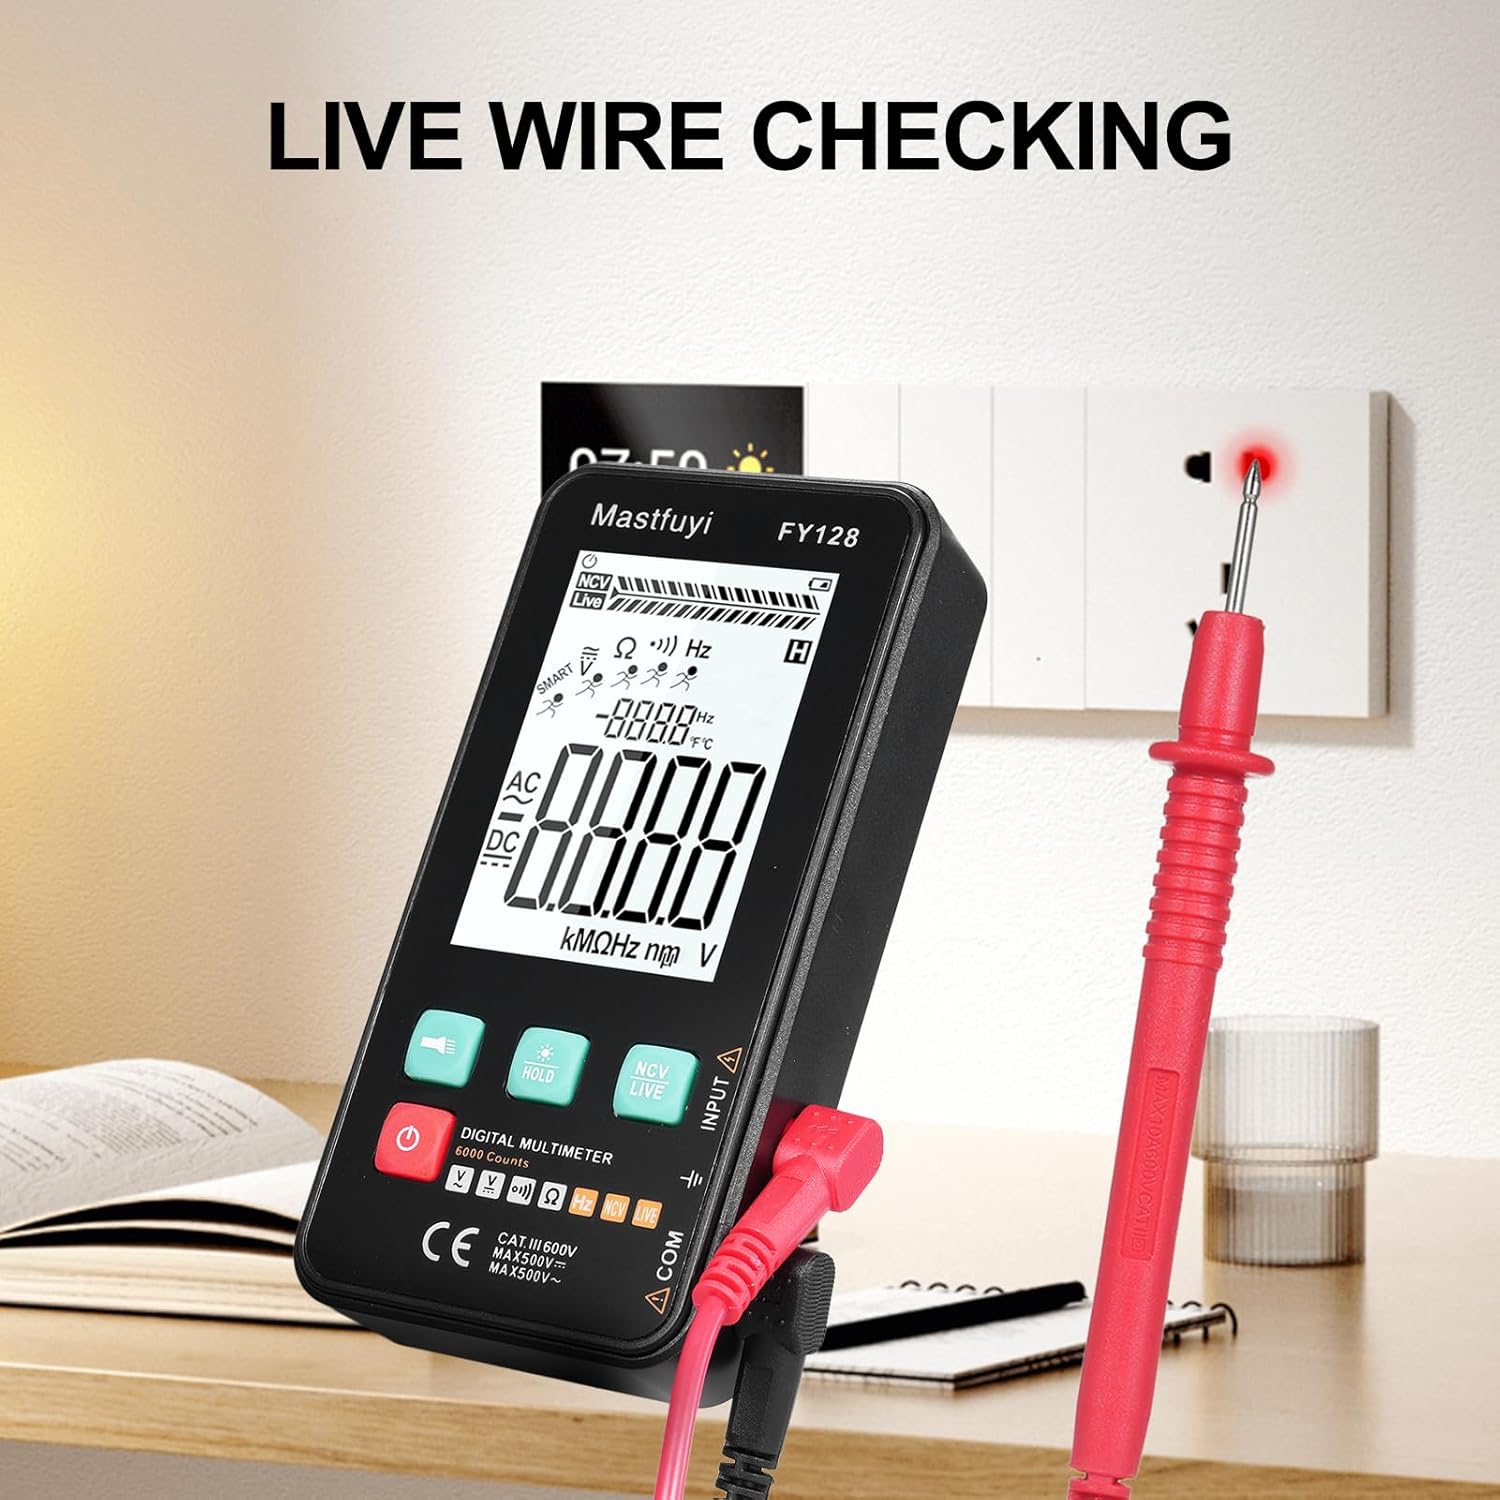
Figure 6: Using the multimeter for live wire detection.
6.8 NCV (bekontaktis tūrinistage) Testas
NCV funkcija leidžia aptikti kintamosios srovės tūrįtage be tiesioginio kontakto.
- Press the 'NCV/LIVE' button until 'NCV' is indicated on the display.
- Bring the top front part of the multimeter close to the wire or electrical outlet.
- The meter will beep and the NCV indicator on the display will illuminate or increase in intensity as it detects AC voltage.

7 pav.: Bekontaktis tūristage (NCV) detection in progress.
6.9 Duomenų sulaikymo funkcija
To freeze the current reading on the display, press the 'HOLD' button. Press it again to release the hold and resume live measurements.
6.10 Žibintuvėlis ir foninis apšvietimas
Press the flashlight button (🔦) to turn on the built-in flashlight. Long press the 'HOLD' button to activate the screen backlight for improved visibility in dark environments.
7. Priežiūra
7.1 Akumuliatoriaus keitimas
When the low battery indicator appears on the display, replace the batteries as described in Section 5.1. Always use new 1.5V AAA batteries.
7.2 Valymas
Norėdami išvalyti multimetrą, nuvalykite korpusą drėgnu skudurėliu.amp šluoste ir švelniu plovikliu. Nenaudokite abrazyvinių medžiagų ar tirpiklių. Prieš naudodami įsitikinkite, kad prietaisas yra visiškai sausas.
7.3 Saugykla
If the multimeter is not used for an extended period, remove the batteries to prevent leakage and corrosion. Store the device in a cool, dry place, away from direct sunlight and extreme temperatures.
8. Problemų sprendimas
Jei kyla problemų dėl multimetro, žr. šias dažniausiai pasitaikančias problemas ir sprendimus:
| Problema | Galima priežastis | Sprendimas |
|---|---|---|
| Nėra ekrano arba ekranas yra pritemdytas | Žemas arba išsikrovusios baterijos; neteisingas baterijų įdėjimas | Pakeiskite baterijas; patikrinkite baterijų poliškumą |
| Netikslūs rodmenys | Low batteries; Damaged test leads; Incorrect function selected | Replace batteries; Inspect/replace test leads; Select correct measurement function |
| Tęstinumo bandymas nepypsi | Open circuit; High resistance; Incorrect function | Ensure circuit is closed; Check for breaks; Select continuity function |
| Matuoklis nereaguoja | Frozen display (Data Hold); Internal fault | Press 'HOLD' button to release; Contact customer support if issue persists |
9. Specifikacijos
The following specifications apply to the KKnoon Digital Multimeter Model FY128 (and FY128C, unless specified for FY129C):
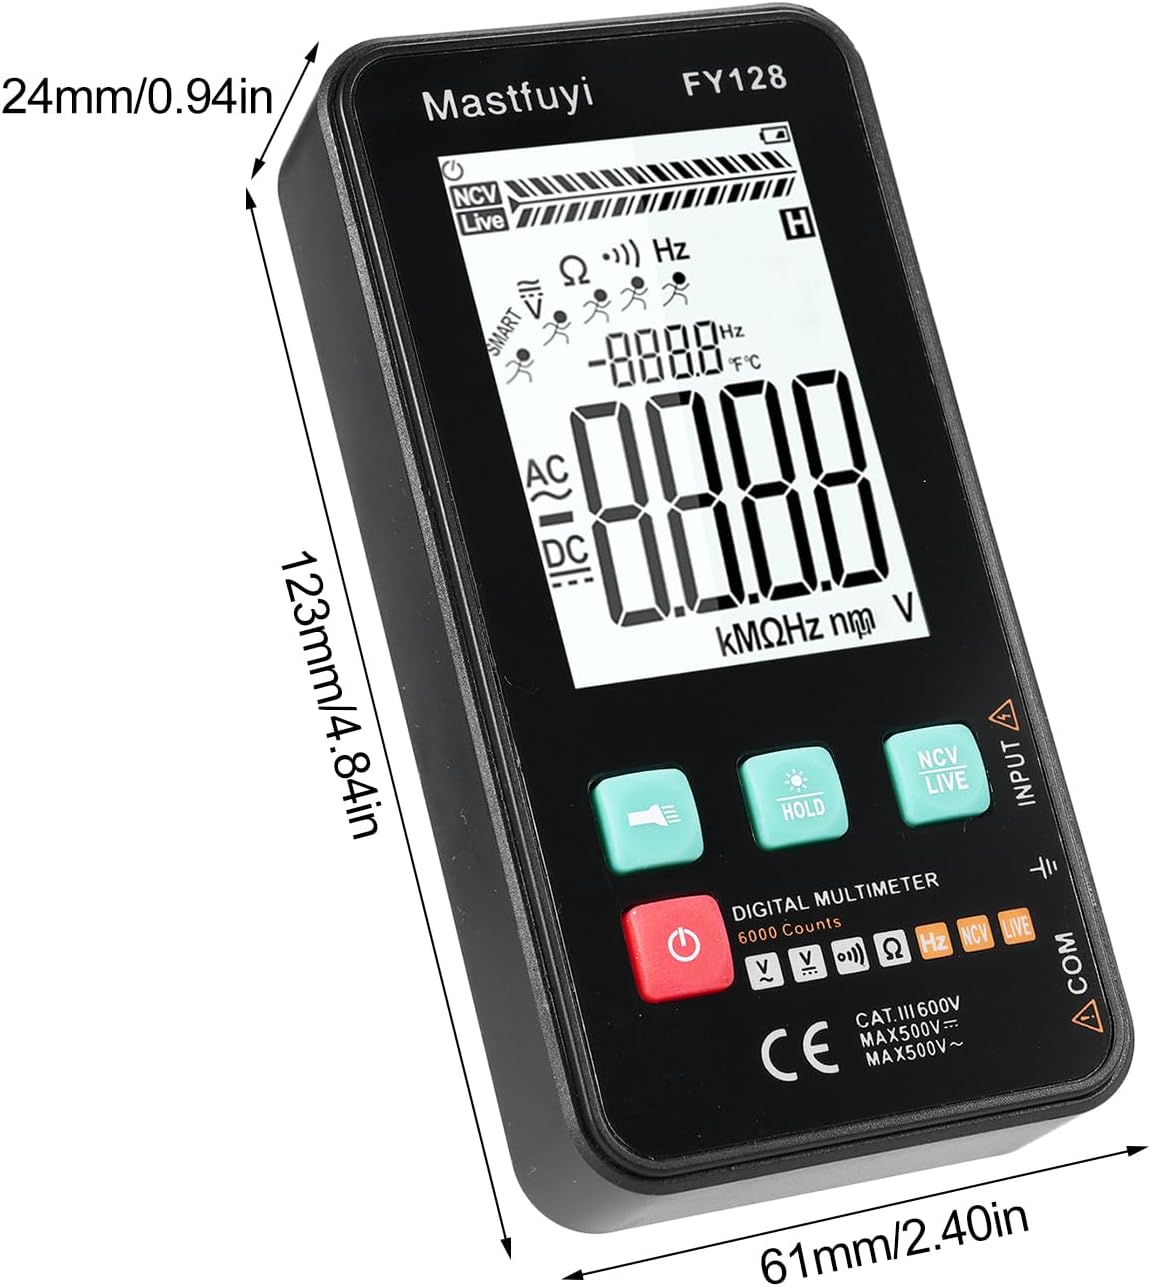
Figure 8: Physical dimensions of the KKnoon Digital Multimeter.
| Parametras | Specification (FY128/FY128C) | Specification (FY129C - if different) |
|---|---|---|
| AC ttage | 1V~500V, ±(1.5%+3) | 0.8V~500V, ±(1.5%+5) |
| DC ttage | 0.5V~500V, ±(1.2%+5) | 0.8V~500V, ±(1.2%+5) |
| Atsparumas | 30Ω~10000KΩ, ±(2%+5) | 30Ω~60000KΩ, ±(2%+5) |
| Dažnis | 40Hz~1000Hz, ±(2.5%+5) | 10Hz~6000Hz, ±(2.5%+5) |
| Talpa | N/A | 6nf~60000µf, ±(2.5%+5) |
| Temperatūra | N/A | -20℃~1000℃, ±(5%+4) |
| Aplinkos temperatūra | N/A | 0℃ ~ 70℃ |
| Diodas | Nr | Taip |
| Tęstinumas | Taip | Taip |
| NCV | Taip | Taip |
| Live Wire Checking | Taip | Taip |
| Automatinis išjungimas | Taip | Taip |
| Maitinimo šaltinis | 2 * 1.5V AAA batteries (Not included) | 2 * 1.5V AAA batteries (Not included) |
| Prekės dydis | 123 * 61 * 24 mm / 4.84 * 2.40 * 0.94 colio | 123 * 61 * 24 mm / 4.84 * 2.40 * 0.94 colio |
| Prekės svoris | 113 g / 3.98 uncijos | 113 g / 3.98 uncijos |
10. Garantija ir palaikymas
For warranty information or technical support, please refer to the product packaging or contact your retailer. Keep your purchase receipt as proof of purchase. For general inquiries, you may visit the KKnoon brand page on Amazon.
