1. Įvadas
This manual provides detailed instructions for the safe and effective use of your Zoom H1 XLR Handy Recorder. The H1 XLR is a portable audio recording device designed for musicians, podcasters, filmmakers, and content creators, featuring 32-bit float recording technology and versatile input options. Please read this manual thoroughly before operating the device to ensure proper functionality and to prevent damage.
2. Produktas baigtasview
2.1. Komponentai ir valdikliai
Familiarize yourself with the various parts and controls of your H1 XLR recorder.

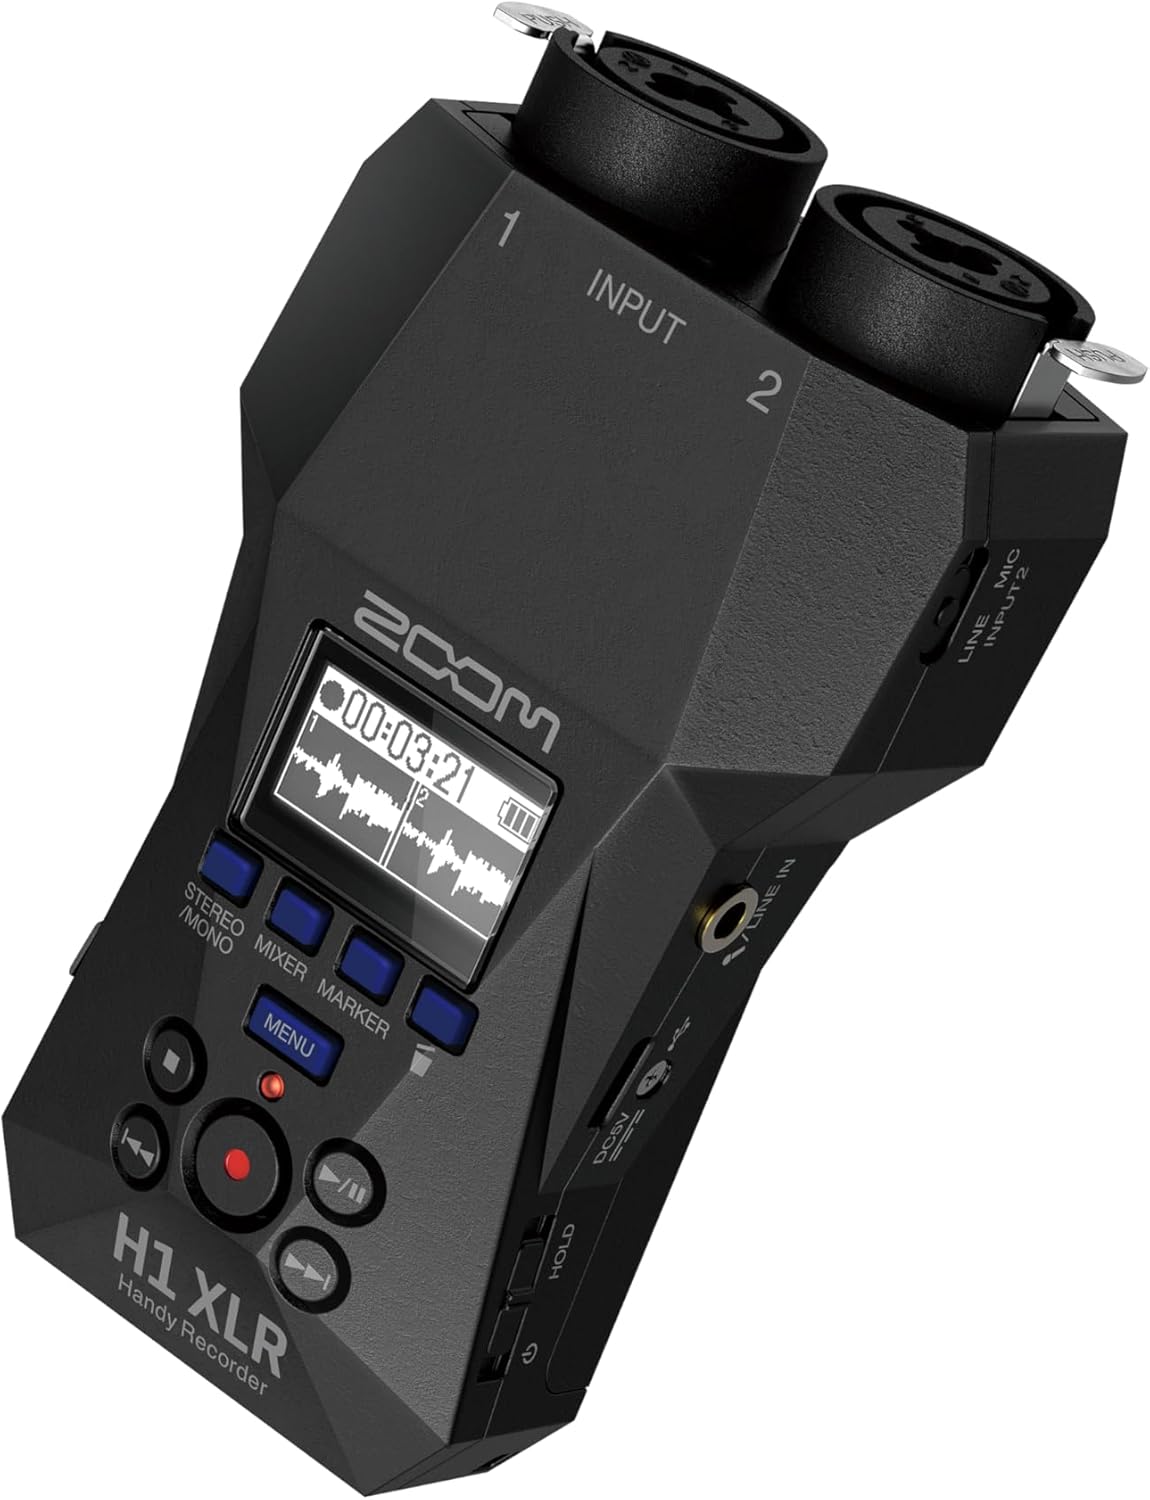
2.1 pav.: priekis View of Zoom H1 XLR
This image displays the front of the Zoom H1 XLR, highlighting the two XLR/TRS combo input jacks at the top, the monochrome OLED display in the center, and the main control buttons including Record, Play/Pause, Stop, Menu, and navigation buttons.
2.2 pav.: Kampinis View with Side Controls
Šis kampuotas view of the H1 XLR shows the side panel, which includes the LINE IN/MIC IN switch, gain adjustment knobs for inputs 1 and 2, the USB-C port, and the power/hold switch.
- XLR/TRS Combo Inputs (1 & 2): Connect XLR microphones or 1/4" TRS line-level devices.
- OLED ekranas: Shows recording levels, battery status, time, and menu options.
- Įrašymo mygtukas: Pradeda ir sustabdo įrašymą.
- Meniu mygtukas: Pasiekia sistemos nustatymus ir parinktis.
- Naršymo mygtukai: Naudojamas meniu naršymui ir atkūrimo valdymui.
- LINE IN / MIC IN Switch: Selects input type for the 3.5mm stereo jack.
- Stiprinimo rankenėlės: Sureguliuokite kiekvieno kanalo įvesties jautrumą.
- USB-C prievadas: For data transfer, power, and use as an audio interface.
- 3.5 mm stereo lizdas: For connecting external microphones or line-level sources.
- Ausinių išvestis: 3.5mm stereo jack for monitoring audio.
- Maitinimo / laikymo jungiklis: Turns the unit on/off and locks controls.
3. Sąranka
3.1. Akumuliatoriaus įdėjimas
- Įsitikinkite, kad įrenginys išjungtas.
- Atidarykite baterijų skyriaus dangtelį, esantį įrenginio gale.
- Įdėkite dvi AA baterijas, laikydamiesi teisingo poliškumo (+/-), kaip nurodyta skyriaus viduje.
- Saugiai uždarykite akumuliatoriaus skyriaus dangtelį.
The H1 XLR supports alkaline, NiMH, and lithium AA batteries. Battery life is approximately 10 hours with alkaline batteries.
3.2. „MicroSD“ kortelės įdėjimas
- Įsitikinkite, kad įrenginys išjungtas.
- Suraskite „microSD“ kortelės lizdą įrenginio šone.
- Insert a microSD card (up to 1TB capacity supported) into the slot until it clicks into place. Ensure the card is inserted in the correct orientation.
- To remove, gently push the card until it clicks out, then pull it from the slot.
A microSD card is required for recording audio. Format the card using the H1 XLR's menu before first use.
3.3. Įjungimas/išjungimas
- Norėdami įjungti: Slide the Power/Hold switch upwards and hold for a few seconds until the display illuminates.
- Norėdami išjungti: Slide the Power/Hold switch upwards and hold for a few seconds until the display turns off.
- Laikymo funkcija: Slide the Power/Hold switch downwards to the 'HOLD' position to lock all buttons and prevent accidental operation during recording or transport.
4. Pagrindinė operacija
4.1. Connecting Microphones and Line Devices
- XLR mikrofonai: Connect XLR cables from your microphones to the XLR/TRS combo inputs (1 and 2) at the top of the unit. Ensure the cables lock securely.
- 1/4" TRS Line Devices: Connect 1/4" TRS cables from line-level sources to the XLR/TRS combo inputs (1 and 2).
- 3.5mm Stereo Input: For external stereo microphones or line-level devices, connect to the 3.5mm stereo jack. Use the LINE IN / MIC IN switch to select the appropriate input level.

Figure 4.1: Connecting XLR Cables
This image shows a user holding the H1 XLR with two XLR cables securely connected to the top input jacks, demonstrating the device's readiness for external microphone input.
4.2. Garso įrašymas
- Connect your audio source(s).
- Power on the H1 XLR.
- Adjust the input gain for each channel using the dedicated gain knobs. Monitor the levels on the OLED display to ensure they are not clipping. The 32-bit float recording feature provides significant headroom, reducing the risk of clipping.
- Paspauskite Įrašas button once to enter record-standby mode. The record indicator will flash.
- Paspauskite Įrašas button again to start recording. The record indicator will illuminate steadily.
- Norėdami sustabdyti įrašymą, paspauskite Sustok mygtuką. Įrašytas file will be saved to the microSD card.
4.3. Garso stebėjimas
Connect headphones to the 3.5mm headphone output jack to monitor your audio in real-time during recording or playback. Adjust the headphone volume using the dedicated volume controls.
4.4. Atkūrimas
- Eikite į norimą file naudodami naršymo mygtukus.
- Paspauskite Leisti / pristabdyti mygtuką, norėdami pradėti atkūrimą.
- Paspauskite Leisti / pristabdyti mygtuką dar kartą, kad sustabdytumėte atkūrimą.
- Paspauskite Sustok mygtuką sustabdyti atkūrimą.
5. Išplėstinės funkcijos
5.1. USB Audio Interface Functionality
The H1 XLR can function as a 2-input/2-output USB audio interface for your computer or mobile device. Connect the H1 XLR to your computer or smartphone via the USB-C port. Select 'Audio Interface' mode from the device's menu. This allows you to record directly to your digital audio workstation (DAW) or use the H1 XLR as a high-quality microphone input for live streaming or video conferencing.

Figure 5.1: H1 XLR as an Audio Interface
This image illustrates the Zoom H1 XLR connected to a smartphone, showcasing its capability to serve as an external audio interface for mobile recording or streaming setups.
5.2. 32-Bit Float Recording
The H1 XLR utilizes 32-bit float recording technology, which captures audio with an extremely wide dynamic range. This virtually eliminates the need to set input gain levels precisely, as clipping is prevented even with very loud signals. You can adjust the volume of your recordings in post-production without introducing noise or distortion.
6. Priežiūra
- Keep the unit dry and clean. Avoid exposure to extreme temperatures, humidity, or direct sunlight.
- Išorę valykite minkšta, sausa šluoste. Nenaudokite abrazyvinių valiklių ar tirpiklių.
- Jei prietaisas ilgesnį laiką nebus naudojamas, išimkite baterijas, kad išvengtumėte elektrolito pratekėjimo.
- Handle the microSD card with care to prevent data loss.
7. Problemų sprendimas
- Įrenginys neįsijungia: Patikrinkite akumuliatoriaus įdėjimą ir įkrovos lygį. Įsitikinkite, kad maitinimo / laikymo jungiklis nėra padėtyje „HOLD“.
- No audio recorded: Verify a microSD card is inserted and formatted. Check input connections and gain levels. Ensure the correct input type (LINE IN/MIC IN) is selected.
- Prasta garso kokybė: Check microphone connections. Ensure gain levels are appropriate (though 32-bit float minimizes clipping, extremely low levels can introduce noise). Try a different microphone or cable.
- Mygtukai nereaguoja: Check if the Power/Hold switch is in the 'HOLD' position.
For further assistance, refer to the official Zoom support resources.
8. Specifikacijos
| Funkcija | Specifikacija |
|---|---|
| Modelio numeris | H1 XLR |
| Įrašymo formatas | WAV (32-bit float) |
| Įėjimai | 2 x XLR/TRS Locking Combo Jacks, 1 x 3.5mm Stereo Mini Jack |
| Išėjimai | 1 x 3.5mm Headphone/Line Output |
| Ekranas | 0.96" Monochrome OLED |
| Maitinimo šaltinis | 2 x AA Batteries (Alkaline, NiMH, Lithium) or USB-C |
| Baterijos veikimo laikas | apytiksliai 10 valandų (šarminis) |
| Saugojimo laikmena | microSD/microSDHC/microSDXC card (up to 1 TB) |
| USB sąsaja | USB Type-C (for data transfer, power, and audio interface) |
| Matmenys (P x G x A) | 5.8 x 3.8 x 1.9 colių (apytiksliai) |
| Svoris | 6.4 ounces / 0.4 pounds (without batteries) |
9. Saugos informacija
- Nebandykite ardyti ar modifikuoti įrenginio.
- Venkite įrenginio numetimo ar stiprių smūgių.
- Laikyti vaikams nepasiekiamoje vietoje.
- Išmeskite baterijas laikydamiesi vietinių taisyklių.
- Naudokite tik nurodytus maitinimo šaltinius ir priedus.
10. Garantija ir palaikymas
Dėl garantijos informacijos ir techninės pagalbos kreipkitės į oficialią „Zoom“ svetainę. websvetainėje arba susisiekite su vietiniu platintoju. Išsaugokite pirkimo kvitą kaip pirkimo įrodymą.


