1. Įvadas
This manual provides detailed instructions for the proper installation, operation, and maintenance of your Pioneer T-9090WR Double Cassette Deck. The T-9090WR is a high-fidelity stereo cassette deck featuring two independent tape transports (Deck I and Deck II), auto-reverse capability, and Dolby B/C noise reduction for superior audio performance. Please read this manual thoroughly before using the unit to ensure optimal performance and longevity.
2. Svarbi saugos informacija
- Maitinimo šaltinis: Prijunkite įrenginį tik prie kintamosios srovės lizdo, kurio galiatage nurodyta galiniame skydelyje.
- Vėdinimas: Užtikrinkite tinkamą vėdinimą. Neužblokuokite ventiliacijos angų. Palikite pakankamai vietos aplink įrenginį tinkamam oro cirkuliavimui.
- Vanduo ir drėgmė: Saugokite įrenginį nuo lietaus ar drėgmės. Nestatykite ant įrenginio daiktų, pripildytų skysčių, pavyzdžiui, vazų.
- Užsienio objektai: Nekiškite jokių pašalinių daiktų į įrenginio angas.
- Aptarnavimas: Nebandykite patys atlikti šio įrenginio techninės priežiūros. Visus techninės priežiūros darbus patikėkite kvalifikuotiems techninės priežiūros darbuotojams.
- Valymas: Disconnect the power cord from the outlet before cleaning. Use a soft, dry cloth. Do not use liquid or aerosol cleaners.
3. Sąranka ir jungtys
3.1 Išpakavimas
Carefully remove the T-9090WR from its packaging. Retain all packing materials for future transport or storage.
3.2 Įdėjimas
Place the cassette deck on a stable, level surface away from direct sunlight, heat sources, and excessive dust. Ensure there is sufficient space around the unit for proper ventilation, especially above the top panel.
3.3 Garso jungtys
Connect the T-9090WR to your amplifier or receiver using RCA audio cables. The unit features standard stereo RCA input and output jacks.

Figure 3.1: Rear panel connections. Connect the 'LINE OUT' jacks to an available 'TAPE IN' or 'AUX IN' on your amplifier. Connect the 'LINE IN' jacks to the 'TAPE OUT' or 'REC OUT' on your amplifier for recording.
- Prijunkite IŠRIKIUOTI (red for right, white for left) on the T-9090WR to the TAPE IN or Aux in domkratai ant tavo ampkeltuvas/imtuvas.
- Prijunkite LINE IN (red for right, white for left) on the T-9090WR to the TAPE OUT or REC OUT domkratai ant tavo ampkeltuvas/imtuvas.
3.4 Maitinimo jungtis
After all audio connections are made, plug the power cord into a suitable AC outlet. The unit is now ready for operation.
4. Naudojimo instrukcijos
4.1 Kasečių įkrovimas ir iškrovimas
To load a cassette, press the IŠMETIMAS button for the desired deck (Deck I or Deck II). The cassette holder will open. Insert the cassette with the open edge facing forward and the tape side facing down. Gently push the cassette holder back until it clicks into place.
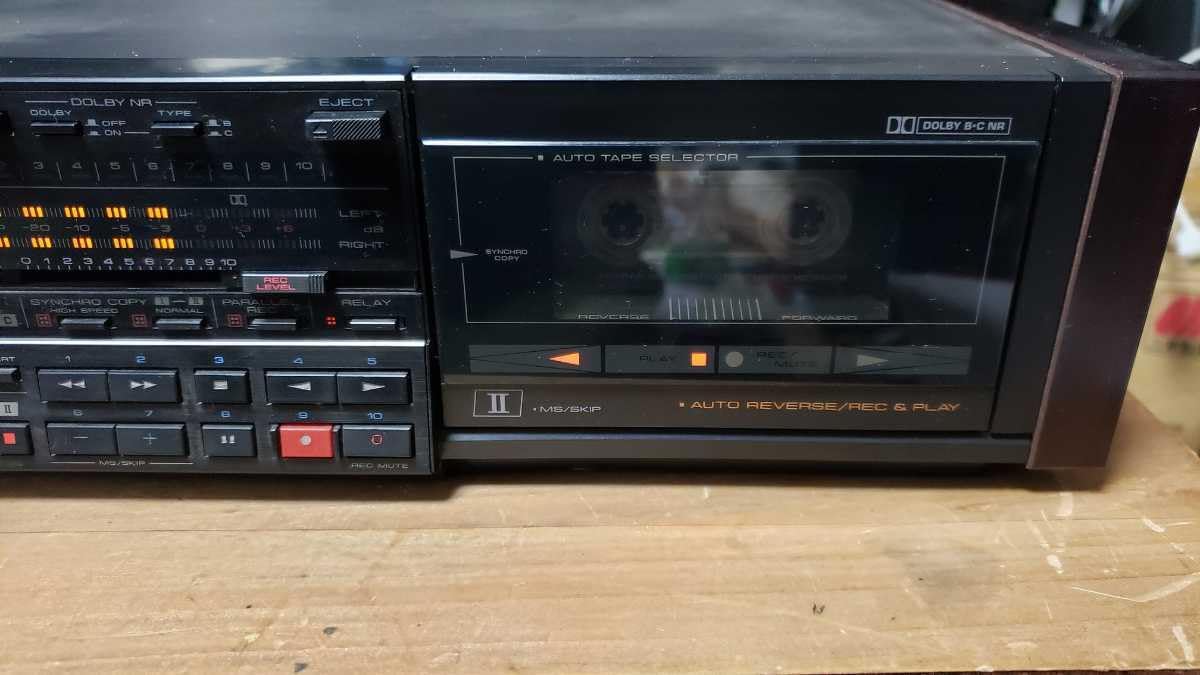
Figure 4.1: Front panel of Deck I with a cassette inserted.
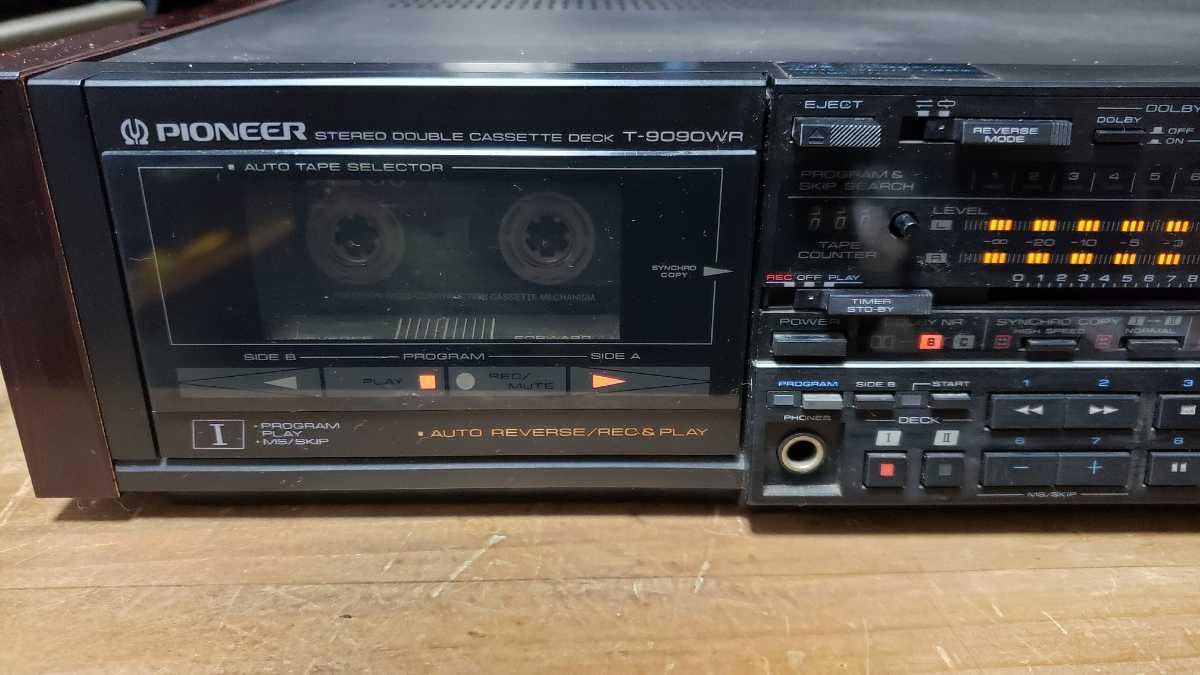
Figure 4.2: Front panel of Deck II with a cassette inserted.
4.2 Pagrindinis atkūrimas
- Insert a cassette into either Deck I or Deck II.
- Pasirinkite tinkamą įvestį amplifier/receiver (e.g., TAPE or AUX).
- Paspauskite ŽAISTI button (►) for the selected deck. The tape will begin to play.
- Norėdami sustabdyti atkūrimą, paspauskite STOP mygtuką (■).
- Naudokite ATSUKTI (◀◀) or GREITI PIRMYN (►►) buttons to navigate the tape.
4.3 Auto-Reverse Function
The T-9090WR features auto-reverse, allowing continuous playback or recording on both sides of a cassette. The ATGALINIS REŽIMAS selector allows you to choose playback direction (forward, reverse, or continuous loop).
4.4 Įrašymas
The T-9090WR allows recording on both Deck I and Deck II. Ensure your amplifier's REC OUT is connected to the deck's LINE IN.
- Insert a recordable cassette into the desired deck.
- Select the input source on your amplifier that you wish to record (e.g., CD, Tuner).
- Paspauskite REC (●) button. The deck will enter record-pause mode.
- Sureguliuokite REC LEVEL controls to ensure the recording level meters peak appropriately without distortion.
- Paspauskite ŽAISTI (►) button to start recording.
- Norėdami sustabdyti įrašymą, paspauskite STOP (■) button.
4.4.1 Synchro Copy
This feature allows for synchronized recording from Deck I to Deck II. Load the source tape into Deck I and a blank tape into Deck II. Press the SYNCHRO COPY mygtuką, tada paspauskite ŽAISTI on Deck I and REC on Deck II.
4.4.2 High-Speed Copy
For faster duplication, the T-9090WR supports high-speed copying. Engage the HIGH SPEED COPY function during synchro copy for quicker dubbing.
4.5 Dolby Noise Reduction
The unit includes Dolby B and C noise reduction systems. Select the appropriate Dolby NR setting (DOLBY NR B or DOLBY NR C) to match the recording. If the tape was recorded without Dolby NR, set the switch to IŠJUNGTA.
4.6 Auto Tape Selector
The T-9090WR automatically detects the type of tape (Normal, CrO2, Metal) inserted and adjusts equalization accordingly. Ensure the tape type is correctly identified for optimal playback and recording quality.
5. Priežiūra
Regular maintenance ensures optimal performance and extends the life of your cassette deck.
5.1 Cleaning Tape Heads and Pinch Rollers
Dust and tape oxide can accumulate on the tape heads, pinch rollers, and capstans, leading to poor sound quality. Clean these components regularly (every 10-20 hours of use) using a cotton swab lightly dampened with isopropyl alcohol or a specialized head cleaning fluid.
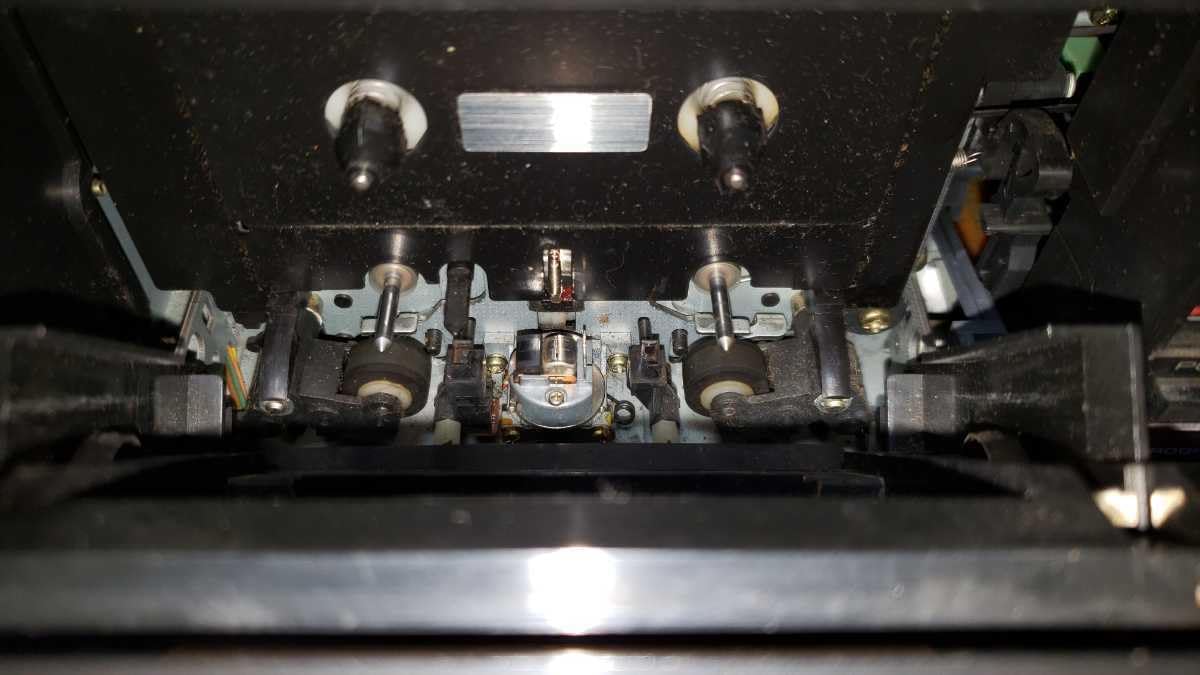
5.1 pav. Vidinis view of Deck I mechanism, showing tape heads and pinch rollers.

5.2 pav. Vidinis view of Deck II mechanism, showing tape heads and pinch rollers.
- Paspauskite IŠMETIMAS mygtuką, kad atidarytumėte kasetės laikiklį.
- Gently wipe the tape heads, capstans, and pinch rollers until clean.
- Prieš įdėdami juostą, leiskite komponentams visiškai išdžiūti.
5.2 Demagnetization
Over time, tape heads can become magnetized, leading to increased noise and dull sound. Demagnetize the heads periodically (e.g., every 50-100 hours of use) using a specialized tape head demagnetizer. Follow the demagnetizer's instructions carefully.
5.3 Išorės valymas
Prietaiso išorę nuvalykite minkšta, sausa šluoste. Įsisenėjusius nešvarumus lengvai nuvalykite šluoste.ampened with mild detergent solution, then wipe dry. Avoid abrasive cleaners or solvents.
6. Problemų sprendimas
If you experience problems with your T-9090WR, consult the following table before seeking professional service.
| Problema | Galima priežastis | Sprendimas |
|---|---|---|
| Nėra galios | Maitinimo laidas neprijungtas; Maitinimo lizdas sugedęs | Patikrinkite maitinimo laido jungtį; Išbandykite kitą lizdą |
| Atkūrimo metu nėra garso | Pasirinkta neteisinga įvestis amplifier; Audio cables loose or faulty; Volume too low | Select correct input (TAPE/AUX); Check RCA cable connections; Increase ampkeltuvo tūris |
| Poor sound quality (dull, muffled) | Dirty tape heads; Worn tape; Incorrect Dolby NR setting | Clean tape heads and pinch rollers (Section 5.1); Try a different tape; Adjust Dolby NR setting |
| Tape not playing or winding | Tape jammed; Pinch rollers dirty; Mechanical issue | Eject and re-insert tape; Clean pinch rollers; If problem persists, seek service |
| Įrašymas neveikia | LINE IN cables not connected; Input source not selected on amplifier; Tape write-protect tab engaged | Check LINE IN connections; Select correct source on amplifier; Cover the write-protect tab on the cassette with tape |
7. Specifikacijos
These specifications are typical and subject to change without notice.
- Modelis: Pioneer T-9090WR
- Tipas: Stereo Double Cassette Deck
- Juostų galvutės: Hard Permalloy (Recording/Playback), Ferrite (Erase)
- Variklis: DC servo variklis
- Triukšmo mažinimas: Dolby B, Dolby C
- Auto-Reverse: Yes, both decks
- Tape Type Selector: Automatic (Normal, CrO2, Metal)
- Dažnio atsakas: (Typical, depending on tape type)
- Normal: 20 Hz - 17 kHz
- CrO2: 20 Hz - 18 kHz
- Metal: 20 Hz - 19 kHz
- Signalo ir triukšmo santykis: (Dolby C ON) > 70 dB
- Oho ir plazdėjimas: < 0.05 % WRMS
- Įėjimai: Line In (RCA)
- Išėjimai: Line Out (RCA), Headphones (6.3mm stereo jack)
- Galios reikalavimai: AC 100V, 50/60 Hz (Japanese market model)
- Matmenys (P x A x G): Apytiksliai 420 x 130 x 300 mm
- Svoris: Maždaug 5.5 kg
8. Garantija ir klientų aptarnavimas
Specific warranty details for the Pioneer T-9090WR Double Cassette Deck are not provided in this document. For warranty information, service, or technical support, please refer to the warranty card included with your product or contact Pioneer customer service directly in your region. You may also visit the official Pioneer webpalaikymo išteklių svetainė.


