1. Įvadas
The virtavo VistaFlask 2K Security Camera is a wireless, battery-powered outdoor camera designed to enhance your home security. Featuring 2K QHD imaging, AI motion detection, starlight lens for colorful night vision, and weatherproof construction, it provides reliable surveillance in various conditions. This manual provides detailed instructions for setting up, operating, maintaining, and troubleshooting your camera.

Image: Two virtavo VistaFlask 2K security cameras, designed for outdoor use.
2. Saugos informacija
- Įsitikinkite, kad kamera yra tvirtai pritvirtinta, kad ji nenukristų.
- Use only the specified charging cable and power adapter to charge the battery.
- Nelaikykite fotoaparato ekstremaliose temperatūrose, kurios yra už jo veikimo diapazono ribų.
- Venkite kameros ardyti ar modifikuoti, nes tai panaikins garantiją ir gali sukelti gedimų.
- Laikykite fotoaparatą ir jo priedus vaikams nepasiekiamoje vietoje.
3. Pakuotės turinys
- virtavo VistaFlask 2K Security Camera(s)
- Montavimo laikiklis (-iai)
- USB įkrovimo laidas
- Vartotojo vadovas
- Montavimo varžtai ir inkarai
4. Produktas baigtasview
The virtavo VistaFlask camera features a compact design with essential components for optimal performance. Key elements include the lens, IR LEDs for night vision, a microphone for audio input, a speaker for two-way communication, and a motion sensor. The power switch, sync button, and charging port are located at the bottom of the camera, alongside the microSD card slot for local storage.

Vaizdas: vidinis view highlighting the battery and electronic components.

Vaizdas: Apačia view of the camera with power switch, charging port, sync button, and microSD card slot.
5. Sąrankos vadovas
5.1 Pradinė sąranka
- Įkraukite fotoaparatą: Before first use, fully charge the camera using the provided USB cable. The battery lasts 1-3 months per charge depending on usage.
- Atsisiųskite programą: Ieškokite 'HOME V' in your smartphone's app store (iOS or Android) and download the application.
- Sukurti paskyrą: Open the 'HOME V' app and follow the on-screen instructions to register a new account or log in if you already have one.
5.2 Kameros susiejimas ir prijungimas
Follow these steps to pair your virtavo VistaFlask camera with the 'HOME V' app. For a visual guide, please refer to the official installation video below.
Video: Official virtavo VistaFlask Installation Guide Setup. This video demonstrates the step-by-step process of binding the camera to the 'HOME V' app using QR codes, including powering on the camera, confirming the red light flashing, connecting to the camera's hotspot, and connecting to your home Wi-Fi network.
- Pridėti įrenginį: In the 'HOME V' app, tap the '+' icon to add a new device.
- Nuskaityti QR kodą: Grant camera access to the app. Scan the QR code located on the back of your virtavo VistaFlask camera.
- Maitinimas: Ensure the camera is powered on. The power switch is located at the bottom.
- Confirm Flashing Light: Confirm that the camera's red indicator light is flashing rapidly. If not, press and hold the 'Sync' button for 5-10 seconds until you hear a 'Du' sound or see rapid flashing.
- Connect to Camera Hotspot: The app will prompt you to connect to the camera's Wi-Fi hotspot (e.g., 'IPC365_AP-XXXX'). Confirm and join this network.
- Select Home Wi-Fi: Choose your home 2.4GHz Wi-Fi network from the list and enter the correct password. Note: This device only supports 2.4GHz Wi-Fi.
- Pavadinkite savo kamerą: Once connected, name your camera for easy identification (e.g., 'Front Door', 'Living Room').
5.3 Fizinis įrengimas
The virtavo VistaFlask camera is designed for easy installation, both indoors and outdoors. Its weatherproof design ensures durability.

Image: Easy installation on smooth surfaces like glass or tiles, no drilling required.

Image: Wireless connection for remote access.
- Pasirinkite vietą: Select a location with good Wi-Fi signal strength and a clear view ploto, kurį norite stebėti.
- Montavimas: Use the provided mounting bracket, screws, and anchors to securely attach the camera to a wall or other suitable surface. Ensure the camera is positioned to capture the desired field of view.
- Atsparus oro sąlygoms: The camera is designed to withstand various weather conditions, making it suitable for outdoor use.
6. Naudojimo instrukcijos
6.1 Tiesiogiai View ir dvipusis garsas
Access real-time video feed and communicate through the camera using the 'HOME V' app.
- Tiesiogiai View: Atidarykite programėlę ir pasirinkite savo fotoaparatą view gyvas pašaras.
- Dvipusis garsas: Tiesioginio transliavimo metu palieskite mikrofono piktogramą view to speak through the camera's speaker, and listen through its microphone.
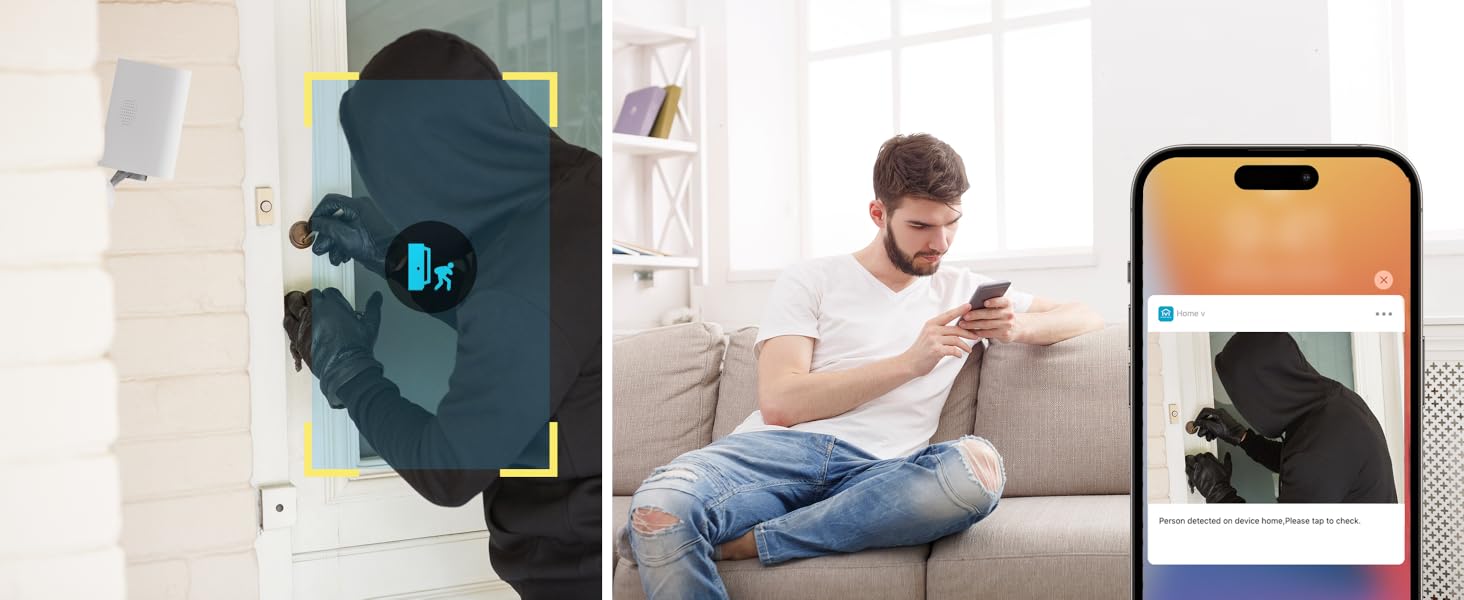
Image: Two-way audio feature for communication.
6.2 Judesio aptikimas ir įspėjimai
The camera features advanced PIR motion detection and AI capabilities to minimize false alarms.
- PIR judesio aptikimas: Detects motion up to 30 feet.
- Išmanieji įspėjimai: Receive instant notifications on your smartphone when motion is detected.
- AI Detection (Cloud Subscription): With an optional cloud subscription, the camera can differentiate between humans, vehicles, and animals, reducing irrelevant alerts.
- Pritaikomos aptikimo zonos: Set specific areas for motion detection to focus on critical zones and ignore others.
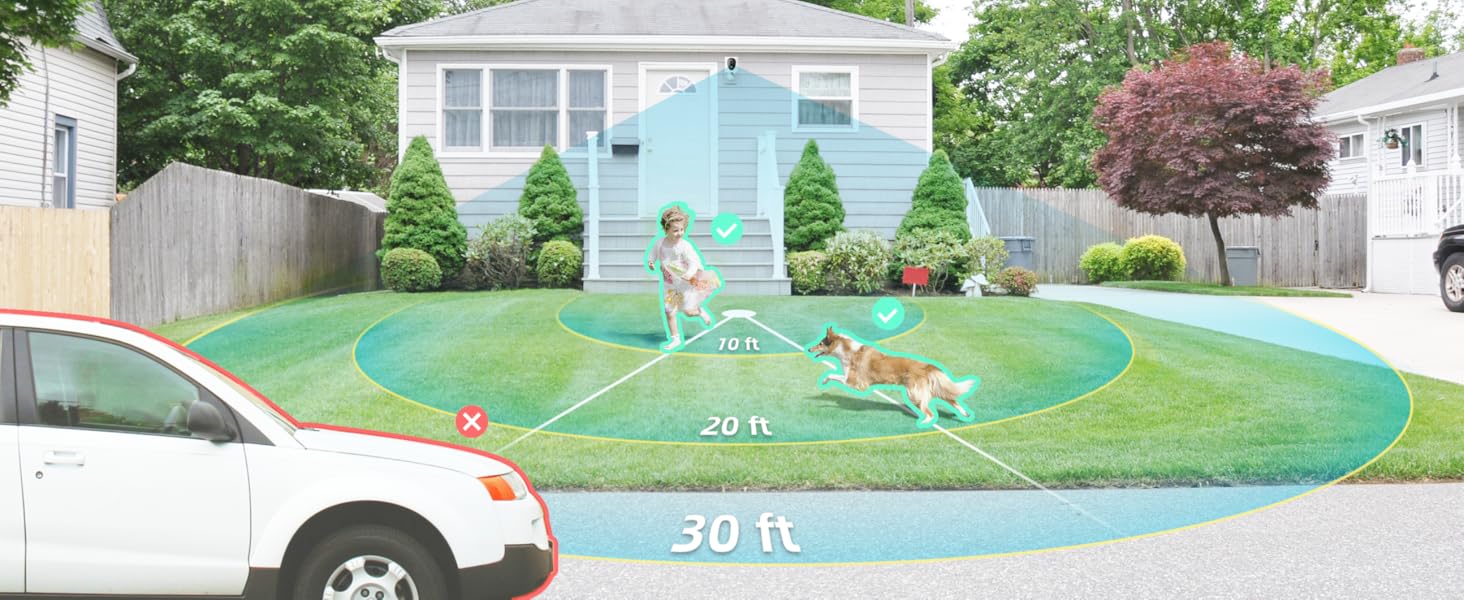
Image: Smart detection distinguishing between people, vehicles, and animals.
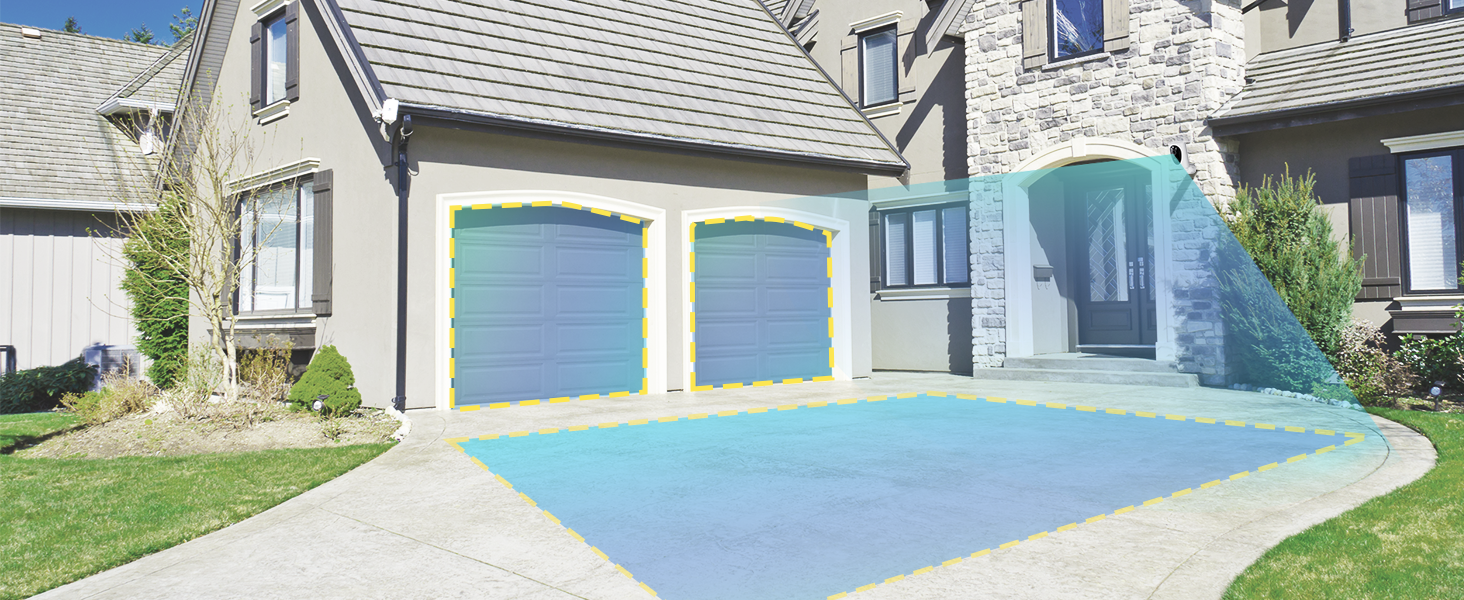
Image: Customizable motion detection zones.

Image: Instant alerts with image previews.
6.3 Naktinis matymas
The camera provides clear vision even in low-light conditions.
- Spalvotas naktinis matymas: Utilizes Starlight technology and a wide F1.6 aperture for vivid, color-rich images in low light.
- „IR Night Vision“: Equipped with 2 high-intensity IR LEDs for clear black-and-white viewing in complete darkness.

Image: Superior 2K QHD imaging and color-rich night vision.
6.4 Įrašymas ir saugojimas
Your data is secured with flexible storage options.
- Vietinė saugykla: Supports microSD cards from 32GB to 256GB for continuous recording, even without network access. (MicroSD card not included).
- Saugykla debesyje: Optional cloud storage plans offer additional features like snapshot alerts and advanced AI capabilities. Video encryption ensures privacy.

Image: Comparison of no-fee basic storage (SD card) and cloud storage options.
6.5 App Features and Remote Access
Manage and control your security remotely via the 'HOME V' app.
- Nuotolinis stebėjimas: Monitor your home from anywhere with an internet connection.
- Kelių vartotojų prieiga: Bendrinkite prieigą prie kameros su šeimos nariais.
- Planavimas: Set schedules for recording or alerts.

Image: Remote access and multi-user monitoring via the 'HOME V' app.
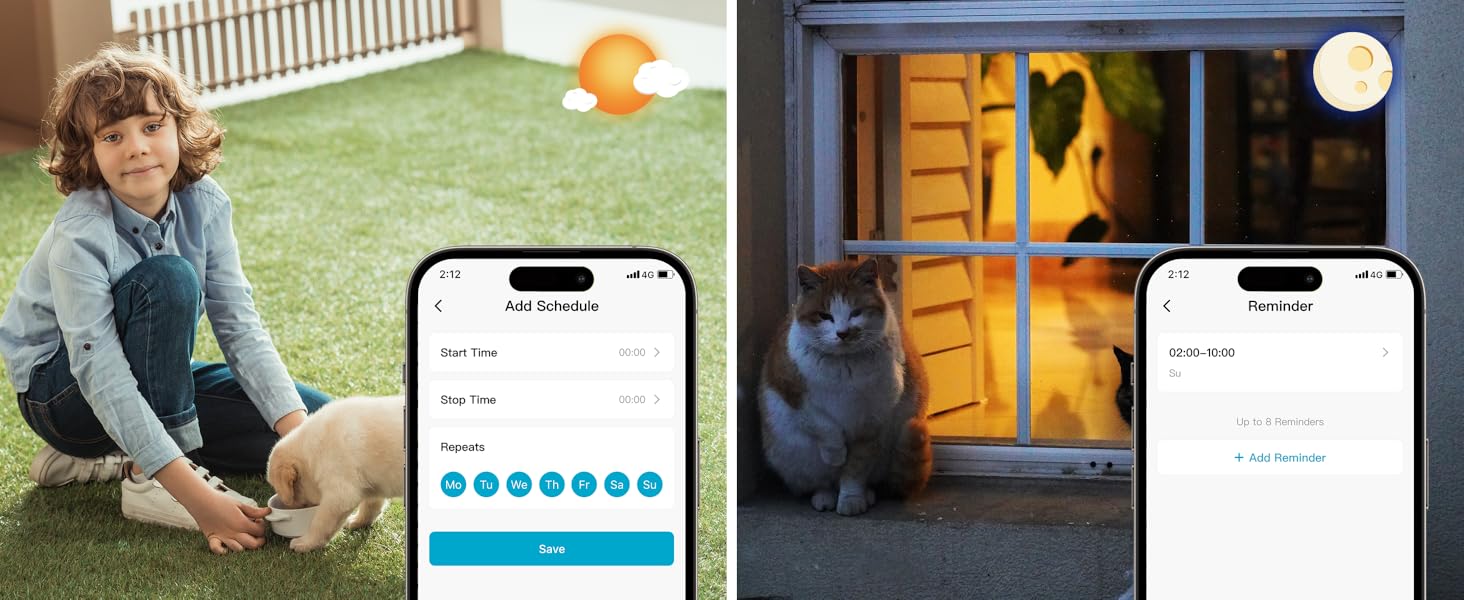
Image: App features including scheduling and reminders.
7. Priežiūra
- Akumuliatoriaus įkrovimas: Recharge the camera battery when prompted by the app. A full charge can last 1-3 months depending on activity.
- Valymas: Švelniai nuvalykite fotoaparato objektyvą ir korpusą minkšta,amp audinys. Venkite abrazyvinių valiklių.
- Firmware atnaujinimai: Regularly check the 'HOME V' app for firmware updates to ensure optimal performance and security.
8. Problemų sprendimas
| problema | Galima priežastis | Sprendimas |
|---|---|---|
| Kamera neįsijungia | Išsikrovęs akumuliatorius; išjungtas maitinimo jungiklis | Charge the camera fully; Ensure power switch is in the 'ON' position. |
| Nepavyksta prisijungti prie „Wi-Fi“. | Incorrect Wi-Fi password; 5GHz Wi-Fi network; Weak Wi-Fi signal | Patikrinkite slaptažodį; Įsitikinkite, kad jungiatės prie 2.4 GHz tinklo; Perkelkite kamerą arčiau maršrutizatoriaus arba naudokite „Wi-Fi“ signalo stiprintuvą. |
| Dažni klaidingi aliarmai | High motion sensitivity; Unfiltered motion sources (e.g., trees, animals) | Adjust motion sensitivity in app; Set up detection zones to exclude irrelevant areas; Consider cloud subscription for AI detection. |
| Poor night vision clarity | Dirty lens; Obstruction in front of camera; Insufficient ambient light for color night vision | Clean the lens; Remove obstructions; Ensure adequate ambient light for color mode or switch to IR night vision. |
| Baterija greitai išsikrauna | High activity/recordings; Frequent live view access; Weak Wi-Fi signal | Reduce motion detection sensitivity; Limit live view sessions; Improve Wi-Fi signal strength. |
9. Specifikacijos
| Funkcija | Detalė |
|---|---|
| Modelio pavadinimas | LJH10 |
| Naudojimas viduje / lauke | Viduje, Lauke |
| Maitinimo šaltinis | Battery Powered (4400mAh rechargeable Lithium battery) |
| Ryšio protokolas | „Wi-Fi“ (tik 2.4 GHz) |
| Valdiklio tipas | HOME V App |
| Montavimo tipas | Sieninis laikiklis |
| Vaizdo įrašymo raiška | 2K QHD |
| Viewing kampas | 120 laipsnių (laukas View130 laipsnių) |
| Naktinio matymo diapazonas | 30 pėdų |
| Silpnos šviesos technologija | Starlight (F1.6 aperture, 3.0mm focal length) |
| IR šviesos diodų skaičius | 2 |
| Atsparumo vandeniui lygis | Atsparus vandeniui |
| Matmenys (I x P x A) | 2.7 x 1.3 x 3.2 colio |
| Prekės svoris | 1.41 svaro |
| Saugojimo parinktys | MicroSD (32GB-256GB), Cloud Storage |
| Ypatingos savybės | 2-Way Audio, Battery Powered, Local Recording, Motion Sensor, Night Vision, AI Motion Detection |
10. Garantija ir palaikymas
virtavo products are designed for reliability and performance. For information regarding product warranty, please refer to the warranty card included in your product packaging or visit the official virtavo website. If you encounter any issues or have questions not covered in this manual, please contact virtavo customer support through the 'HOME V' app or their official support channels for assistance.


