1. Įvadas
This manual provides instructions for the installation, operation, and maintenance of your SOUNDKITS Single Din Touchscreen Radio. This device integrates modern infotainment features such as Apple CarPlay, Android Auto, Bluetooth connectivity, and a 6.5-inch IPS display into a standard single DIN form factor, suitable for upgrading classic vehicles.

Image: The SOUNDKITS Single Din Touchscreen Radio unit, featuring a 6.5-inch IPS display showing the Apple CarPlay interface, accompanied by its infrared remote control.
2. Saugos informacija
Read all instructions carefully before installation and operation. Failure to follow these instructions may result in injury or damage to the device or vehicle.
- Profesionalus montavimas rekomenduojamas: Due to the complexity of car audio systems, professional installation is advised.
- Maitinimo šaltinis: Prijunkite įrenginį tik prie 12 V nuolatinės srovės maitinimo šaltinio su neigiamu įžeminimu.
- Laidai: Ensure all wiring is correctly connected to prevent short circuits and damage. Insulate all exposed wires.
- Vairavimo sauga: Nenaudokite įrenginio taip, kad tai atitrauktų jūsų dėmesį nuo vairavimo. Visada teikite pirmenybę eismo saugumui.
- Temperatūra: Venkite ilgą laiką laikyti įrenginį tiesioginiuose saulės spinduliuose arba itin aukštose temperatūrose.
- Drėgmė: Laikykite įrenginį sausai. Drėgmė gali sukelti gedimą arba elektros smūgį.
3. Pakuotės turinys
Patikrinkite, ar pakuotėje yra visi reikalingi daiktai:
- Single Din CarPlay Stereo Unit
- Laidų laidai
- Montavimo rinkiniai
- IR nuotolinio valdymo pultas
- User Instruction Manual (this document)
4. Produktas baigtasview
4.1 Priekinio skydelio valdikliai ir prievadai
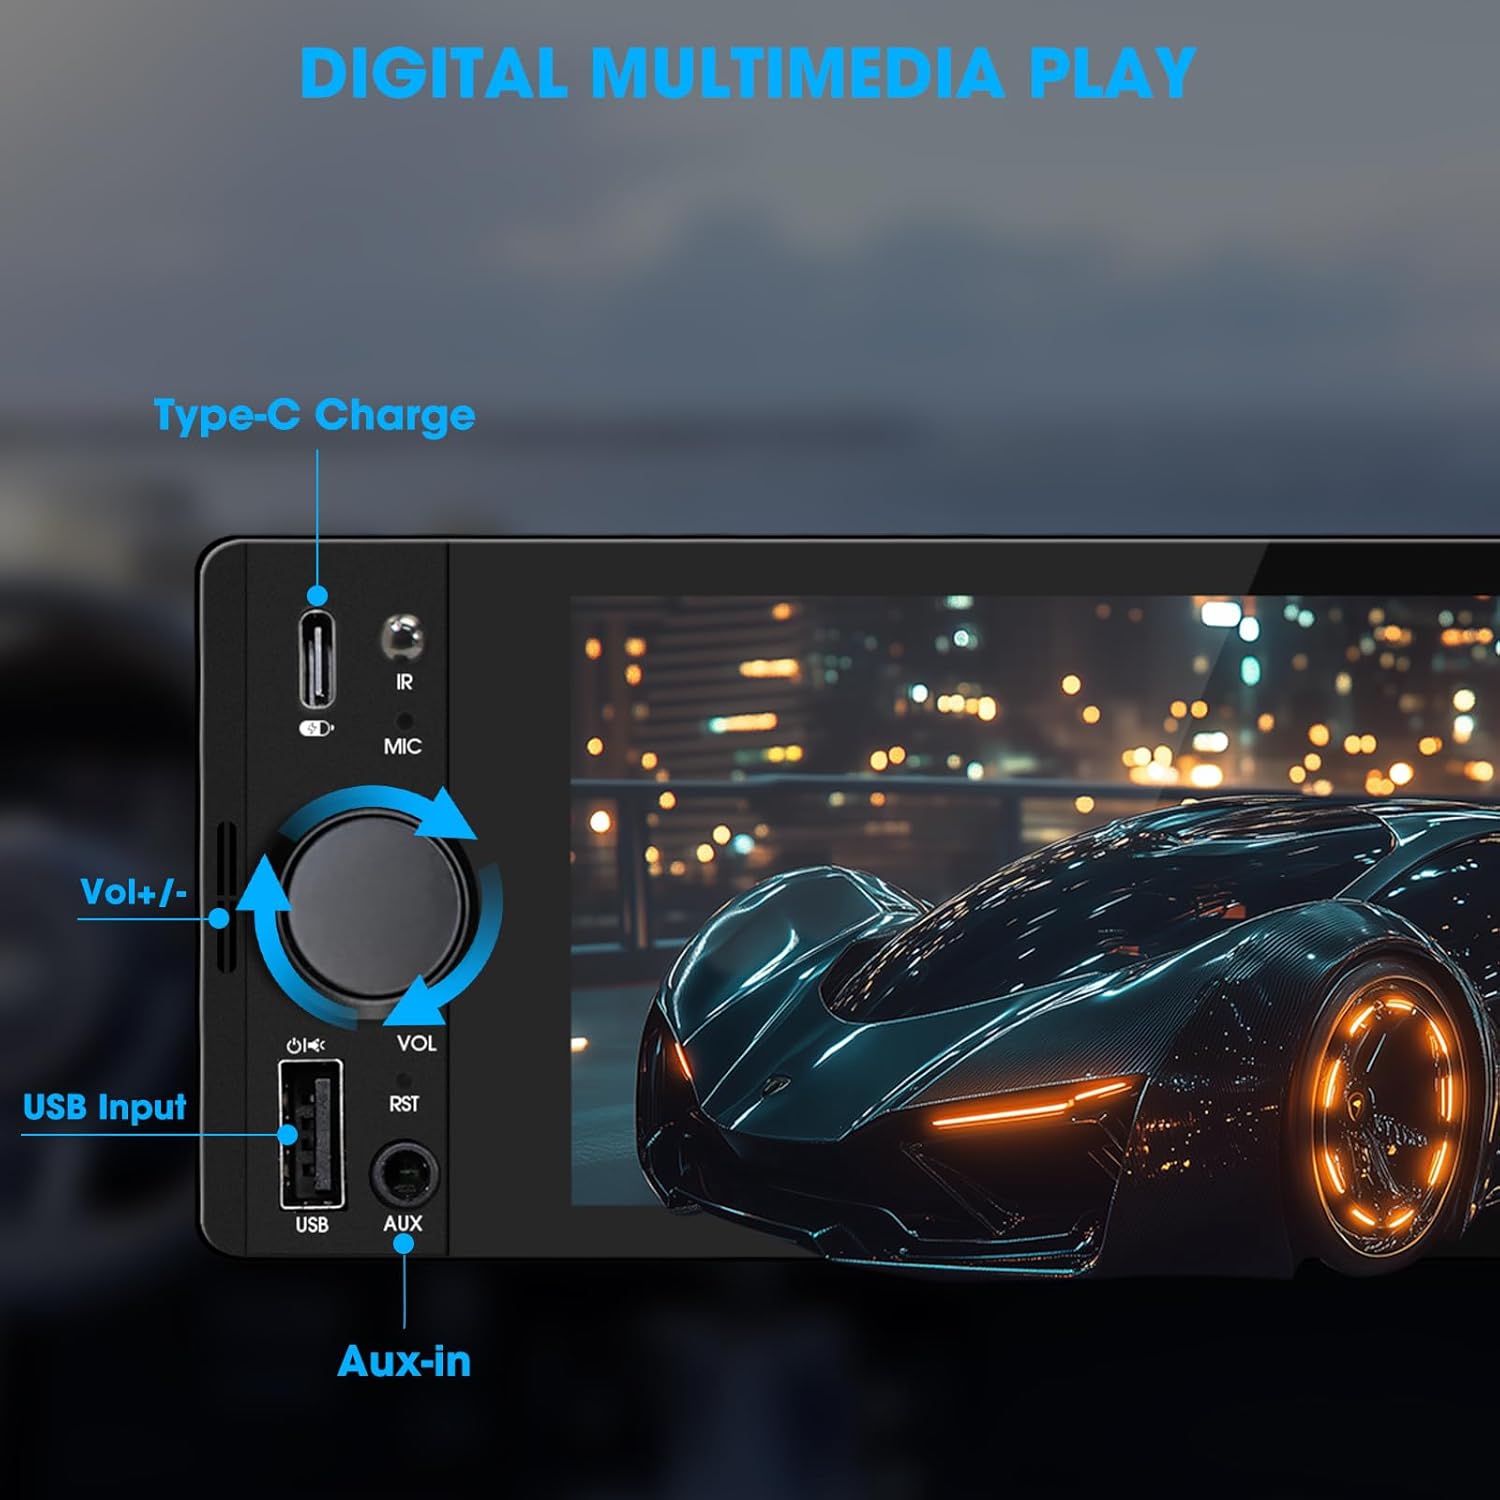
Image: Close-up of the radio's front panel, highlighting the Type-C charging port, IR receiver, microphone, volume knob, USB input, and AUX-in port.
- 6.5 colių IPS jutiklinis ekranas: Main display for all functions and interfaces.
- Garsumo rankenėlė (VOL): Pasukite, kad sureguliuotumėte garsumą. Paspauskite, kad nutildytumėte / įjungtumėte garsą.
- USB įvestis: For media playback, CarPlay/Android Auto connection, and phone mirroring.
- AUX įvestis: 3.5mm audio input for external audio devices.
- C tipo įkrovimo prievadas: Provides 2.1A quick charging for compatible devices.
- Mikrofonas (MIC): Integruotas mikrofonas skambučiams be rankų ir balso komandoms.
- IR imtuvas: Nuotolinio valdymo pultui.
- Atstatymo mygtukas (RST): Small button to reset the unit (requires a thin object like a paperclip).
4.2 Galinio skydelio jungtys

Image: Diagram showing the rear connections of the radio, including the main wiring harness, RCA outputs, external microphone jack, and radio antenna input.
- Pagrindinio laidų pluošto jungtis: Connects to the vehicle's power, speaker, and control wires.
- RCA Audio Outputs (L-OUT, R-OUT): Išoriniam prijungimui ampgelbėtojai.
- RCA Video Outputs (V-OUT1, V-OUT2): For connecting external monitors (e.g., headrest monitors).
- Galinisview Kameros įvestis (CAMIN): RCA input for a rearview fotoaparatas.
- Išorinio mikrofono lizdas: For connecting an optional external microphone.
- Radijo antenos įvestis: Connects to the vehicle's AM/FM antenna.
5. Sąranka ir diegimas
This section outlines the general steps for installing the SOUNDKITS Single Din Touchscreen Radio. Professional installation is recommended.
5.1 Kontrolinis sąrašas prieš įdiegiant
- Prieš pradėdami montavimą, įsitikinkite, kad automobilio akumuliatorius yra atjungtas.
- Confirm the vehicle has a standard single DIN slot.
- Gather necessary tools (wire strippers, crimpers, electrical tape, screwdriver).

Image: A visual comparison showing older car radios replaced by the modern SOUNDKITS Single Din Touchscreen Radio, demonstrating the aesthetic upgrade.
5.2 Laidų jungtys
Refer to the provided wiring harness diagram for specific connections. The harness uses universal ISO interface and wire color coding.
| Vielos spalva | Funkcija |
|---|---|
| Geltona | Nuolatinė 12 V įtampa (baterija) |
| Raudona | 12 V priedas (uždegimas) |
| Juoda | Žemė (GND) |
| Mėlyna | antena/Amp„Lifier“ nuotolinis įjungimas |
| Oranžinė | Illumination/Dimmer |
| Ruda | Vairo valdymas (SWC) |
| Žalia/Balta | Galinis kairysis garsiakalbis (+) |
| Žalia/juoda | Galinis kairysis garsiakalbis (-) |
| Violetinė / balta | Galinis dešinysis garsiakalbis (+) |
| Violetinė/Juoda | Galinis dešinysis garsiakalbis (-) |
| Balta / balta | Priekinis kairysis garsiakalbis (+) |
| Balta/Juoda | Priekinis kairysis garsiakalbis (-) |
| Pilka/Balta | Priekinis dešinysis garsiakalbis (+) |
| Pilka/juoda | Priekinis dešinysis garsiakalbis (-) |
| Reverse (often Pink/Brown) | Reverse Gear Signal (for rearview kamera) |
Pastaba: Always cross-reference with your vehicle's specific wiring diagram and the diagram provided with the product's harness. Incorrect wiring can cause damage.
5.3 Įrenginio montavimas
- Secure the mounting sleeve into the vehicle's single DIN dash opening.
- Connect all necessary wiring harnesses, antenna, and any external accessories (e.g., rearview camera, external microphone).
- Carefully slide the head unit into the mounting sleeve until it locks into place.
- Prijunkite transporto priemonės akumuliatorių.
- Prieš surinkdami prietaisų skydelio apdailą, patikrinkite visas funkcijas.
6. Naudojimo instrukcijos
6.1 Pagrindinės operacijos
- Maitinimo įjungimas/išjungimas: The unit powers on with the vehicle's ignition. Press and hold the volume knob to turn off/on the display.
- Garsumo valdymas: Rotate the volume knob clockwise to increase volume, counter-clockwise to decrease. Press the knob to mute/unmute.
- Jutiklinio ekrano sąsaja: Navigate menus and select options by tapping or swiping on the 6.5-inch IPS touchscreen.
6.2 „Bluetooth“ ryšys

Image: The radio's display showing a successful Bluetooth 5.3 connection to a smartphone, with music playback information visible.
- Pagrindiniame meniu pasirinkite Bluetooth piktogramą.
- On your smartphone, search for available Bluetooth devices and select "SOUNDKITS" (or similar device name).
- Jei būsite paraginti, patvirtinkite susiejimo kodą abiejuose įrenginiuose.
- Once connected, you can make hands-free calls and stream audio.
6.3 „Apple CarPlay“ ir „Android Auto“
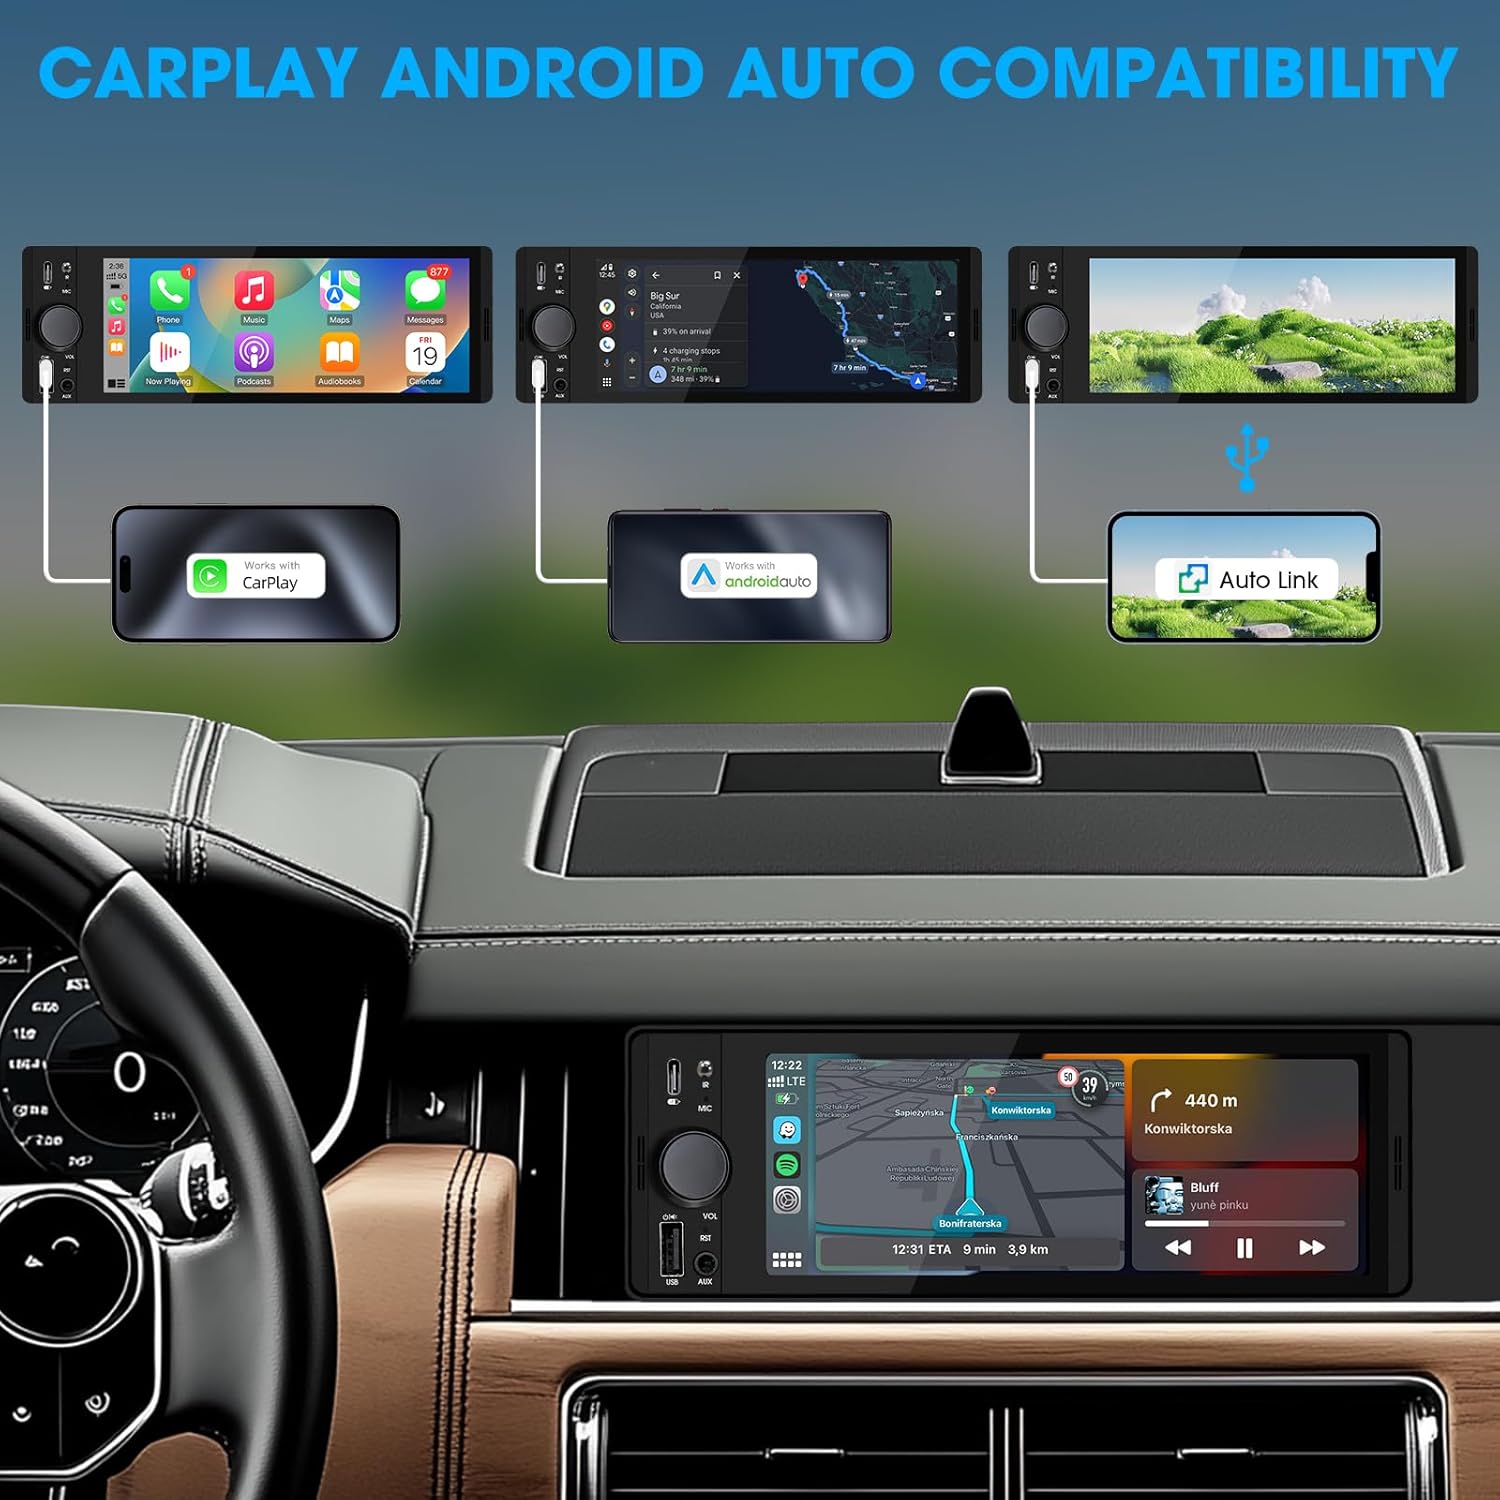
Image: An illustration demonstrating how to connect smartphones via USB for Apple CarPlay, Android Auto, and Auto Link functionality on the car stereo.
- Connect your iPhone (for CarPlay) or Android phone (for Android Auto) to the unit's USB port using a certified USB cable.
- The unit will automatically detect the connection and launch the respective interface.
- Follow any on-screen prompts on your phone or the unit to complete the setup.
- Access navigation, music, calls, and other compatible apps directly from the touchscreen.
6.4 USB Phone Mirroring
This feature allows you to display your smartphone's screen directly on the unit's display.
- Connect your smartphone to the unit's USB port.
- Select the "Phonelink" or "Mirrorlink" option from the main menu.
- Follow the on-screen instructions to establish the connection. This may require installing a specific app on your phone.
6.5 Radijas (AM/FM)

Image: The radio interface displaying AM and FM frequency ranges and signal strength, indicating available stations.
- Pagrindiniame meniu pasirinkite Radijas piktogramą.
- Bakstelėkite AM or FM to switch bands.
- Naudokite Ieškokite buttons to automatically search for stations.
- Tap and hold a preset number to save the current station.
6.6 Media Playback (USB, AUX)
- USB: Insert a USB drive into the USB port. The unit will automatically detect and play compatible audio/video files. Naršyti files using the on-screen interface.
- AUX: Connect an external audio device to the 3.5mm AUX-in port using an audio cable. Select the AUX source from the main menu.
6.7 Valdymas balsu

Image: A driver interacting with the car stereo using voice commands for Siri and Google Assistant, demonstrating hands-free operation.
When connected via CarPlay or Android Auto, you can activate your phone's voice assistant (Siri or Google Assistant) by pressing the voice control button on the unit (if available) or by using the voice command phrase (e.g., "Hey Siri" or "Ok Google").
6.8 Vairo valdymas (SWC)
Image: The steering wheel control configuration screen on the radio, showing options to program various buttons for functions like volume, track skip, and mode.
If your vehicle supports steering wheel controls, connect the SWC wire during installation. Access the Vairo valdymas settings in the unit's menu to program the buttons to control various functions (e.g., volume, track skip, mode).
6.9 Ekvalaizerio nustatymai

Image: The audio equalizer settings interface, showing adjustable frequency bands and preset options, alongside a diagram of RCA audio and video outputs.
Prisijunkite prie Garso nustatymai or EQ menu to adjust audio parameters. The unit features a 10-band equalizer with preset options (e.g., Pop, Rock, Jazz) and custom settings to tailor the sound output to your preference.
6.10 Galinisview Kameros įvestis
Prijunkite galinę dalįview camera to the CAMIN RCA input. When the vehicle is shifted into reverse, the unit will automatically display the camera feed, enhancing parking safety.
7. Specifikacijos
| Funkcija | Detalė |
|---|---|
| Modelio numeris | Single Din Touchscreen Radio |
| Ekranas | 6.5 Inch HD IPS Touch Screen (1024x600 resolution) |
| Ryšys | Bluetooth 5.3, USB, Auxiliary, Type-C (charging) |
| Išmaniųjų telefonų integracija | Apple CarPlay (Wired), Android Auto (Wired), Screen Mirroring |
| Garso išvestis | 300W Peak Power, 4-CH RCA Out, 10-band EQ |
| Radijo imtuvas | AM (530–1710 kHz), FM (87.5–107.9 MHz) |
| Vaizdo įrašų atkūrimas | 1080p Video Playback, H.264, H.265/HEVC encoding |
| Kontrolės metodai | Touchscreen, IR Remote Control, Steering Wheel Control, Voice Control |
| Matmenys | 4.5 x 7.36 x 2.4 colio (gaminys) |
| Svoris | 2.03 svaro |
| Maitinimo šaltinis | 12 V DC (neigiamas įžeminimas) |
8. Problemų sprendimas
Dažniausiai pasitaikančias problemas ir jų sprendimus rasite šiame skyriuje.
8.1 Nėra galios
- Patikrinkite laidus: Ensure the yellow (constant 12V), red (accessory 12V), and black (ground) wires are correctly connected and have proper voltage.
- Lydusis saugiklis: Check the fuse on the unit's wiring harness and the vehicle's fuse box. Replace if blown.
- Baterija: Ensure the vehicle's battery is charged and connected.
8.2 Nėra garso
- Garsumo lygis: Increase the volume. Check if the unit is muted.
- Garsiakalbio laidai: Verify all speaker wires are correctly connected and not short-circuited.
- Šaltinio pasirinkimas: Ensure the correct audio source (e.g., Radio, USB, Bluetooth, AUX) is selected.
- Ampgyvybingesnis: Jei išorinis amplifier is used, ensure it is powered on and correctly wired.
8.3 „CarPlay“ / „Android Auto“ neprisijungia
- USB kabelis: Use a high-quality, certified USB data cable. Faulty cables can prevent connection.
- USB prievadas: Ensure the phone is connected to the correct USB port on the unit.
- Telefono nustatymai: Patikrinkite telefono nustatymus, kad įsitikintumėte, jog įjungta „CarPlay“ / „Android Auto“ ir leidžiama prisijungti prie įrenginio.
- Programinės įrangos naujinimas: Ensure your phone's operating system and any relevant apps (e.g., Android Auto app) are up to date.
8.4 Jutiklinis ekranas nereaguoja
- Atstatyti įrenginį: Use a thin object to press the RST button on the front panel to perform a soft reset.
- Maitinimo ciklas: Turn off the vehicle's ignition, wait a few minutes, then restart.
9. Priežiūra
- Ekrano valymas: Jutiklinį ekraną švelniai nuvalykite minkšta, nepūkuota šluoste. Jei dėmės sunkiai įveikiamos, šiek tiek pamirkykite.ampNuvalykite šluostę vandeniu arba ekranui saugiu valikliu. Venkite stiprių cheminių medžiagų.
- Bendras valymas: Use a dry, soft cloth to wipe the unit's body. Do not use abrasive cleaners or solvents.
- Firmware atnaujinimai: Periodiškai tikrinkite gamintojo websvetainėje, kurioje pateikiami visi galimi programinės įrangos atnaujinimai, siekiant užtikrinti optimalų našumą ir suderinamumą.
10. Garantija ir palaikymas
SOUNDKITS provides the following support and warranty information:
- Garantija: The product comes with a 12-month responsibility for all products.
- Free Replacement/Refund: A 90-day free replacement or refund policy is available.
- Technical Guidance & Support: Lifetime technical guidance and support are provided.
- Klientų aptarnavimas: Fast response within 24 hours for inquiries.
For further assistance, please contact SOUNDKITS customer support through the platform where the product was purchased or visit the official SOUNDKITS store page.
You can typically find contact information by navigating to the seller's profile on the purchase platform and selecting "Ask a question."

Image: A graphic detailing SOUNDKITS' customer service commitments: 24-hour fast response, 90-day free replacement or refund, 12-month product responsibility, and lifetime technical guidance & support.


