1. Įvadas
This manual provides detailed instructions for the installation, operation, and maintenance of your Sharkoon MK6 RGB Micro ATX PC Case. Please read this manual thoroughly before beginning assembly to ensure proper setup and optimal performance.
The Sharkoon MK6 RGB is a compact Micro ATX PC case designed with a modern glass aesthetic, featuring tempered glass panels on the front and side. It includes three pre-installed addressable RGB PWM fans for efficient cooling and customizable lighting. The case supports BTF motherboards and offers ample space for various components, including large graphics cards and extensive cooling solutions.
2. Sąranka ir komponentų diegimas
Before starting, ensure you have all necessary tools, including a screwdriver set and anti-static wrist strap.
2.1. Bylos atidarymas
Carefully remove the tempered glass side panel by unscrewing the retaining thumbscrews, typically located at the rear of the case. Gently slide the panel off and set it aside on a soft, flat surface to prevent scratches.
2.2 Pagrindinės plokštės montavimas
- Install the I/O shield into the designated opening at the rear of the case.
- Align your Micro ATX or BTF motherboard with the standoffs inside the case. Ensure all standoffs match the motherboard's mounting holes.
- Pritvirtinkite pagrindinę plokštę naudodami pateiktus varžtus. Neperveržkite.
2.3 Maitinimo bloko (PSU) montavimas
The MK6 RGB supports bottom-mount power supplies up to 23.5 cm in length.
- Įstumkite maitinimo bloką į jam skirtą skyrių korpuso apačioje, gale.
- Secure the PSU to the case using screws from the rear panel.
2.4 Atminties disko diegimas
The case accommodates up to two 3.5" HDDs or three 2.5" SSDs.
- 3.5 colio kietieji diskai: Locate the drive cage, typically near the PSU shroud. Mount the HDDs using the provided trays or screws.
- 2.5 colio SSD diskai: SSDs can be mounted on dedicated brackets behind the motherboard tray or within the drive cage.
2.5 Vaizdo plokštės (GPU) diegimas
The MK6 RGB supports graphics cards up to 41 cm in length and includes a rubberized graphics card holder for support.
- Nuimkite reikiamus PCIe lizdų dangtelius nuo korpuso galo.
- Įdėkite vaizdo plokštę į atitinkamą PCIe lizdą pagrindinėje plokštėje.
- Secure the graphics card with screws. Adjust the graphics card holder to provide additional support if needed.
2.6 Aušinimo sistemos įrengimas
The case comes with three pre-installed 120mm addressable RGB PWM fans. Two fans are inverted on the side for intake, and one is at the rear for exhaust. The case supports up to eight fans in total.
- Papildomi gerbėjai: Install additional 120mm or 140mm fans in available mounting positions (top, bottom, side) as required for optimal airflow.
- Liquid Cooling Radiators: The case supports a 360mm radiator and an additional 240mm radiator. Mount radiators to the designated areas (e.g., top, side) using appropriate screws.
2.7 Kabelių valdymas
Kabelių tvarkymui naudokite kabelių išvedimo angas ir tvirtinimo taškus už pagrindinės plokštės dėklo. Tai pagerina oro srautą ir vizualiai pagerina vaizdą.

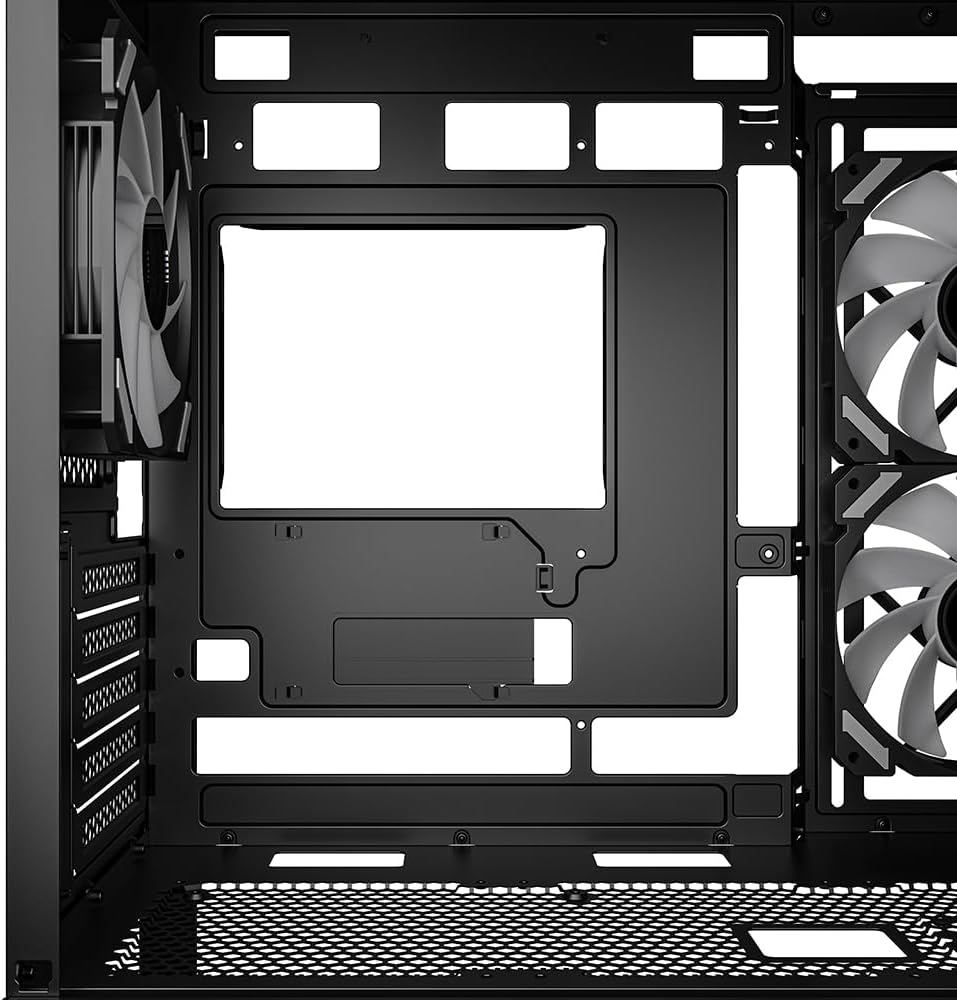
1 pav. Vidinis view of the Sharkoon MK6 RGB PC case, highlighting the pre-installed fans and drive bay locations.

2 pav. Vidinis view showing the motherboard tray and various cutouts for efficient cable management.

3 pav. Vidinis view illustrating the available mounting points for liquid cooling radiators.

4 pav. Vidinis view displaying the adjustable graphics card holder for enhanced GPU support.
3. Naudojimo instrukcijos
3.1 Įjungimas
After all components are installed and cables are connected, close the side panel. Connect your monitor, keyboard, mouse, and power cable to the PC. Press the power button on the front panel to start your system.
3.2 RGB apšvietimo valdymas
The MK6 RGB includes an RGB controller that provides connections for up to four LED elements and up to four PWM fans. The pre-installed fans are connected to this controller.
- Numatytieji režimai: The RGB lighting will typically cycle through default patterns upon startup.
- Programinės įrangos valdymas: If connected to a compatible motherboard, RGB lighting can be controlled via the motherboard's RGB synchronization software. Refer to your motherboard manual for specific instructions.
- Rankinis valdymas: Some cases may feature a dedicated button on the front panel to cycle through RGB modes. Consult the case's quick start guide for this feature.
3.3 Priekinio skydelio jungtys
The front panel features modern TRRS and USB-C ports for broad compatibility with various devices. Connect your peripherals and storage devices as needed.

5 pav.: priekis view of the Sharkoon MK6 RGB PC case, showcasing the tempered glass panel and visible RGB fans.
4. Priežiūra
Reguliarus techninis aptarnavimas padeda užtikrinti optimalų kompiuterio komponentų veikimą ir ilgaamžiškumą.
4.1 Dulkių filtro valymas
The case features dust filters to prevent dust accumulation. Regularly clean these filters to maintain good airflow.
- Locate and remove the dust filters (e.g., top, bottom, front).
- Clean the filters using compressed air or by rinsing them with water. Ensure they are completely dry before reinstallation.
4.2 Grūdinto stiklo valymas
Use a soft, lint-free cloth and a non-abrasive glass cleaner to clean the tempered glass panels. Avoid harsh chemicals that could damage the glass or coatings.
4.3 Fan Cleaning
Over time, dust can accumulate on fan blades, reducing cooling efficiency. Use compressed air to gently clean the fan blades. Ensure the system is powered off before cleaning.
6 paveikslas: viršuje view of the Sharkoon MK6 RGB PC case, illustrating the removable magnetic dust filter for easy cleaning.
5. Problemų sprendimas
Šiame skyriuje aptariamos dažniausiai pasitaikančios problemos, su kuriomis galite susidurti.
5.1 Sistema neįsijungia
- Maitinimo jungtys: Verify that the PSU is properly connected to the wall outlet and the power switch on the PSU is in the 'ON' position.
- Priekinio skydelio jungtys: Ensure the power button cable from the front panel is correctly connected to the motherboard's front panel header.
- Vidiniai komponentai: Check that all major components (motherboard, CPU, GPU, RAM) are securely seated and connected to the PSU.
5.2 Fans Not Spinning or RGB Not Lighting Up
- Ventiliatorių jungtys: Confirm that all fan power cables are securely connected to the motherboard or the RGB controller.
- RGB Controller Power: Ensure the RGB controller itself is receiving power, typically via a SATA power connector from the PSU.
- Software/Button: If using software control, check the software settings. If there's a physical RGB button, try cycling through modes.
5.3 Silpnas oro srautas arba perkaitimas
- Dulkių filtrai: Išvalykite visus užsikimšusius dulkių filtrus.
- Ventiliatoriaus orientacija: Ensure fans are oriented correctly for optimal airflow (intake at front/side, exhaust at rear/top).
- Kabelių valdymas: Patobulinkite laidų valdymą, kad sumažintumėte oro srauto kliūtis.
6. Specifikacijos
| Funkcija | Detalė |
|---|---|
| Modelio pavadinimas | MK6 RGB |
| Prekės ženklas | Šarkoonas |
| Atvejo tipas | Mid Tower |
| Pagrindinės plokštės suderinamumas | Micro ATX, BTF |
| Medžiaga | Grūdintas stiklas |
| Spalva | Juoda |
| Gaminio matmenys (IxPxH) | 17.13 x 8.86 x 17.52 colio (43.5 x 22.5 x 44.5 cm) |
| Prekės svoris | 13.42 svaro (6.1 kg) |
| CPU aušintuvo aukščio tarpas | Iki 17 cm |
| Graphics Card Length Clearance | Iki 41 cm |
| PSU ilgio prošvaisa | Iki 23.5 cm |
| Drive Bays | 2 x 3.5 colio HDD arba 3 x 2.5 colio SSD |
| Iš anksto įdiegti ventiliatoriai | 3x 120mm Addressable RGB PWM Fans |
| Maksimalus ventiliatoriaus palaikymas | Up to 8 fans |
| Radiatoriaus palaikymas | 1x 360mm, 1x240mm |
| Priekinės įvesties / išvesties prievadai | TRRS, USB-C, USB 3.0 (1 port listed in specs) |
| Aušinimo būdas | Oras |
| Maitinimo šaltinio tvirtinimo tipas | Apatinis kalnas |
7. Informacija apie garantiją
For detailed warranty information regarding your Sharkoon MK6 RGB PC Case, please refer to the official Sharkoon website or contact your local retailer. Warranty terms and conditions may vary by region and purchase location.
8. Techninė pagalba
If you encounter any issues or require technical assistance beyond the scope of this manual, please visit the official Sharkoon support website for FAQs, driver downloads, and contact information. You may also reach out to your point of purchase for support.