1. Įvadas
Thank you for choosing the GenMachine Mini PC AMD Ryzen 3 4300U. This compact and high-performance mini computer is designed for both home and office use, offering efficient multitasking, 4K visuals, and advanced connectivity. This manual provides essential information for setting up, operating, and maintaining your device.
2. Kas yra dėžutėje
Patikrinkite, ar pakuotėje yra visi reikalingi daiktai:
- GenMachine Mini PC (R3 4300U 8G 256G)
- Vartotojo vadovas
- Maitinimo adapteris
- HDMI kabelis
- Tvirtinimo laikiklis (VESA tvirtinimui)

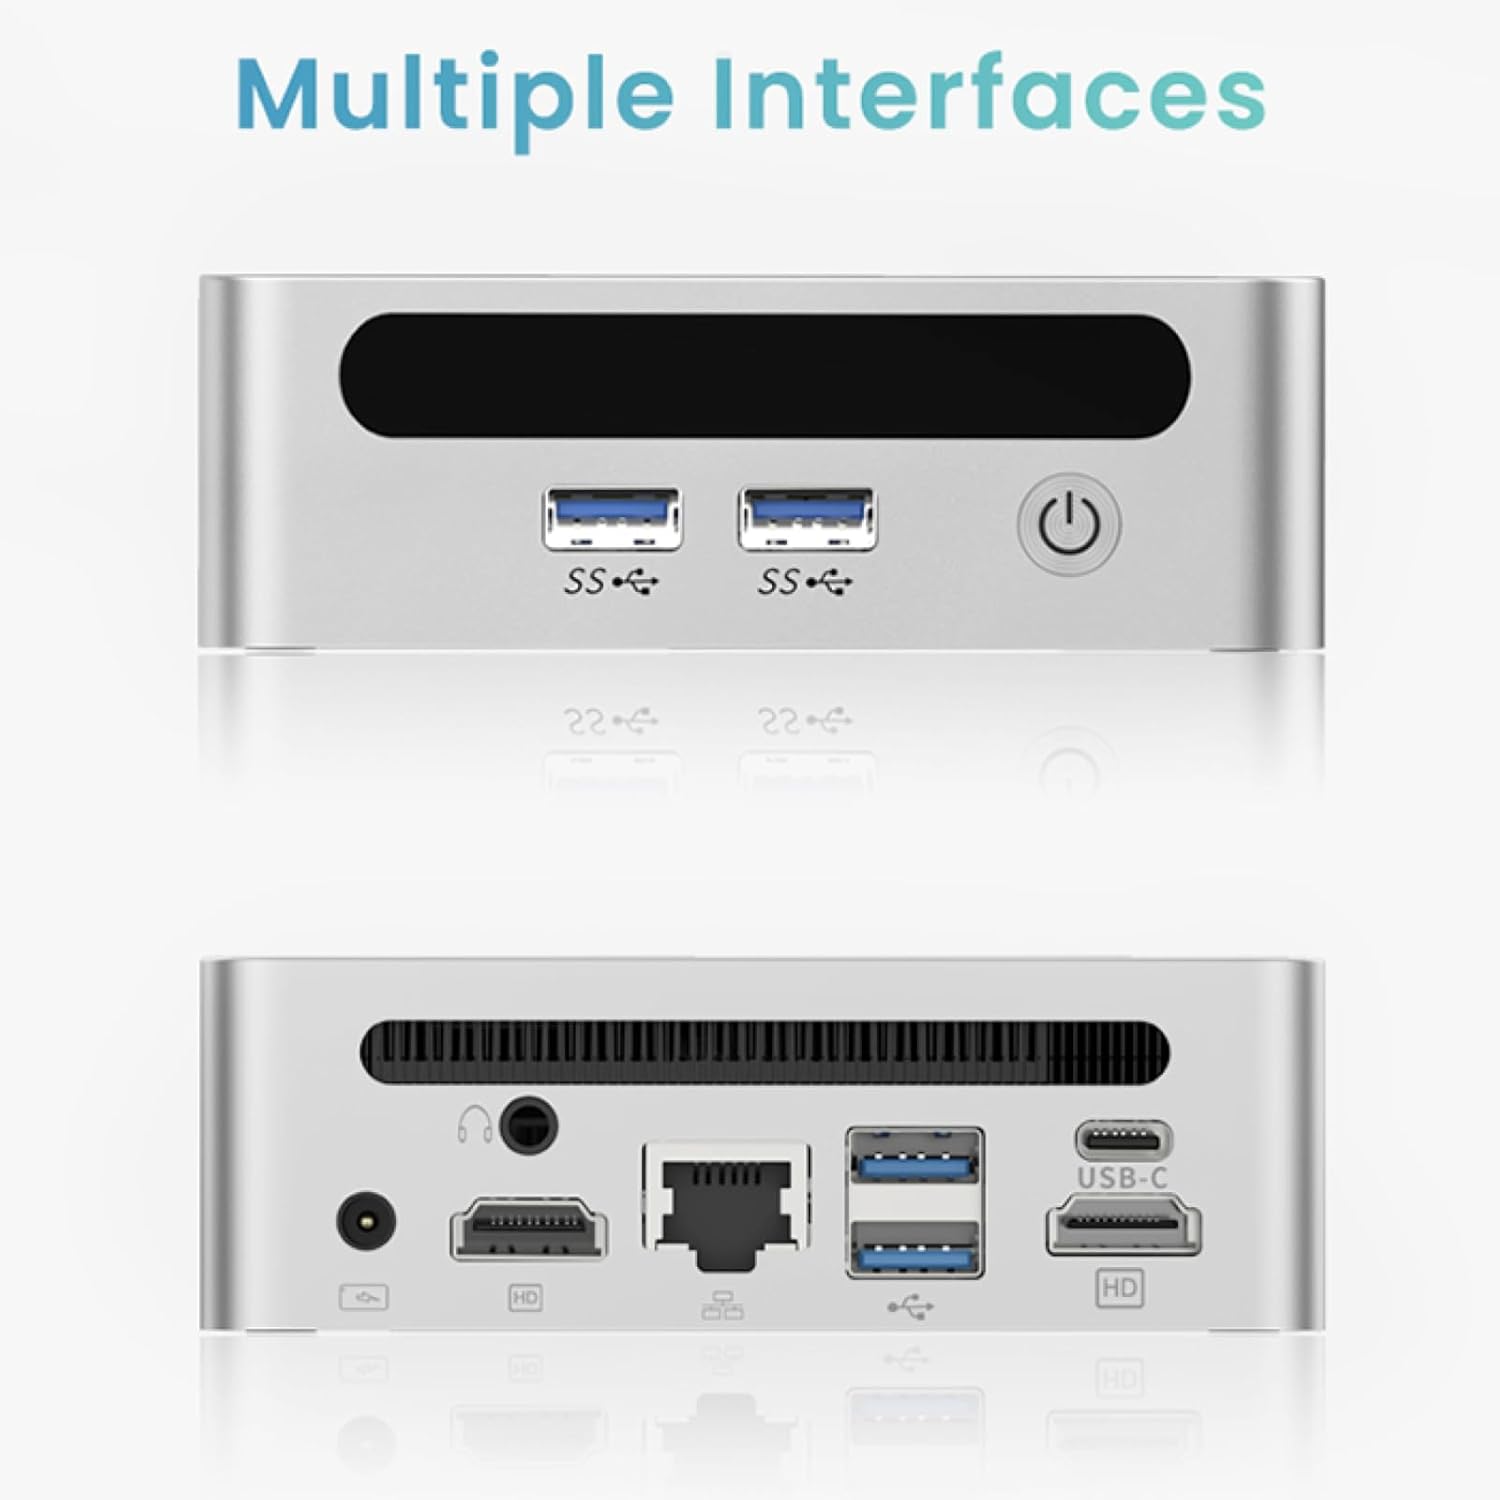
3. Produktas baigtasview (Techninė įranga)
The GenMachine Mini PC features a compact design with various ports for connectivity and expansion.
Priekinis skydelis
- Maitinimo mygtukas: Norėdami įjungti / išjungti įrenginį.
- USB 3.0 prievadai (x2): For high-speed data transfer and peripheral connections.
- USB 2.0 prievadas (x1): Standartinėms periferinėms jungtims.
Galinis skydelis
- DC maitinimo įvestis: Prijunkite pridedamą maitinimo adapterį čia.
- USB 2.0 prievadas (x1): Standartinėms periferinėms jungtims.
- HDMI prievadai (x2): For connecting displays, supporting up to 4K resolution.
- Ethernet (LAN) prievadas: Laidinio tinklo ryšiui.
- 3.5 mm garso lizdas: Ausinėms ar garsiakalbiams.
- Kensingtono užrakto lizdas: Dėl įrenginio tvirtinimo.
4. Sąrankos vadovas
Pradinis ryšys
- Išjunkite mini kompiuterį ir atjunkite visus laidus.
- Connect your monitor(s) to the HDMI port(s) on the rear panel.
- Prijunkite klaviatūrą ir pelę prie galimų USB prievadų.
- (Optional) For a wired network connection, plug an Ethernet cable into the LAN port.
- Connect the power adapter to the DC input port and then to a power outlet.
- Norėdami įjungti mini kompiuterį, paspauskite priekiniame skydelyje esantį maitinimo mygtuką.
Operating System Setup (Windows 11)
Your GenMachine Mini PC comes with Windows 11 pre-installed. Upon first boot, you will be guided through the initial Windows setup process, including:
- Regiono ir klaviatūros išdėstymo pasirinkimas.
- Network connection (Wi-Fi 6 or Ethernet).
- Prisijungimas prie „Microsoft“ paskyros arba vietinės paskyros sukūrimas.
- Privatumo nustatymų konfigūracija.
Vykdykite ekrane pateikiamus nurodymus, kad užbaigtumėte sąranką.
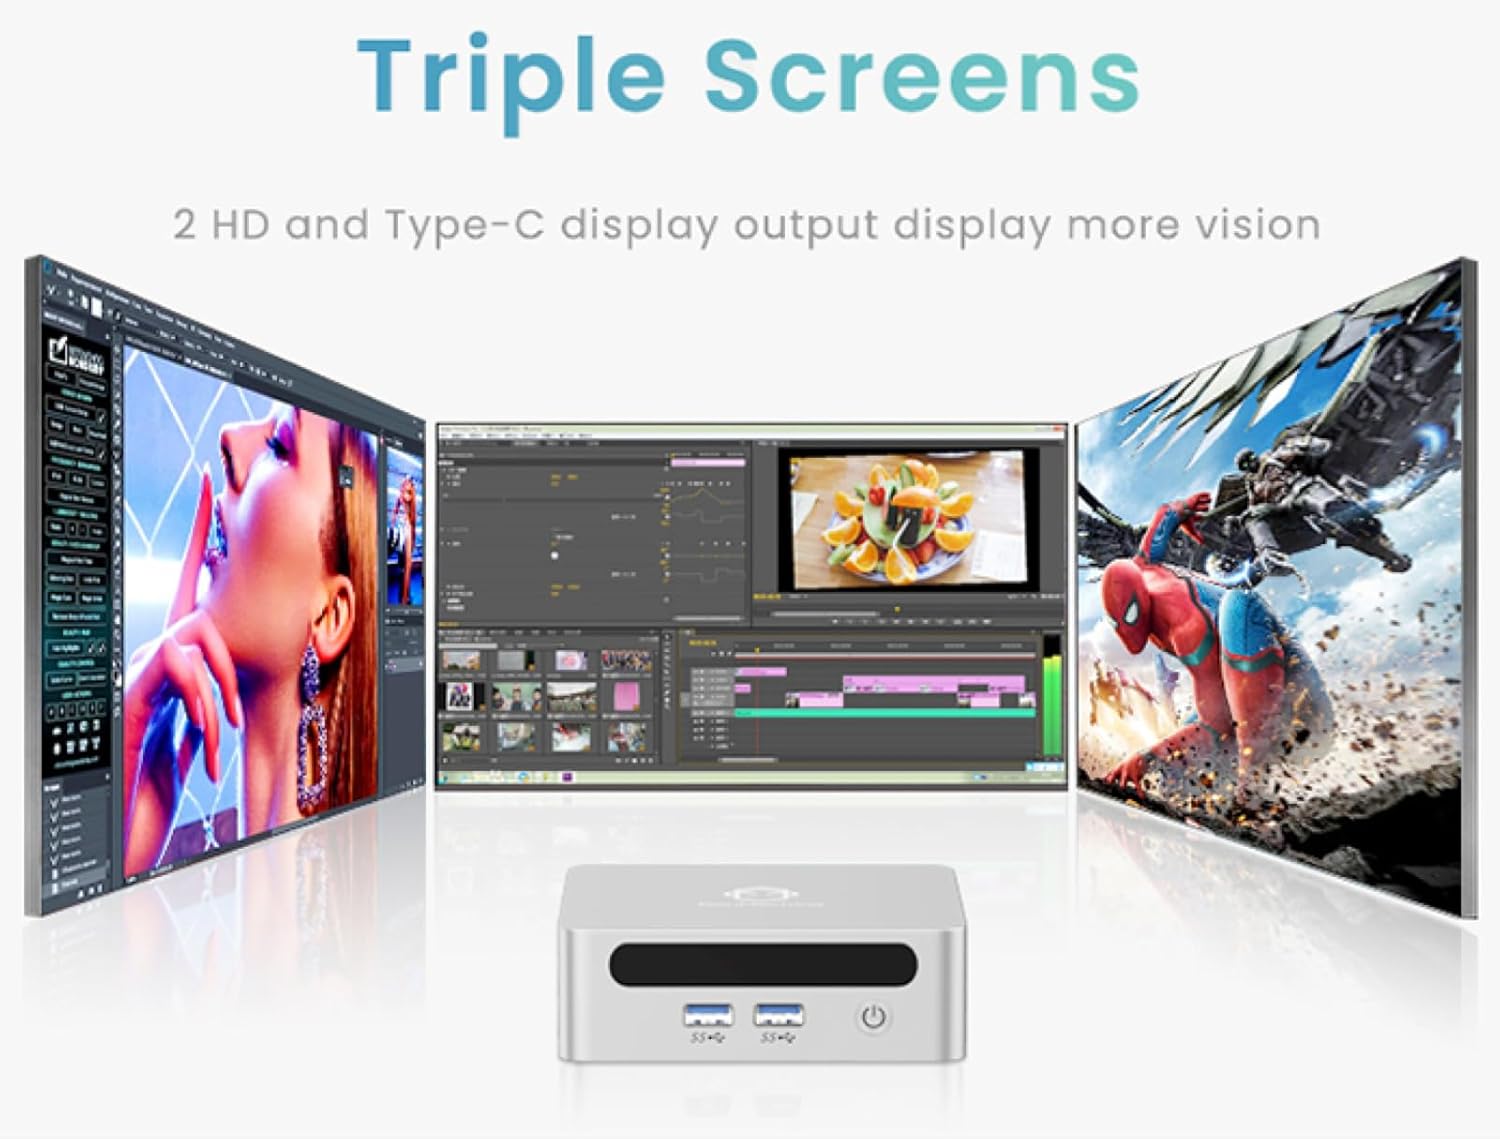
5. Performance and Usage
The AMD Ryzen 3 4300U processor, combined with 8GB DDR4 RAM and a 256GB SSD, provides robust performance for various tasks.
Pagrindinės funkcijos:
- 4K Ultra HD Visuals & Dual Display Support: Connect up to two 4K monitors for enhanced productivity or immersive entertainment.
- „Wi-Fi 6“ ir „Bluetooth 5.2“: Enjoy faster and more stable wireless internet and seamless connectivity with Bluetooth peripherals.
- Kompaktiškas ir tylus dizainas: Its small footprint and ultra-quiet cooling system make it suitable for any workspace without distraction.

6. Upgrading Components (Maintenance)
The GenMachine Mini PC allows for easy upgrades of its RAM and SSD to further enhance performance or storage capacity.
Reikalingi įrankiai:
- Mažas Phillips atsuktuvas
- Plastic pry tool (optional, for opening the case)
- New SSD (M.2 2280 NVMe or 2.5-inch SATA SSD)
- New RAM (DDR4 SODIMM)
Procedūra:
- Išjunkite mini kompiuterį ir atjunkite visus laidus.
- Carefully remove the four rubber foot pads on the bottom of the Mini PC to reveal the hidden screws.
- Atsukite keturis varžtus.
- Gently pry open the bottom plate along the edges. Be careful with the internal clips.
- Locate the existing SSD and RAM modules.
- To remove the SSD: If fixed by screws, unscrew them. If by clips, open the clips and pull out the original SSD.
- To remove RAM: Open the clips at both ends of the memory slot and pull out the original memory vertically.
- Insert the new SSD/RAM into the respective slots, ensuring they are properly seated and secured.
- Replace the bottom plate, aligning it with the clips and screw holes.
- Screw on the previously removed screws and reattach the foot pads.
7. Montavimo parinktys
The GenMachine Mini PC can be mounted behind a VESA-compatible monitor using the included mounting bracket, saving desk space and creating a clean setup.

8. Specifikacijos
| Funkcija | Detalė |
|---|---|
| Procesorius | AMD Ryzen 3 4300U (2.7 GHz) |
| RAM | 8 GB DDR4 SDRAM |
| Sandėliavimas | 256GB 2280 SSD (PCIE x 16 interface) |
| Grafika | Integruota AMD Radeon grafika |
| Operacinė sistema | OS (Windows 11 pre-installed) |
| Ryšys | Wi-Fi 6, Bluetooth 5.2, Ethernet |
| Vaizdo išvestis | 2x HDMI (4K @ 60Hz), USB-C (DisplayPort Alt Mode) |
| USB prievadai | 2x USB 3.0, 2x USB 2.0, 1x USB-C |
| Matmenys | 6.26 x 6.26 x 3.6 colio |
| Svoris | 2 svaro |
9. Problemų sprendimas
- Nėra galios: Įsitikinkite, kad maitinimo adapteris yra tvirtai prijungtas tiek prie „Mini PC“, tiek prie veikiančio maitinimo lizdo.
- Nėra ekrano: Verify that the HDMI cable(s) are correctly connected to the monitor(s) and the Mini PC. Check monitor input source settings.
- No Internet (Wi-Fi): Ensure Wi-Fi is enabled in Windows settings and you are connected to the correct network.
- No Internet (Wired): Check the Ethernet cable connection and ensure your router is functioning correctly.
- Lėtas našumas: Close unnecessary applications. Check for background updates. Consider upgrading RAM or SSD if issues persist.
10. Garantija ir palaikymas
For warranty information, technical support, or service inquiries, please refer to the contact details provided in your product packaging or visit the official GenMachine websvetainę. Išsaugokite pirkimo čekį garantiniams reikalavimams.