1. Įvadas
This manual provides essential information for the proper installation, operation, and maintenance of your LaView 2K Solar Camera Outdoor Wireless Security System. Please read this manual thoroughly before using the product to ensure optimal performance and safety. This system includes four (4) 2K QHD wireless cameras with integrated solar panels for continuous power.
2. Produktas baigtasview
„LaView 2K Solar Camera is a high-performance outdoor security solution designed for ease of use and comprehensive surveillance. Key features include:
- 2K QHD & Color Night Vision: Captures ultra-clear color images day and night.
- 100% Wireless & Solar-Powered: Eliminates wiring and manual recharging.
- 360° pasukimas ir 120° pakreipimas: Provides full coverage with no blind spots.
- Smart PIR Detection: Reduces false alarms by accurately detecting people, vehicles, and pets.
- Dvipusis garsas: Enables communication with visitors or deterring intruders.
- IP65 atsparumas oro sąlygoms: Designed to withstand harsh outdoor conditions.
- Kelių vartotojų bendrinimas: Supports up to 20 simultaneous viewPirmas
- Išmaniųjų namų suderinamumas: Veikia su Amazon Alexa ir Google Assistant.

Figure 1: LaView 2K Solar Camera Outdoor Wireless Security System (4 Pack)
3. Kas yra dėžutėje
Jūsų LaView 2K Solar Camera system includes the following components:
- 4 x LaView 2K Solar Camera Bodies
- 4 x Solar Panels (integrated or separate, depending on model variant)
- Mounting Hardware (screws, anchors, mounting brackets)
- USB-C įkrovimo laidas
- Greito paleidimo vadovas / Naudotojo vadovas

Figure 2: Typical box contents for LaView 2K Solar Camera.
4. Sąranka
4.1 Pradinė kameros sąranka
- Įkraukite fotoaparatą: Fully charge the camera battery using the provided USB-C cable before installation.
- Atsisiųskite programą: Atsisiųskite ir įdiekite „WAN“View Cloud" app from your smartphone's app store (available for Android and iOS).
- Maitinimas: Open the waterproof cover on the bottom of the camera. Press and hold the power button for approximately 5 seconds until you hear a chime and the camera begins its self-test rotation.
- Poravimas: Atidarykite WansView Cloud app, create an account, and log in. Tap the "+" or "Add Device" button. The app should automatically detect nearby devices via Bluetooth. Follow the in-app instructions to complete the pairing process. Ensure your smartphone is connected to a 2.4GHz Wi-Fi network.
4.2 Fizinis įrengimas
- Pasirinkite vietą: Select an outdoor location with good Wi-Fi signal strength and sufficient sunlight exposure for the solar panel. The camera is IP65 weatherproof.
- Sumontuokite fotoaparatą: Use the provided mounting template to mark drill holes on your wall. Drill holes, insert anchors, and secure the camera's mounting bracket with screws. Attach the camera body to the bracket.
- Sumontuokite saulės kolektorių: If the solar panel is separate, mount it in a location that receives maximum direct sunlight throughout the day. Connect the solar panel cable to the camera's 5V charging port.
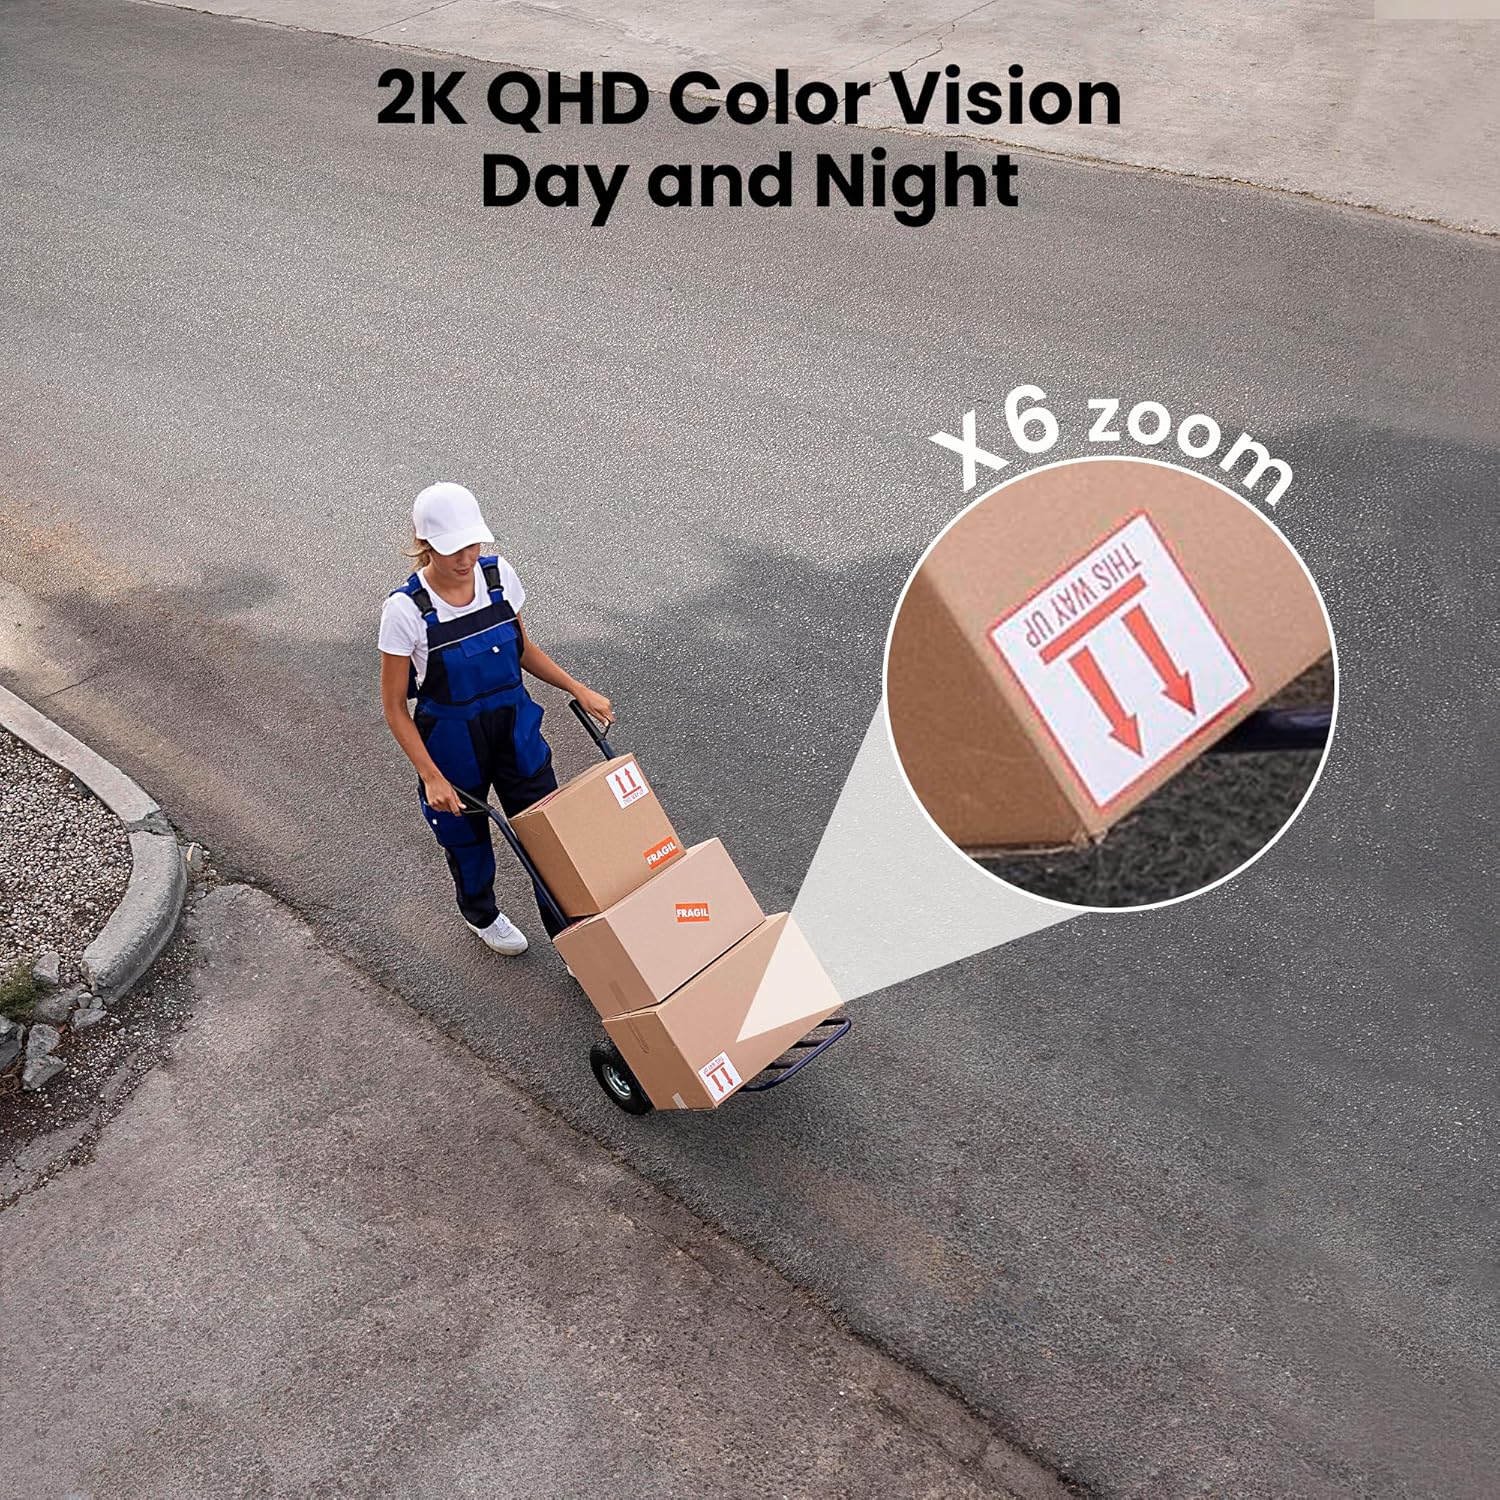
Figure 3: Flexible installation options for the LaView 2K Solar Camera.
5. Naudojimo instrukcijos
5.1 Tiesiogiai View ir kameros valdymas
- Atidarykite WansView Cloud app to access the live feed from your camera.
- Use the on-screen controls to pan the camera 360° horizontally and tilt it 120° vertically for full coverage.
- Utilize the 6X digital zoom feature to view details in the 2K QHD resolution.

Figure 4: Control 360° pan and 120° tilt directly from your phone.
5.2 Vaizdo kokybė ir naktinis matymas
- The camera provides 2K QHD video resolution for clear images.
- Spalvotas naktinis matymas: With an F/1.6 aperture, the camera captures clear color images even in low-light conditions.
- Infraraudonųjų spindulių nakties vizija: For complete darkness, the camera automatically switches to infrared mode for black and white video.
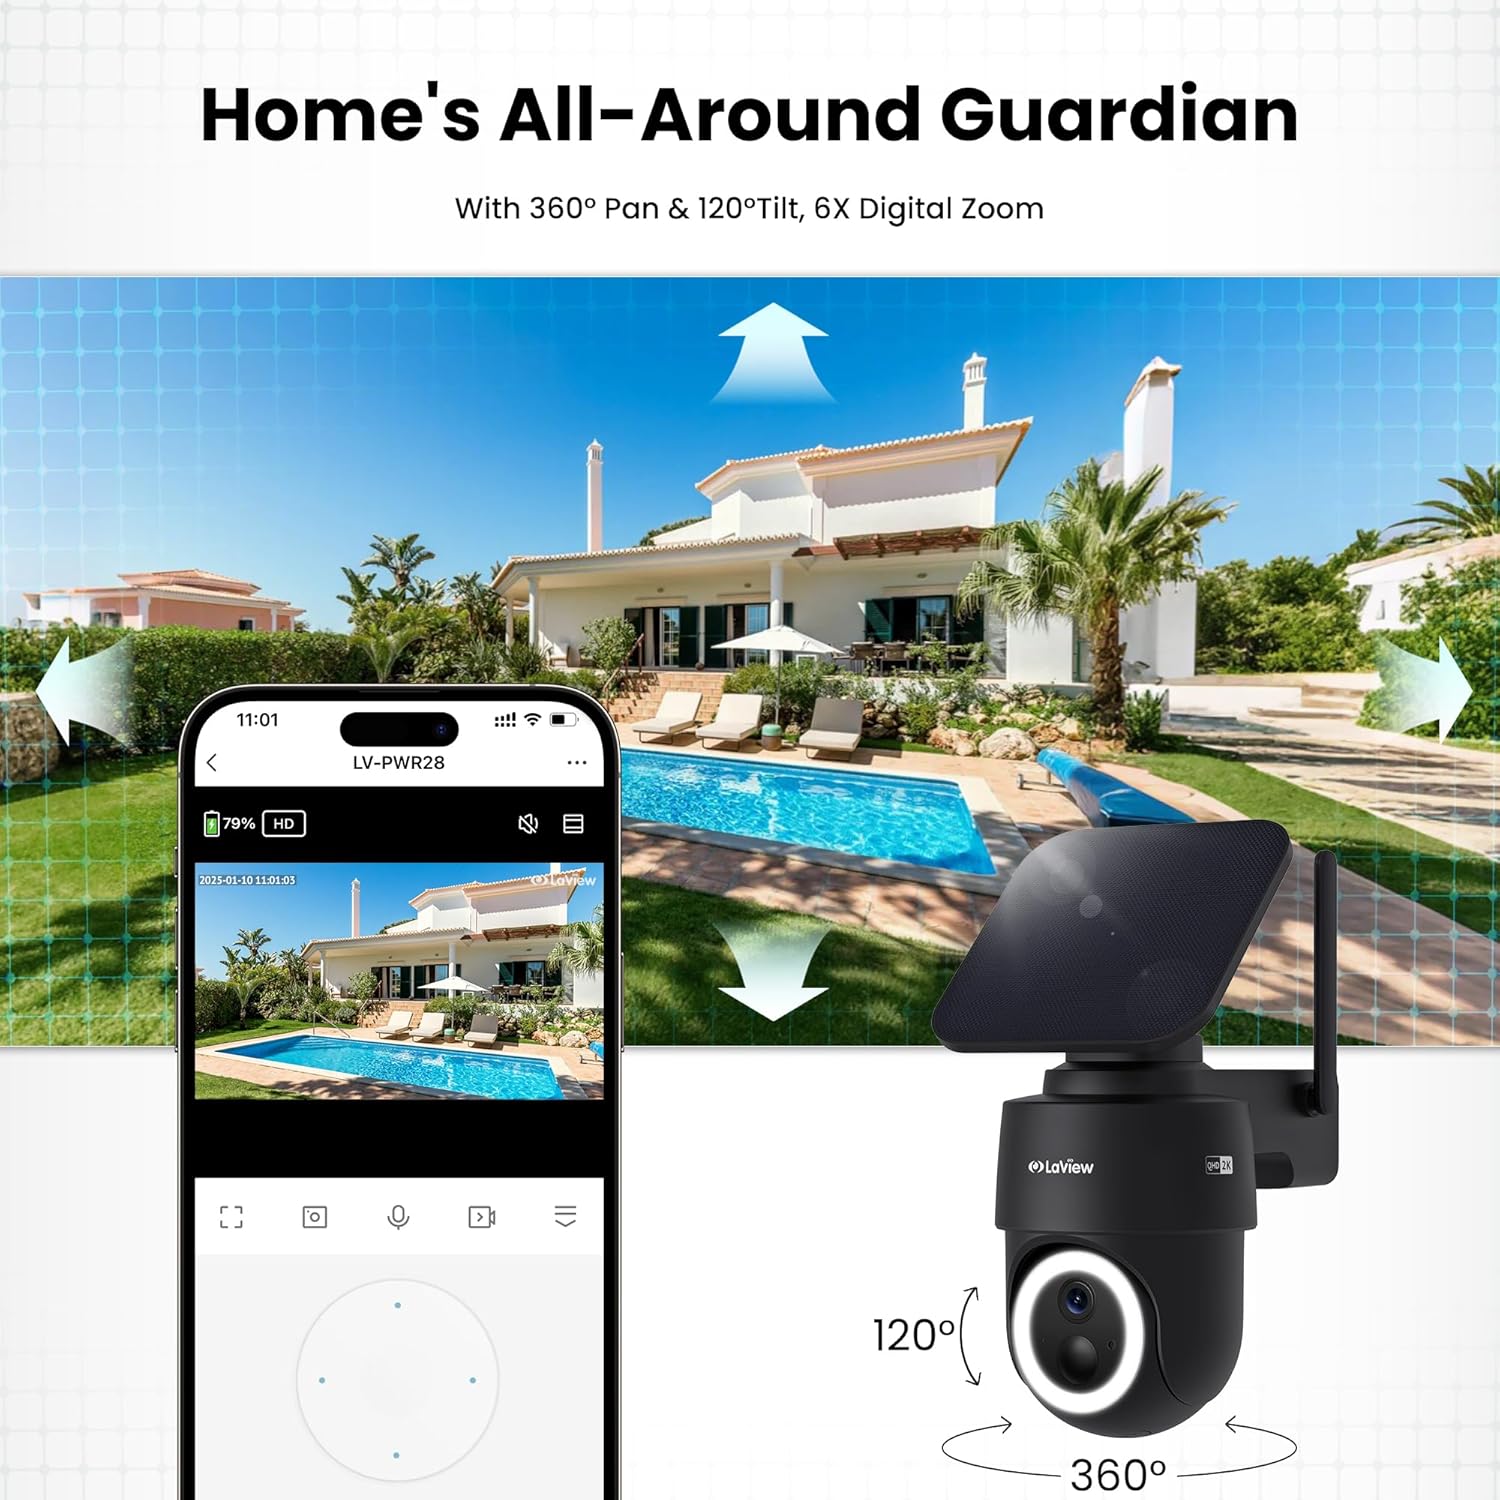
Figure 5: Experience 2K QHD color vision day and night with 6X zoom.
5.3 Judesio aptikimas ir įspėjimai
- PIR aptikimas: The advanced PIR sensor and intelligent algorithms accurately detect human, vehicle, and pet motion, reducing false alarms.
- Pritaikomos zonos: Set specific detection sensitivity and zones within the app.
- Momentiniai įspėjimai: Gaukite tiesioginius pranešimus savo išmaniajame telefone, kai aptinkamas judesys.
- Sirena ir prožektorius: Configure the camera to trigger a siren and spotlight upon motion detection for deterrence.

Figure 6: Auto-record on motion detection, capturing movement paths for clear activity tracking.
5.4 Dvipusis garsas
- Use the microphone and speaker in the app to communicate with anyone near the camera.

Figure 7: Stay connected with two-way talk functionality.
5.5 Saugojimo parinktys
- „Micro SD“ kortelė: Įdėkite „Micro SD“ kortelę (iki 256 GB, nepridedama) į tam skirtą lizdą, skirtą įrašams saugoti.
- Saugykla debesyje: Optional cloud storage is available with a 30-day free trial. A subscription is required for continued cloud service.

Figure 8: Dual storage options: Micro SD card and Cloud Storage.
5.6 Išmaniųjų namų integracija
- The camera is compatible with Amazon Alexa and Google Assistant. Follow the instructions in your smart home app to connect the camera.

Figure 9: Works with smart home devices like Amazon Alexa and Google Assistant.
6. Priežiūra
6.1 Akumuliatoriaus įkrovimas
- The integrated solar panel continuously charges the camera's rechargeable battery. Ensure the solar panel is clean and free from obstructions for optimal charging.
- If necessary, the camera can also be charged directly via the USB-C port using the provided cable.

Figure 10: Forever powered with portable solar panel.
6.2 Atsparumas oro sąlygoms
- The camera has an IP65 weatherproof rating, protecting it from dust and water jets. It operates in temperatures from 14°F to 122°F (-10°C to 50°C).

Figure 11: IP65 Weatherproof design for all conditions.
6.3 Valymas
- Reguliariai valykite kameros objektyvą ir saulės bateriją minkšta,amp cloth to ensure clear image quality and efficient charging.
7. Problemų sprendimas
- Fotoaparatas neprisijungia prie „Wi-Fi“: Ensure your Wi-Fi network is 2.4GHz. Reboot your router and smartphone. Reset the camera by holding the reset button for 5 seconds until you hear a chime, then attempt pairing again.
- Dažni klaidingi aliarmai: Adjust the PIR detection sensitivity and customize detection zones within the app to minimize unwanted alerts from non-relevant motion sources.
- Prasta vaizdo kokybė: Ensure the camera lens is clean and free from obstructions. Check Wi-Fi signal strength.
- Akumuliatorius neįkraunamas: Verify the solar panel is receiving direct sunlight and is free from dirt or obstructions. Ensure the solar panel cable is securely connected to the camera.
8. Specifikacijos
| Modelio pavadinimas | LV-PWR28Q-B-4PK |
| Naudojimas viduje / lauke | Lauke |
| Maitinimo šaltinis | Varomas saulės energija |
| Ryšio protokolas | „Wi-Fi“ (tik 2.4 GHz) |
| Vaizdo įrašymo raiška | 2K QHD (3K mentioned in specs, but 2K QHD in features) |
| Valdiklio tipas | Amazon Alexa |
| Montavimo tipas | Sieninis laikiklis |
| Atsparumo oro sąlygoms įvertinimas | IP65 |
| Darbinė temperatūra | nuo 14°F iki 122°F (nuo -10°C iki 50°C) |
| Prekės matmenys (I x P x A) | 10 x 13 x 9 colio |
| Prekės svoris | 7.88 svaro |
| UPC | 192728016859 |
9. Garantija ir palaikymas
- 1 metų pakeitimo garantija: Jūsų LaView 2K Solar Camera system is covered by a 1-year replacement warranty.
- Techninis palaikymas visą gyvenimą: LaView offers lifetime technical support via phone for prompt and reliable solutions.
- 1-on-1 Customer Service: Dedicated customer service is available for personalized assistance.

Figure 12: LaView provides comprehensive after-sales support.


