1. Įvadas
Thank you for choosing the FLYLINKTECH 5000A Jump Starter. This portable device is designed to provide instant power to jump-start 12V vehicles, charge electronic devices, and offer emergency lighting. Please read this manual thoroughly before use to ensure safe and optimal performance.
2. Svarbi saugos informacija
- Prieš naudodami visada įsitikinkite, kad užvedimo jungiklis yra visiškai įkrautas.
- Nebandykite užvesti užšalusio akumuliatoriaus.
- Prijunkite klamps correctly: red to positive (+), black to negative (-). Reverse polarity can cause damage.
- Nejunkite raudonos ir juodos jungtiesamps kartu.
- Laikyti vaikams nepasiekiamoje vietoje.
- Naudokite gerai vėdinamoje vietoje.
- Stenkitės ilgą laiką nelaikyti prietaiso ekstremaliose temperatūrose arba tiesioginiuose saulės spinduliuose.
- Jei prietaisas naudojimo metu pernelyg įkaista, nedelsdami jį atjunkite.
- Konkrečias užvedimo nuo kito akumuliatoriaus procedūras rasite savo transporto priemonės naudotojo vadove.
3. Pakuotės turinys
Patikrinkite, ar pakuotėje yra visi reikalingi daiktai:
- FLYLINKTECH 5000A Jump Starter (Model BD10)
- Smart Jumper kabeliai
- USB-C įkrovimo laidas
- EVA saugojimo dėklas
- Vartotojo vadovas

Image: Contents of the FLYLINKTECH 5000A Jump Starter package, including the jump starter unit, smart jumper cables, USB-C charging cable, and EVA storage case.
4. Produktas baigtasview
Familiarize yourself with the components and ports of your jump starter:
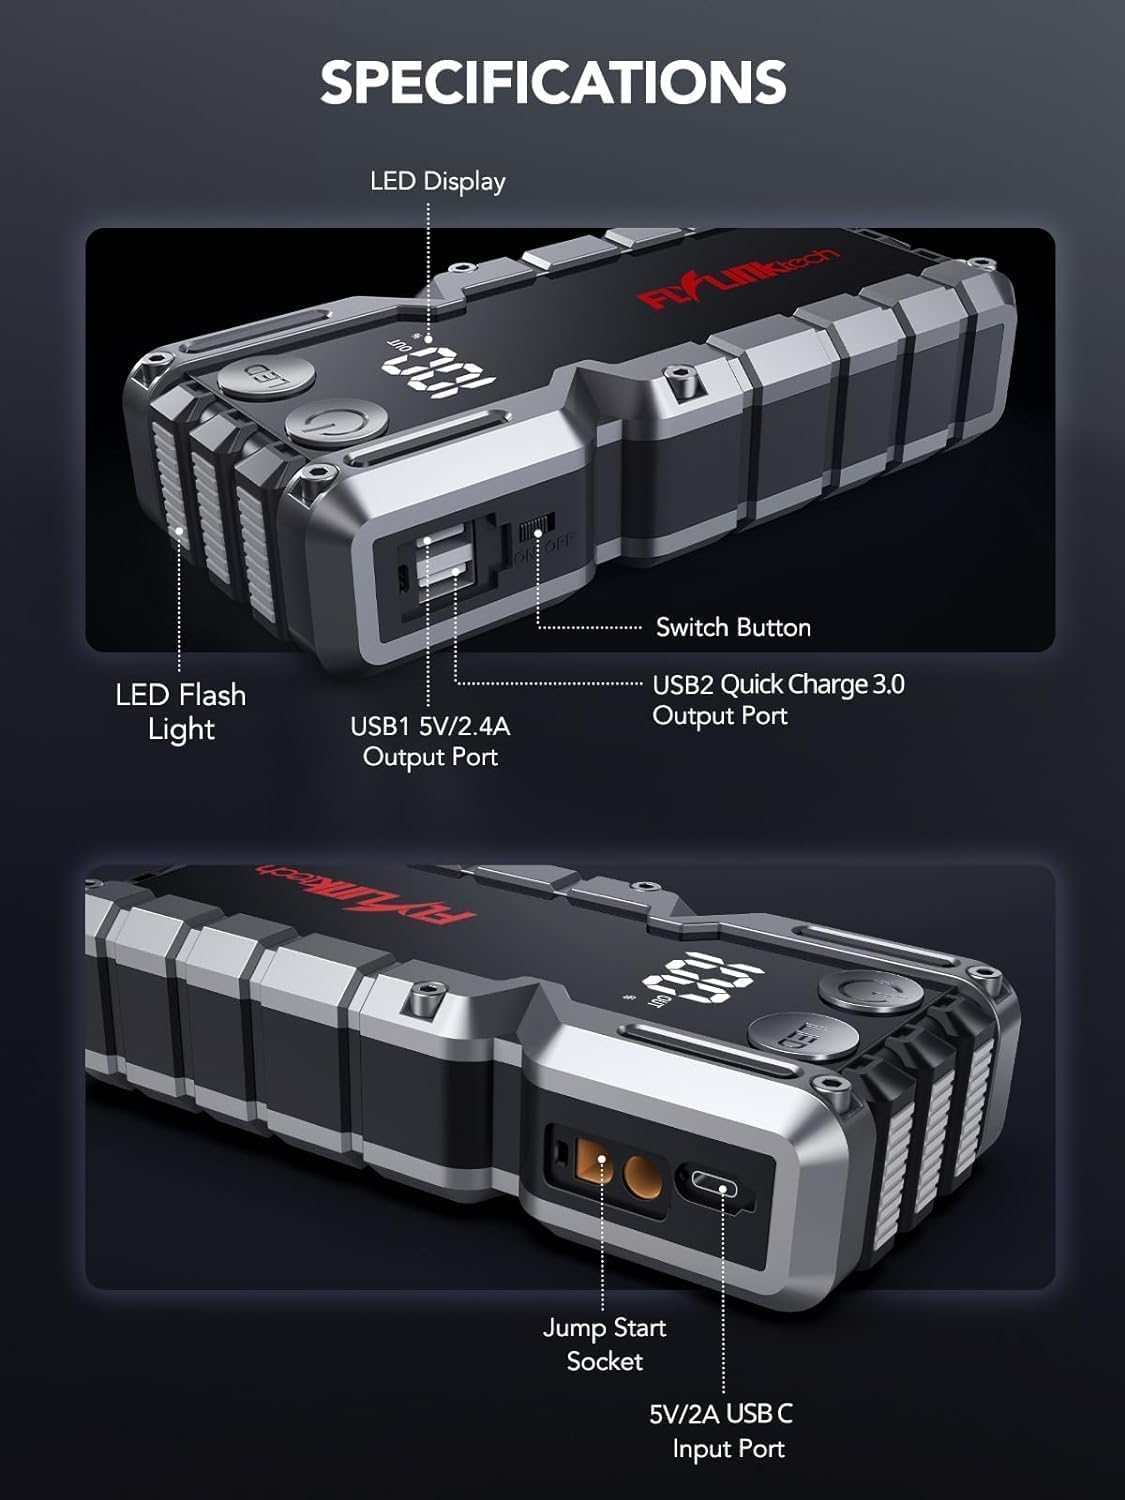
Vaizdas: Išsamus view of the jump starter showing the LED display, LED flashlight, power button, switch button, USB1 5V/2.4A output port, USB2 Quick Charge 3.0 output port, Jump Start Socket, and 5V/2A USB-C input port.
- Skystųjų kristalų ekranas: Rodo akumuliatoriaus procentątage.
- LED žibintuvėlis: Suteikia apšvietimą su keliais režimais.
- Maitinimo mygtukas: Activates the device and controls flashlight modes.
- Perjungimo mygtukas: Pagrindinis maitinimo valdymas.
- USB1 išvestis (5 V / 2.4 A): Standartinis USB įkrovimo prievadas.
- USB2 Output (QC3.0): Quick Charge 3.0 port for faster charging.
- Užvedimo lizdas: Jungiamasi prie išmaniųjų užvedimo laidų.
- USB-C Input (5V/2A): Used to recharge the jump starter.
5. Užvedimo laidininko įkrovimas
Before first use, fully charge the jump starter. It is recommended to recharge the unit every 3-6 months to maintain battery health.
- Connect the provided USB-C charging cable to the USB-C input port on the jump starter.
- Kitą USB-C laido galą prijunkite prie 5 V / 2 A USB sieninio adapterio (nepridedamas) arba automobilinio įkroviklio.
- The LED display will show the charging progress. The unit is fully charged when the display shows 100%.

Image: The jump starter connected via USB to charge a smartphone and a tablet, demonstrating its power bank functionality.
6. Užvedimas nuo kito automobilio šaltinio
Follow these steps carefully to safely jump-start your 12V vehicle:
- Paruoškite užvedimo laidą: Ensure the jump starter is at least 50% charged. Turn off your vehicle's ignition and all accessories (headlights, radio, etc.).
- Prijunkite išmaniuosius užvedimo laidus: Insert the blue plug of the smart jumper cables into the Jump Start Socket on the jump starter. Ensure a firm connection. The indicator light on the smart clamp will flash red and green.
- Prijunkite prie automobilio akumuliatoriaus:
- Pritvirtinkite raudona (+) klamp prie teigiamo jūsų automobilio akumuliatoriaus gnybto.
- Pritvirtinkite juoda (-) klamp prie neigiamo jūsų automobilio akumuliatoriaus gnybto.
Once connected correctly, the indicator light on the smart clamp taps žalia.
- Užvesti transporto priemonę: Go into your vehicle and start the engine. If the vehicle does not start immediately, wait 30 seconds and try again. If it still doesn't start, press the "BOOST" button on the smart clamp for 3 seconds until the green light turns solid, then try starting the car again within 30 seconds.
- Nuimkite laidus: Once the engine starts, immediately remove the smart jumper cables from the vehicle battery, then disconnect them from the jump starter.

Image: Visual guide for jump-starting: 1. Insert jump clamp į stiprintuvą. 2. Prijunkiteamps to car battery. 3. Start your car. 4. Remove clamps.

Paveikslėlis: išmanusis klamps connected to the jump starter, illustrating the 10-layer safety protections including short circuit, reverse charge, over charge, reverse polarity, over discharge, over current, reverse connection, and high temperature protection.
7. Naudojimas kaip išorinės baterijos
The jump starter can also be used to charge your electronic devices.
- Connect your device's USB charging cable to either the USB1 (5V/2.4A) or USB2 (QC3.0) output port on the jump starter.
- Įkroviklis automatiškai pradės krauti jūsų įrenginį.
- The LED display will show the remaining battery capacity of the jump starter.

Image: The jump starter functioning as a portable power bank, with two USB output ports (5V/2.4A and Quick Charge 3.0) actively charging a smartphone and a tablet.
8. LED žibintuvėlio naudojimas
The built-in 600-lumen LED flashlight has three modes for various situations:
- Norėdami įjungti / išjungti: Press and hold the LED button for 3 seconds.
- Norėdami perjungti režimus: Once the light is on, short press the LED button to switch between:
- Nuolat įjungta: Bendram apšvietimui.
- SOS režimas: Mirksi tarptautinis SOS signalas avarinėms situacijoms.
- Stroboskopo režimas: Rapid flashing for warning or signaling.

Image: The jump starter with its LED flashlight active, illustrating the three available modes: standard flashlight, SOS signal, and strobe light for emergencies.
9. Priežiūra
- Valymas: Wipe the unit with a soft, dry cloth. Do not use harsh chemicals or abrasive materials.
- Saugykla: Store the jump starter in its EVA case in a cool, dry place away from direct sunlight. Ensure it is charged to at least 50% before storing for extended periods. Recharge every 3-6 months.
- Akumuliatoriaus priežiūra: The internal lithium-ion battery is designed for long life. Avoid fully discharging the unit frequently.

Water-resistant design.

Rugged ABS shell for drop resistance.

Operates in extreme temperatures (-4°F to 140°F).
10. Problemų sprendimas
| Problema | Galima priežastis | Sprendimas |
|---|---|---|
| Vehicle won't start after connecting. | Jump starter battery too low; incorrect clamp jungtis; visiškai išsikrovęs automobilio akumuliatorius. | Įsitikinkite, kad užvedimo užvedimo įtaisas yra visiškai įkrautas. Patikrinkiteamp connections (red to +, black to -). Press the "BOOST" button on the smart clamp for 3 seconds and try again. |
| Išmanusis klamp indicator light is red/flashing. | Reverse polarity; short circuit; over-temperature. | Atjungti klamps and re-connect correctly. Check for any short circuits. Allow unit to cool down if overheated. |
| Užvedimo jungiklis neįkraunamas. | Sugedęs įkrovimo laidas arba adapteris; atsilaisvinęs kontaktas. | Ensure USB-C cable and adapter are working and connected securely. Try a different cable or adapter. |
| Neveikia LED žibintuvėlis. | Not activated correctly; low battery. | Press and hold the LED button for 3 seconds to activate. Ensure the jump starter has sufficient charge. |
11. Specifikacijos
| Funkcija | Detalė |
|---|---|
| Didžiausia srovė | 5000A |
| Baterijos talpa | 18000 66.6 mAh (XNUMX Wh) |
| Pradėti Voltage | 12 V |
| Variklio suderinamumas | Iki 9.0 l benzininio / 8.0 l dyzelinio |
| USB išvestis 1 | 5V/2.4A |
| USB išvestis 2 | QC3.0 |
| USB-C įvestis | 5V/2A |
| LED žibintuvėlis | 600-Lumen (Constant, SOS, Strobe) |
| Darbinė temperatūra | -4°F iki 140°F (nuo -20°C iki 60°C) |
| Matmenys | 4.2 x 9 x 19 cm |
| Svoris | 540 g (1.19 svaro) |
| Saugos priemonės | 10-Layer (Short Circuit, Reverse Polarity, Over-Current, etc.) |
12. Garantija ir palaikymas
The FLYLINKTECH 5000A Jump Starter comes with an industry-leading 3 metų garantija nuo įsigijimo datos. Ši garantija taikoma gamybos defektams ir užtikrina patikimą veikimą.
For technical support, warranty claims, or any questions regarding your product, please contact FLYLINKTECH customer service through the retailer's platform or visit our official websvetainę.
Prašome išsaugoti pirkimo įrodymą garantijos galiojimui.


