1. Įvadas
This manual provides essential information for setting up, operating, and maintaining your GenMachine Mini PC AMD Ryzen 7 7735HS. Please read this manual thoroughly before using the device to ensure proper functionality and safety.
2. Saugos informacija
Kad nesugadintumėte įrenginio ar nesusižalotumėte, laikykitės šių saugos nurodymų:
- Saugokite įrenginį nuo vandens, drėgmės ar ekstremalių temperatūrų.
- Užtikrinkite tinkamą vėdinimą, kad išvengtumėte perkaitimo. Neužblokuokite ventiliacijos angų.
- Naudokite tik pateiktą maitinimo adapterį.
- Stenkitės, kad prietaisas nenumestų ar nepatirtų stipraus smūgio.
- Nebandykite patys atidaryti ar taisyti įrenginio. Visus techninės priežiūros darbus patikėkite kvalifikuotiems specialistams.
3. Pakuotės turinys
Patikrinkite, ar pakuotėje yra visi reikalingi daiktai:
- GenMachine Mini PC
- Vartotojo vadovas
- Maitinimo adapteris
- HDMI kabelis
- Montavimo laikiklis (su varžtais)

Paveikslėlis: Pakuotės turinys. This image displays the items included in the GenMachine Mini PC box: the Mini PC unit, user manual, power adapter, HDMI cable, and a mounting bracket with screws.
4. Produktas baigtasview
The GenMachine Mini PC is a compact, high-performance computer designed for various applications, from home office tasks to multimedia consumption. Its small footprint allows for versatile placement.

Vaizdas: priekis View of GenMachine Mini PC. This image shows the front panel of the GenMachine Mini PC, featuring the power button, USB-C port, audio jack, and two USB 3.0 ports.
4.1 Priekinis skydelis
- Maitinimo mygtukas: Paspauskite norėdami įjungti/išjungti įrenginį.
- USB-C prievadas: Duomenų perdavimui ir ekrano išvesčiai.
- Garso lizdas: Ausinėms arba išoriniams garsiakalbiams.
- USB 3.0 prievadai (x2): Skirta prijungti periferinius įrenginius, tokius kaip klaviatūros, pelės ar išorinės atminties įrenginiai.
4.2 Galinis skydelis

Vaizdas: Galinis View of GenMachine Mini PC. This image illustrates the rear panel of the Mini PC, highlighting the power input, HDMI ports, Ethernet ports, and additional USB ports.
- Maitinimo įvestis (nuolatinė srovė): Čia prijunkite maitinimo adapterį.
- HDMI prievadai (x2): Connect to monitors or TVs for video output. Supports 4K resolution.
- Ethernet Ports (x2): For wired network connections (Dual 2.5G).
- USB 2.0 prievadai (x2): For connecting various USB devices.
4.3 Design and Dimensions

Image: GenMachine Mini PC Size Comparison. This image compares the compact size of the GenMachine Mini PC to a traditional tower chassis, illustrating its space-saving design. Dimensions are shown as 126mm x 130mm x 40mm.
The GenMachine Mini PC features an ultra-durable, lightweight metal casing. Its compact design (approximately 126 x 130 x 40 mm) makes it significantly smaller than traditional desktop computers, ideal for any work environment.
5. Sąranka
5.1 Išorinių įrenginių prijungimas
- Connect your monitor(s) to the HDMI ports or the USB-C port using appropriate cables.
- Prijunkite USB klaviatūrą ir pelę prie galimų USB prievadų.
- If using wired internet, connect an Ethernet cable to one of the Ethernet ports.
- Prijunkite maitinimo adapterį prie „Mini PC“ nuolatinės srovės įvesties prievado, tada įjunkite jį į maitinimo lizdą.
5.2 Įjungimas
Press the power button on the front panel of the Mini PC. The power indicator light will illuminate, and the system will begin to boot.
5.3 Initial Operating System Setup
Upon first boot, you will be guided through the operating system setup process (e.g., Windows 11). Follow the on-screen instructions to configure language, region, network, and user accounts.
6. Naudojimo instrukcijos
6.1 Tinklo ryšys
- „Wi-Fi“: During initial setup or via the operating system's network settings, select your Wi-Fi network and enter the password. The Mini PC supports Wi-Fi 6 for faster and more stable wireless connections.
- Ethernet: If an Ethernet cable is connected, the system should automatically detect and connect to the wired network. The Mini PC features dual 2.5G network ports for enhanced connectivity.
6.2 „Bluetooth“ įrenginiai
The Mini PC supports Bluetooth 5.2. To pair a Bluetooth device (e.g., headphones, keyboard, mouse):
- Enable Bluetooth on your device and set it to pairing mode.
- On the Mini PC, go to the operating system's Bluetooth settings.
- Ieškokite and select your device from the list, then follow any on-screen prompts to complete pairing.
6.3 Kelių ekranų sąranka
The GenMachine Mini PC supports up to four displays simultaneously, utilizing its two HDMI ports and one full-function USB-C port (which supports 4K display output).
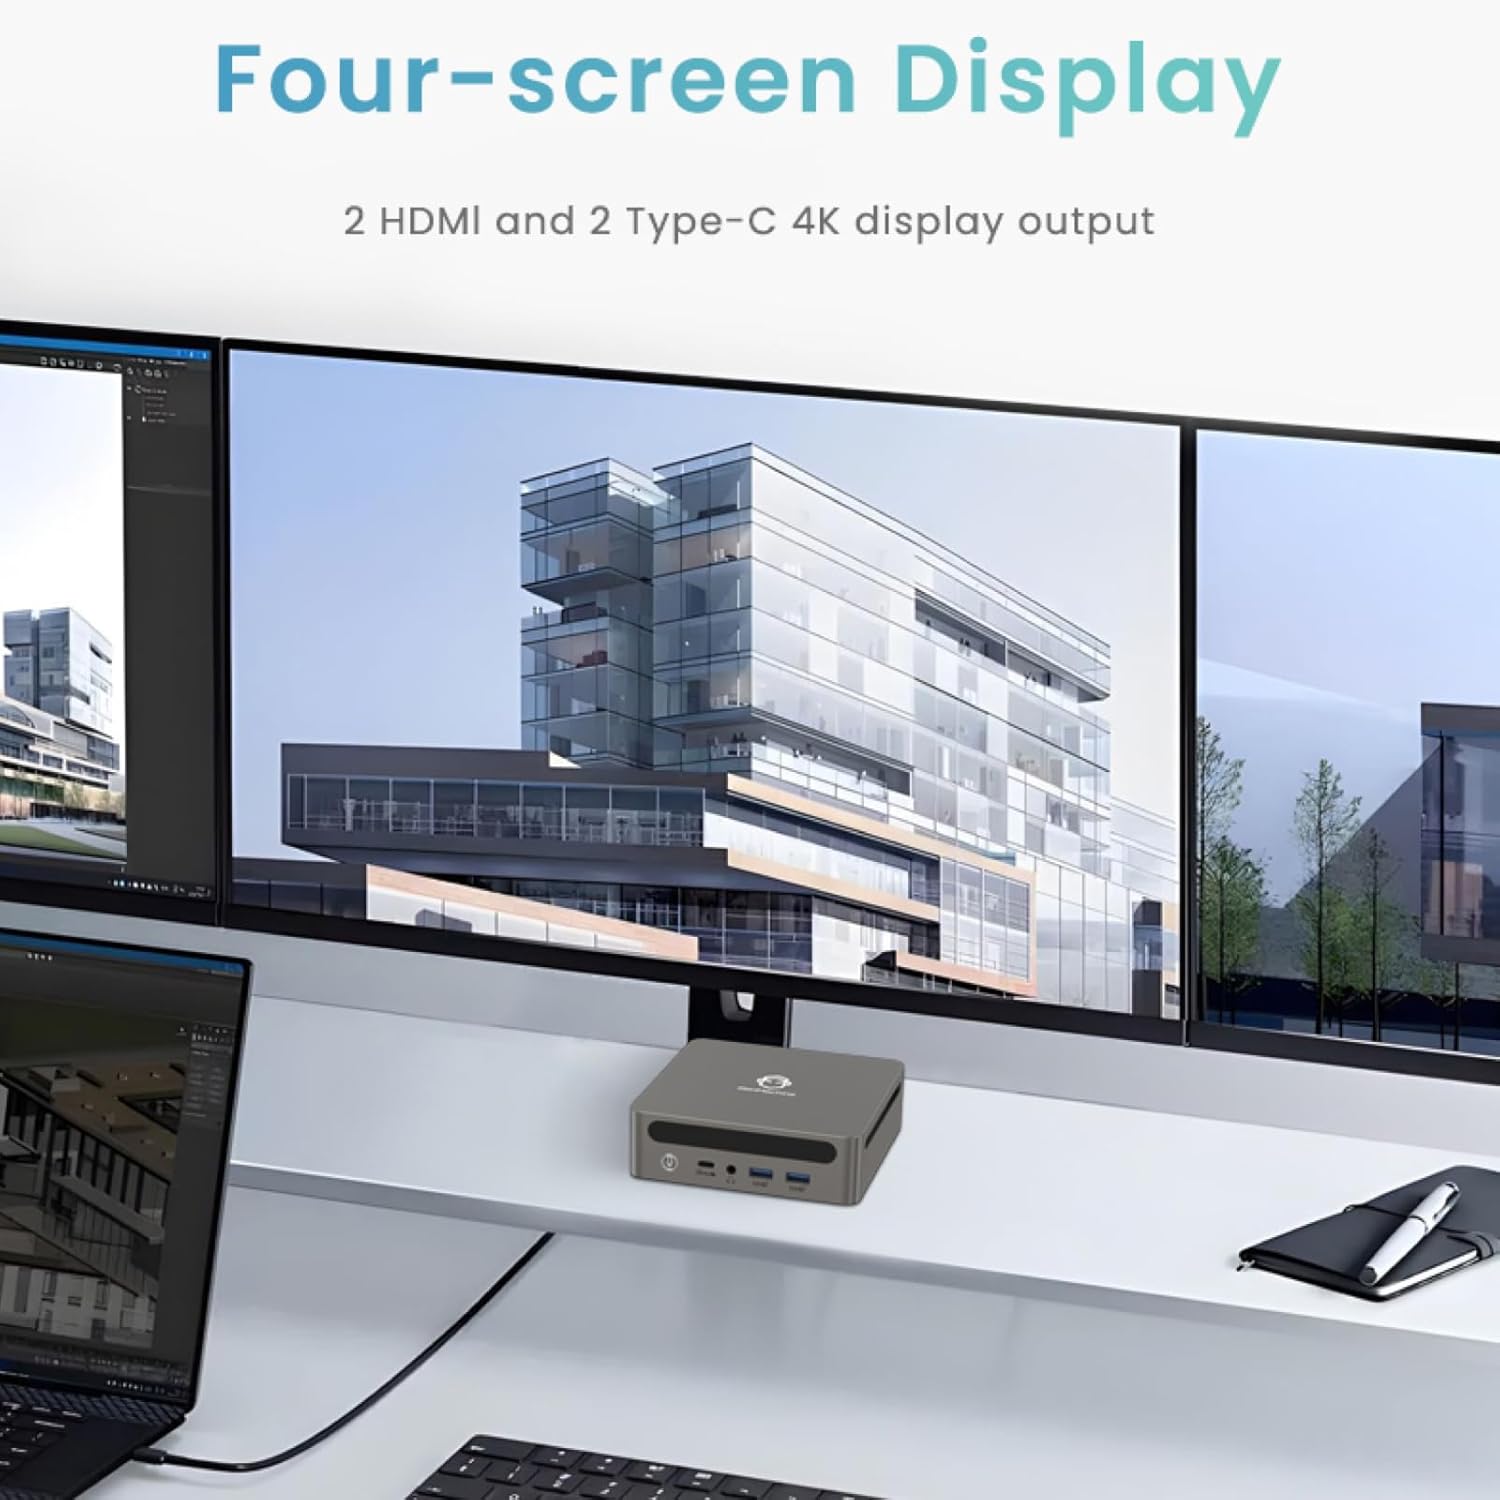
Image: Four-Screen Display Setup. This image demonstrates the GenMachine Mini PC connected to four monitors, showcasing its multi-display capabilities for enhanced productivity.
To configure multiple displays, connect your monitors and then adjust display settings within your operating system (e.g., Extend, Duplicate, or Second screen only).
7. Priežiūra
7.1 Valymas
Regularly clean the exterior of the Mini PC with a soft, dry cloth. For stubborn dirt, slightly dampen the cloth with water. Do not use harsh chemicals or abrasive cleaners. Ensure ventilation openings are free of dust buildup.
7.2 Programinės įrangos naujiniai
Keep your operating system and drivers updated to ensure optimal performance and security. Check for updates regularly through your operating system's settings.
7.3 Saugykla
Kai ilgesnį laiką nenaudojate mini kompiuterio, laikykite jį vėsioje, sausoje vietoje, toliau nuo tiesioginių saulės spindulių ir ekstremalių temperatūrų.
8. Problemų sprendimas
| Problema | Galima priežastis | Sprendimas |
|---|---|---|
| Nėra galios | Neprijungtas maitinimo adapteris; sugedęs maitinimo lizdas. | Ensure power adapter is securely connected to the Mini PC and a working power outlet. Try a different outlet. |
| Monitoriuje nėra vaizdo | Monitor not connected; incorrect input source selected on monitor; faulty cable. | Check HDMI/USB-C cable connections. Ensure the monitor is set to the correct input source. Try a different cable or monitor. |
| Wi-Fi neprisijungia | Incorrect password; router issue; Wi-Fi adapter driver issue. | Verify Wi-Fi password. Restart your router. Check operating system settings for Wi-Fi adapter status and drivers. |
| Sistema lėta arba nereaguoja | Too many applications running; insufficient free storage; outdated drivers. | Close unnecessary applications. Free up disk space. Update operating system and drivers. Restart the Mini PC. |
9. Specifikacijos
The following table details the technical specifications of the GenMachine Mini PC AMD Ryzen 7 7735HS:
| Funkcija | Detalė |
|---|---|
| Procesorius | AMD Ryzen 7 7735HS (3.2 GHz, 8 Cores, 16 Threads, up to 4.75 GHz Max Boost Clock) |
| Grafika | AMD Radeon Graphics (Integrated, 680 MB RAM) |
| RAM | 32GB LPDDR5 (up to 6400 Mb/s) |
| Sandėliavimas | 512GB 2280 SSD (PCIE x 16 interface) |
| Operacinė sistema | OS (Windows 11 typically pre-installed) |
| Vaizdo išvestis | 2x HDMI (4K @ 60Hz), 1x USB-C (4K display output), supports up to 3 displays |
| USB prievadai | 2x USB 3.0, 2x USB 2.0, 1x USB-C (full-function USB 4.0 port) |
| Tinklo kūrimas | Wi-Fi 6, Bluetooth 5.2, Dual 2.5G Ethernet |
| Garsas | Garso lizdas |
| Matmenys | 6.34 x 6.3 x 3.62 colio (apytiksliai 16.1 x 16 x 9.2 cm) |
| Svoris | 2.4 svaro (apie 1.09 kg) |
| Spalva | Smulkintuvas |

Image: AMD Ryzen 7 7735HS Processor. This image highlights the specifications of the AMD Ryzen 7 7735HS processor, including its 8 cores, 16 threads, and up to 4.75 GHz max boost clock.

Image: LPDDR5 Memory Performance. This image illustrates the enhanced speed of LPDDR5 RAM, showing a 50% increase in maximum DRAM bandwidth compared to LPDDR4X, reaching up to 6400 Mb/s.
10. Garantija ir palaikymas
For warranty information and technical support, please refer to the documentation included with your purchase or visit the official GenMachine websvetainėje. Išsaugokite pirkimo įrodymą garantiniams reikalavimams.
For further assistance, you may contact GenMachine customer service through their official channels.