1. Įvadas
This manual provides detailed instructions for the installation, operation, and maintenance of your Xigmatek Aqua V AIR Arctic Mid-Tower PC Case. Please read this manual thoroughly before beginning any installation to ensure proper setup and safe operation. Retain this manual for future reference.
2. Saugos informacija
Montuodami ir eksploatuodami laikykitės šių saugos priemonių:
- Prieš montuodami arba išimdami bet kokius komponentus, visada atjunkite maitinimo šaltinį nuo sieninio lizdo.
- Dėvėkite antistatinį riešo dirželį, kad išvengtumėte elektrostatinės iškrovos (ESD) žalos jautriems komponentams.
- Atsargiai elkitės su komponentais. Venkite tiesiogiai liesti kontaktų ar plokščių.
- Užtikrinkite tinkamą vėdinimą aplink kompiuterio korpusą, kad jis neperkaistų.
- Smulkias dalis ir įrankius laikykite vaikams nepasiekiamoje vietoje.
- Nebandykite modifikuoti korpuso ar jo komponentų, nes tai gali panaikinti garantiją ir sukelti pavojų saugumui.
3. Pakuotės turinys
Patikrinkite, ar pakuotėje yra visi reikalingi daiktai:
- Xigmatek Aqua V AIR Arctic Mid-Tower PC Case
- Accessory kit (screws, standoffs, cable ties)
- Vartotojo vadovas (šis dokumentas)
If any items are missing or damaged, contact your retailer or Xigmatek support.
4. Produktas baigtasview
The Xigmatek Aqua V AIR Arctic is a mid-tower PC case designed for high-performance gaming configurations. It features tempered glass panels for component visibility and optimized airflow with pre-installed ARGB fans.

4.1 pav.: Priekinis kairysis view of the Xigmatek Aqua V AIR Arctic PC case, showcasing the tempered glass front and side panels, and the pre-installed ARGB fans.

4.2 pav.: galinis view of the PC case, showing the I/O shield cutout, expansion slots, and rear fan mount.
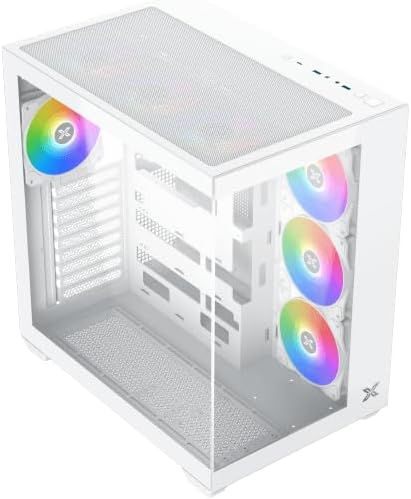
4.3 pav.: Iš viršaus į apačią kampuotas view, highlighting the top mesh panel for additional cooling and the internal layout.
5. Sąranka ir diegimas
Follow these steps to install your PC components into the Xigmatek Aqua V AIR Arctic case.
5.1. Bylos rengimas
- Padėkite dėklą ant lygaus, stabilaus paviršiaus.
- Remove the tempered glass side panel by unscrewing the thumb screws at the rear and carefully sliding it off. Place it on a soft, non-abrasive surface to prevent scratches.
- Remove the opposite steel side panel by unscrewing the thumb screws and sliding it off.
5.2. Pagrindinės plokštės montavimas
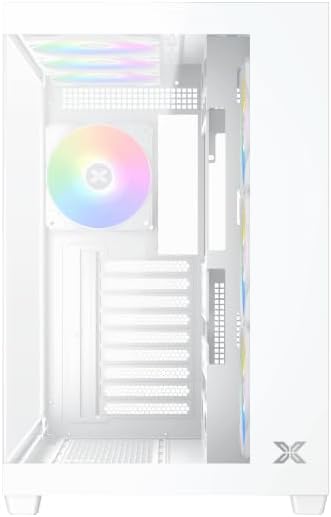
5.1 pav. Vidus view of the case, illustrating the motherboard mounting area and cable routing cutouts.
- Įstatykite įvesties/išvesties skydą į išpjovą korpuso gale.
- Align your motherboard with the pre-installed standoffs. Ensure the standoffs match your motherboard's form factor (ATX, Micro ATX).
- Secure the motherboard using the provided screws from the accessory kit. Do not overtighten.
5.3. Maitinimo šaltinio (PSU) įrengimas
- Locate the PSU mounting bracket at the bottom rear of the case.
- Įstumkite maitinimo šaltinį į tam skirtą skyrių iš korpuso galo.
- Secure the PSU to the case using the screws provided with your power supply.
5.4. Atminties disko diegimas
The case supports multiple storage drives:
- 2.5 colio SSD diskai: Mount directly to the SSD trays located behind the motherboard tray. Secure with screws.
- 3.5 colio kietieji diskai: Install into the drive cage located beneath the PSU shroud. Slide the drive into the tray and secure with screws.
5.5. Vaizdo plokštės (GPU) ir išplėtimo plokštės diegimas
- Nuimkite reikiamus išplėtimo lizdų dangtelius korpuso gale.
- Įdėkite vaizdo plokštę arba kitas išplėtimo korteles į atitinkamus pagrindinės plokštės PCIe lizdus.
- Secure the cards with the provided screws.
5.6. Kabelių valdymas

5.2 paveikslas: View behind the motherboard tray, illustrating the ample space and tie-down points for effective cable management.
Kabelių išdėstymui naudokite laidų išpjovas ir tvirtinimo taškus už pagrindinės plokštės dėklo. Tai pagerina oro srautą ir vizualiai pagerina vaizdą.
- Connect all necessary power cables from the PSU to the motherboard, GPU, and storage drives.
- Connect front panel cables (USB, audio, power/reset switches, LED indicators) to the corresponding headers on your motherboard. Refer to your motherboard manual for specific header locations.
- Connect the ARGB fan cables to the integrated fan controller or directly to your motherboard's ARGB headers if available.
5.7. Ventiliatoriaus ir radiatoriaus laikiklis
The Xigmatek Aqua V AIR Arctic comes with 7 pre-installed 120mm ARGB fans. Additional cooling options are available:
- Priekyje: Supports up to 3 x 120mm or 2 x 140mm fans / 240mm, 280mm, 360mm radiators.
- Į viršų: Supports up to 3 x 120mm or 2 x 140mm fans / 240mm, 280mm, 360mm radiators.
- Galinis: Supports 1 x 120mm fan.
- Apačia: Supports up to 3 x 120mm fans.
Ensure proper fan orientation for optimal airflow (intake at front/bottom, exhaust at rear/top).
6. Operacinis
Once all components are installed and cables are connected, replace the side panels. Connect your monitor, keyboard, mouse, and power cable. Press the power button on the front panel to start your system.
The pre-installed ARGB fans can be controlled via the integrated controller (if present) or through compatible motherboard software, allowing customization of lighting effects and fan speeds.
7. Priežiūra
Reguliarus techninis aptarnavimas padeda užtikrinti optimalų kompiuterio komponentų veikimą ir ilgaamžiškumą.
- Dulkių valymas: Periodically clean dust filters (top, front, bottom) to maintain good airflow. Use compressed air to remove dust from inside the case and components.
- Išorinis valymas: Išorinius paviršius nuvalykite minkšta, damp skudurėliu. Venkite abrazyvinių valiklių ar tirpiklių.
- Kabelių tvarkymo patikrinimas: Occasionally check cable routing to ensure no cables are obstructing fans or airflow.
8. Problemų sprendimas
Jei kyla problemų, vadovaukitės toliau pateiktais įprastais trikčių šalinimo veiksmais.
- Sistema neįsijungia:
- Įsitikinkite, kad maitinimo šaltinis įjungtas ir tinkamai prijungtas prie sieninio lizdo.
- Verify all power cables (24-pin ATX, 8-pin CPU, PCIe, SATA) are securely connected.
- Patikrinkite priekinio skydelio maitinimo jungiklio jungtis su pagrindine plokšte.
- Nėra ekrano išvesties:
- Ensure the monitor cable is connected to the graphics card (not the motherboard I/O if using a dedicated GPU).
- Iš naujo įstatykite grafikos plokštę ir RAM modulius.
- Fans not spinning or ARGB not working:
- Patikrinkite ventiliatoriaus maitinimo jungtis su pagrindine plokšte arba ventiliatoriaus valdikliu.
- Verify ARGB connections to the controller or motherboard headers.
- Ensure any fan control software or BIOS settings are correctly configured.
For more complex issues, consult your component manuals or contact Xigmatek technical support.
9. Specifikacijos
| Funkcija | Detalė |
|---|---|
| Modelio pavadinimas | Aqua V AIR Arctic |
| Modelio numeris | EN45837 |
| Atvejo tipas | Vidurio bokštas |
| Pagrindinės plokštės suderinamumas | ATX, mikro ATX |
| Medžiaga | Steel Alloy, Tempered Glass |
| Spalva | Baltas |
| Iš anksto įdiegti ventiliatoriai | 7 x 120 mm ARGB ventiliatoriai |
| Maksimalus GPU ilgis | 410 mm |
| USB prievadai | 3 |
| Svoris | 8.8 kilogramo |
10. Garantija ir palaikymas
Xigmatek products are manufactured to high quality standards. For warranty information, please refer to the warranty card included with your product or visit the official Xigmatek website. For technical support or inquiries, please contact Xigmatek customer service through their official channels.
Oficialus Websvetainė: www.xigmatek.com


