1. Įvadas
Thank you for choosing the RAINPOINT Irrigation Computer. This device is designed to simplify your garden watering tasks with its advanced features and user-friendly interface. It allows for precise control over watering schedules across multiple zones, ensuring optimal hydration for your plants while conserving water.
Please read this manual thoroughly before operating the device to ensure proper installation, programming, and maintenance. Keep this manual for future reference.
2. Produktas baigtasview
2.1 Komponentai
The RAINPOINT Irrigation Computer features a robust design with a large LCD display and intuitive controls. Key components include:
- Pagrindinis blokas: Houses the control panel, LCD display, and battery compartment.
- Žalvarinis įvadas: Durable connection point for your water source, compatible with 3/4 and 1-inch hoses/taps.
- Three Independent Outlets: Allows for connection of up to three separate watering zones.
- Valdymo ratukas: Used for navigating through settings and modes.
- Mygtukai: OK/Manual, Delay/+, Zone/-, used for specific functions and adjustments.

2.1 pav.: priekis view of the RAINPOINT Irrigation Computer, showing the large LCD display, control dial, and three outlets at the bottom.
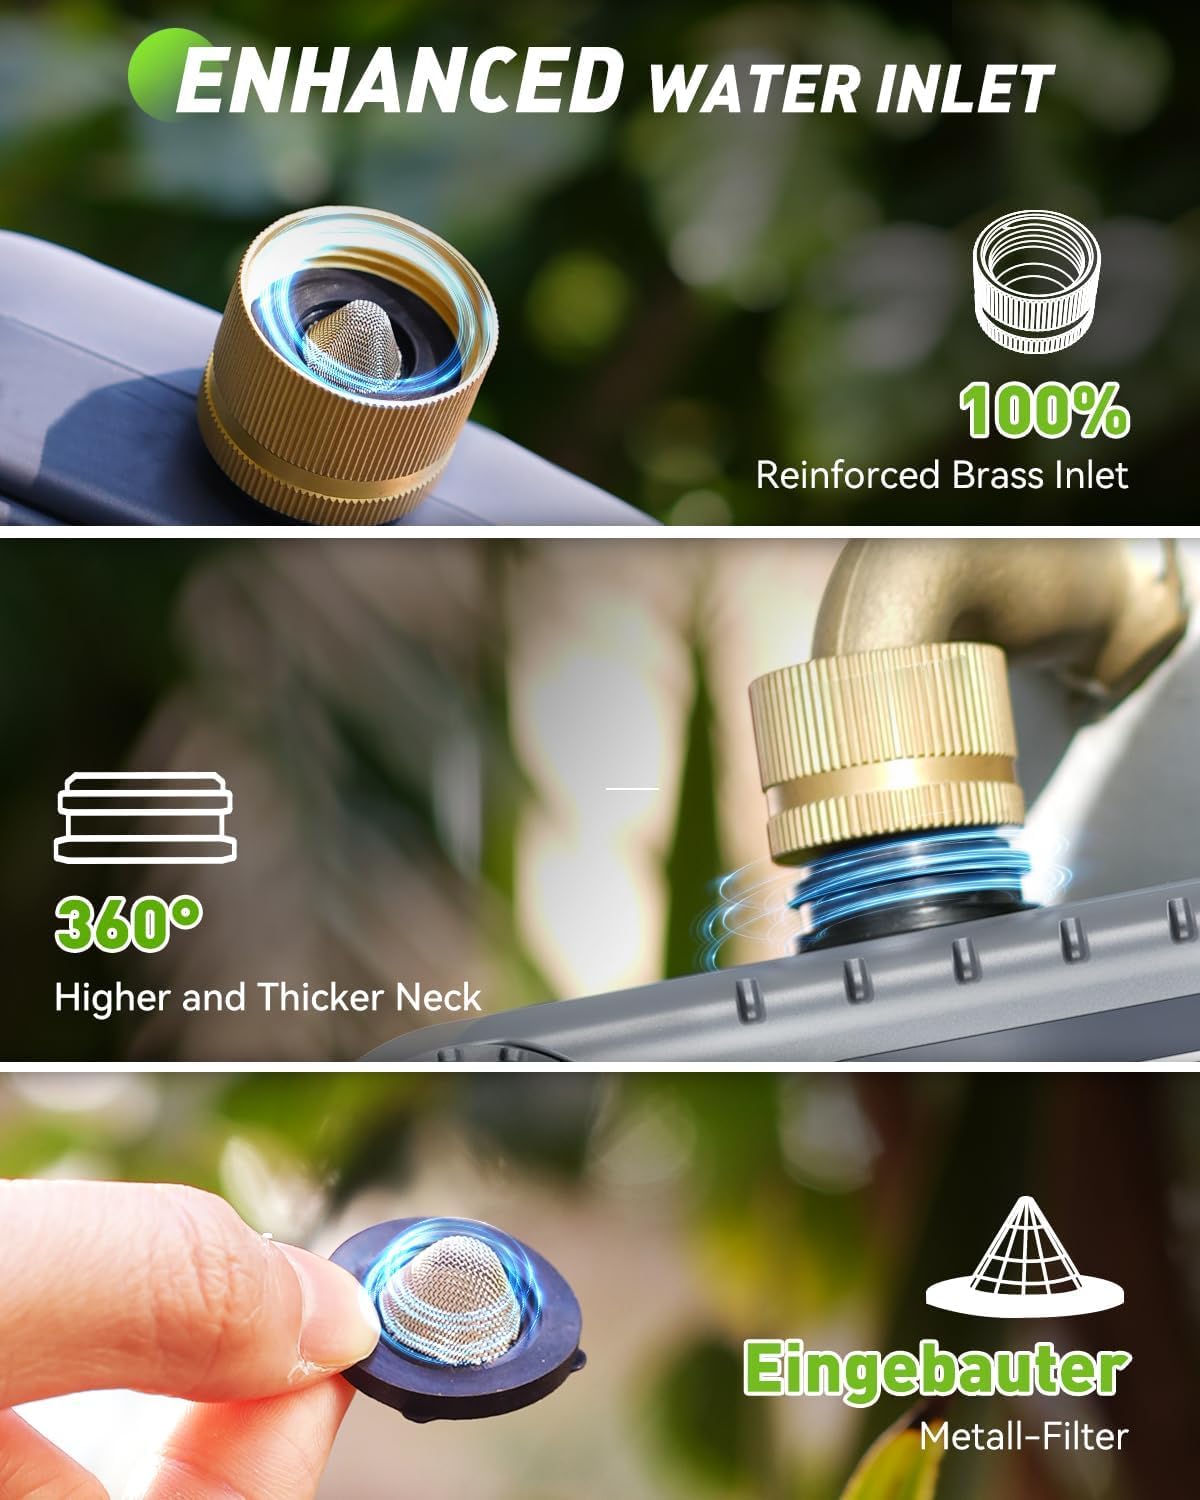
2.2 pav. Išsamus view of the enhanced water inlet, featuring a reinforced brass connection and an integrated metal filter for durability and clean water flow.
2.2 Pagrindinės savybės
- 3 Independent Zones: Program distinct watering schedules for up to three different areas.
- Enhanced Timer Performance: Durable brass inlet and reinforced solenoid valve for stable water flow.
- Lietaus uždelsimo funkcija: Pause watering for 24, 48, or 72 hours to prevent overwatering during rainfall.
- Rankinis laistymo režimas: Nedelsiant pradėkite laistymą nepaveikdami užprogramuotų tvarkaraščių.
- Didelis LCD ekranas: Clear and easy-to-read screen for programming and monitoring.
- Žemo akumuliatoriaus apsauga: Alerts for low battery and automatically shuts off the valve to prevent water waste.
3. Sąranka
3.1 Akumuliatoriaus įdėjimas
The irrigation computer requires 4 AA 1.5V batteries (not included). To install:
- Suraskite akumuliatoriaus skyrių įrenginio gale.
- Gently pull up the two tabs on the back cover to open the compartment.
- Įdėkite 4 AA baterijas, užtikrindami teisingą poliškumą (+/-).
- Close the battery compartment securely, pressing down until the tabs click into place.
Note: The LCD screen will activate upon successful battery installation.
3.2 Installation to Faucet
Before connecting, ensure your faucet is clean and free of debris.
- Attach the brass inlet of the irrigation computer to your outdoor faucet. Ensure the included sealing washer is properly seated to prevent leaks.
- Tighten the connection by hand until secure. Do not overtighten.
- Connect your garden hoses to the three independent outlets at the bottom of the unit. Ensure each hose is securely fastened.

Figure 3.1: Installation of the irrigation computer to a standard outdoor faucet, highlighting the ergonomic design for easy handling.
4. Naudojimo instrukcijos
4.1 Laikrodžio nustatymas
- Pasukite valdymo ratuką į padėtį NUSTATYTI LAIKRODĮ.
- Naudokite +/- mygtukais nustatykite esamą valandą. Paspauskite OK/MANUAL patvirtinti.
- Naudokite +/- buttons to adjust the current minute. Press OK/MANUAL patvirtinti.
- Dabar nustatytas laikrodis.
4.2 Laistymo grafikų programavimas (automatinis režimas)
Each of the three zones can be programmed independently. The device will execute plans for one zone at a time to maintain water pressure.

Figure 4.1: The LCD display illustrating the customizable settings for watering schedules, including start time, duration, and frequency.
- Pasukite valdymo ratuką į padėtį PRADŽIOS LAIKAS.
- Paspauskite ZONE +/- button to select the zone you wish to program (ZONE 1, 2, or 3).
- Naudokite +/- buttons to set the desired start time for the selected zone. Press OK/MANUAL patvirtinti.
- Pasukite valdymo ratuką į padėtį KIEK ILGAI.
- Ensure the correct zone is selected using ZONE +/-. Naudokite +/- buttons to set the watering duration (from 1 minute to 4 hours). Press OK/MANUAL patvirtinti.
- Pasukite valdymo ratuką į padėtį KAIP DAŽNAI.
- Ensure the correct zone is selected using ZONE +/-. Naudokite +/- buttons to set the watering frequency (from 1-12 hours or 1-7 days). Press OK/MANUAL patvirtinti.
- Repeat steps for other zones as needed.
- Pasukite valdymo ratuką į padėtį ON to activate the programmed schedules.
Important Note: The device can only execute the plan for one zone at a time. If there is a conflict in activation plans for multiple zones, only one zone will operate, and the others will wait for the previous zone's execution to complete before starting. This ensures optimal water pressure for each zone.
4.3 Rankinis laistymas
To initiate immediate watering without affecting your programmed schedules:

Figure 4.2: A user demonstrating manual watering, with the display showing options to select and activate specific zones for immediate watering.
- Pasukite valdymo ratuką į padėtį ON.
- Paspauskite OK/MANUAL button. The display will show "MANUAL".
- Naudokite ZONE +/- button to select the zone you wish to water manually.
- Naudokite +/- mygtukais nustatykite norimą rankinio laistymo trukmę (nuo 1 minutės iki 8 valandų).
- Paspauskite OK/MANUAL pradėti laistyti rankiniu būdu.
- Norėdami sustabdyti rankinį laistymą, paspauskite OK/MANUAL dar kartą arba pasukite ratuką į IŠJUNGTA.
4.4 Lietaus uždelsimo funkcija
The rain delay function allows you to temporarily suspend your watering schedule for a set period, preventing overwatering during rainy conditions.
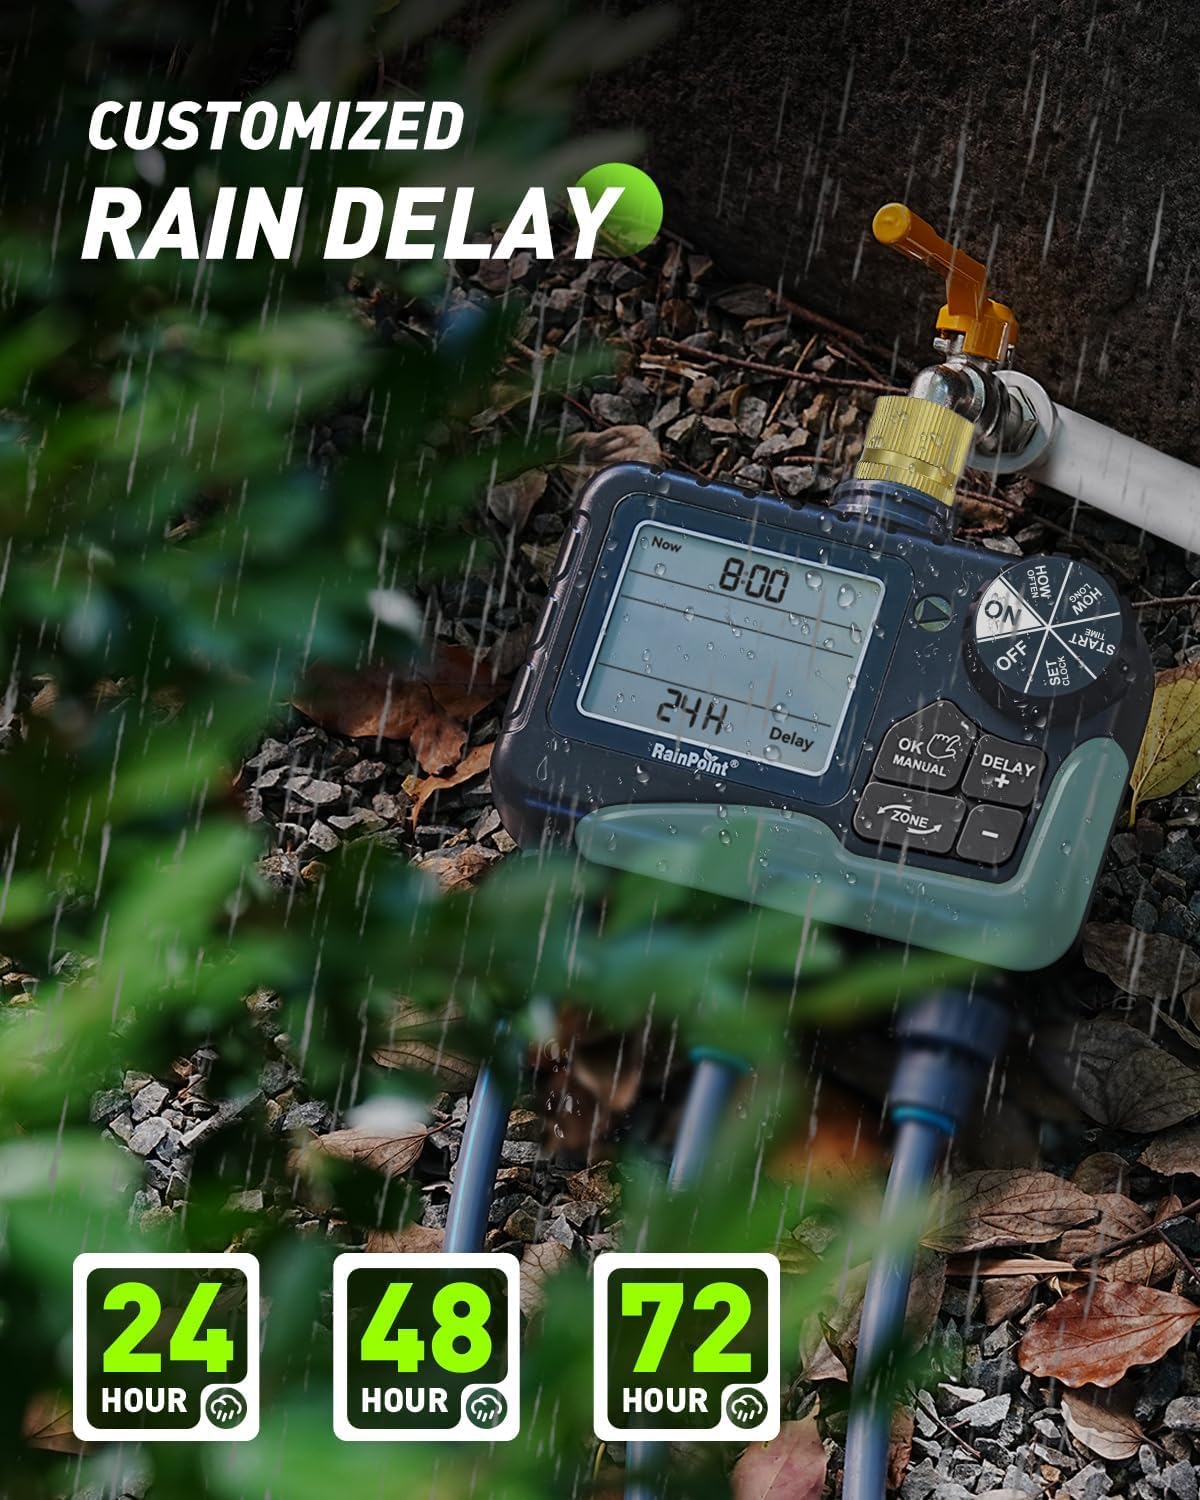
Figure 4.3: The irrigation computer displaying the rain delay options, allowing users to pause watering for 24, 48, or 72 hours.
- Pasukite valdymo ratuką į padėtį ON.
- Paspauskite DELAY/+ button. The display will show "DELAY".
- Naudokite +/- buttons to select the desired delay duration (24H, 48H, or 72H).
- Paspauskite OK/MANUAL to activate the rain delay. The timer will automatically resume its schedule after the selected delay period.
- Norėdami atšaukti lietaus atidėjimą, paspauskite DELAY/+ again and select "0H" or turn the dial to IŠJUNGTA ir tada atgal į ON.
4.5 Turning Off the Device
To stop all watering and programming, turn the control dial to IŠJUNGTA. This will suspend all active schedules until the dial is turned back to ON.
5. Priežiūra
- Baterijos keitimas: Replace batteries when the low battery indicator appears on the LCD. The valve will automatically shut off when batteries are critically low to prevent water waste.
- Valymas: Periodically clean the brass inlet filter to prevent debris from entering the unit and affecting water flow. Remove the filter, rinse it under running water, and reinsert.
- Saugojimas žiemą: During freezing temperatures, remove the irrigation computer from the faucet and store it indoors in a dry, frost-free location. Remove batteries before storage.
- Vožtuvų priežiūra: The improved coil valve design minimizes shock and ensures smoother water flow. No specific user maintenance is required for the internal valve beyond keeping the inlet filter clean.

Figure 5.1: The display indicating a low battery reminder and the automatic shut-off feature to conserve water.

Figure 5.2: Visual comparison highlighting the structural design improvements of the upgraded coil valve, leading to less water pressure loss compared to older valve types.
6. Problemų sprendimas
| Problema | Galima priežastis | Sprendimas |
|---|---|---|
| Nėra vandens srauto. |
|
|
| Watering does not start at programmed time. |
|
|
| Nuotėkiai iš jungčių. |
|
|
| Ekranas tuščias arba blankus. |
|
|
7. Specifikacijos
| Funkcija | Detalė |
|---|---|
| Modelio numeris | B-ITV347 |
| Matmenys | Apytiksliai 18.7 cm gylio x 19.5 cm pločio x 10.9 cm aukščio |
| Svoris | Maždaug 866 gramų |
| Medžiaga | Brass (inlet), ABS Plastic |
| Vandens slėgio diapazonas | 0.5–8 barai (7.25–116 PSI) |
| Srauto greitis | 5 - 35 Liters per minute |
| Darbinė temperatūra | 3–50 °C |
| Maitinimo šaltinis | 4 x AA 1.5 V baterijos (į komplektą neįeina) |
| Laistymo trukmė | 1 minute to 4 hours (programmable) |
| Laistymo dažnis | 1-12 hours or 1-7 days (programmable) |
| Lietaus delsos parinktys | 24H, 48H, 72H |
| Apsauga nuo patekimo | IP65 |
8. Garantija ir palaikymas
RAINPOINT offers lifetime support for this product. If you require further assistance, have questions, or encounter any issues not covered in this manual, please contact RAINPOINT customer service.
For warranty information and to register your product for a 5-year guarantee, please refer to the contact details provided with your purchase or visit the official RAINPOINT websvetainę.


