1. Įvadas
This user manual provides comprehensive instructions for the ASRock B860M-X Micro ATX motherboard. It covers installation, configuration, operation, and troubleshooting to ensure optimal performance and longevity of your system. The ASRock B860M-X is designed to support Intel Core Ultra processors with an LGA1851 socket, offering advanced features for a powerful computing experience.
2. Saugos informacija
Montavimo ir eksploatavimo metu visada laikykitės šių saugos priemonių:
- Prieš liesdami bet kokius komponentus, atjunkite maitinimo laidą nuo sieninio lizdo.
- Kad išvengtumėte elektrostatinės iškrovos (ESD) sukeltos žalos komponentams, dėvėkite antistatinį riešo dirželį.
- Imkite komponentus už kraštų, kad išvengtumėte jautrių dalių prisilietimo.
- Užtikrinkite tinkamą ventiliaciją kompiuterio korpuse, kad jis neperkaistų.
- Saugokite pagrindinę plokštę nuo drėgmės ar ekstremalių temperatūrų.
3. Pakuotės turinys
Patikrinkite, ar pagrindinės plokštės pakuotėje yra visi šie elementai:
- ASRock B860M-X Micro ATX Motherboard
- Greito montavimo vadovas
- Reguliavimo pranešimas
- SATA duomenų kabeliai
- I / O skydas
- M.2 varžtai / atramos

Image: ASRock B860M-X Motherboard and included accessories.
4. Pagrindinės plokštės išdėstymas
Familiarize yourself with the key components and connectors on your ASRock B860M-X motherboard.

Vaizdas: Iš viršaus į apačią view of the ASRock B860M-X Micro ATX Motherboard, highlighting the CPU socket, RAM slots, and various connectors.
Galinis I/O skydelis
The rear I/O panel provides various ports for connecting peripherals.
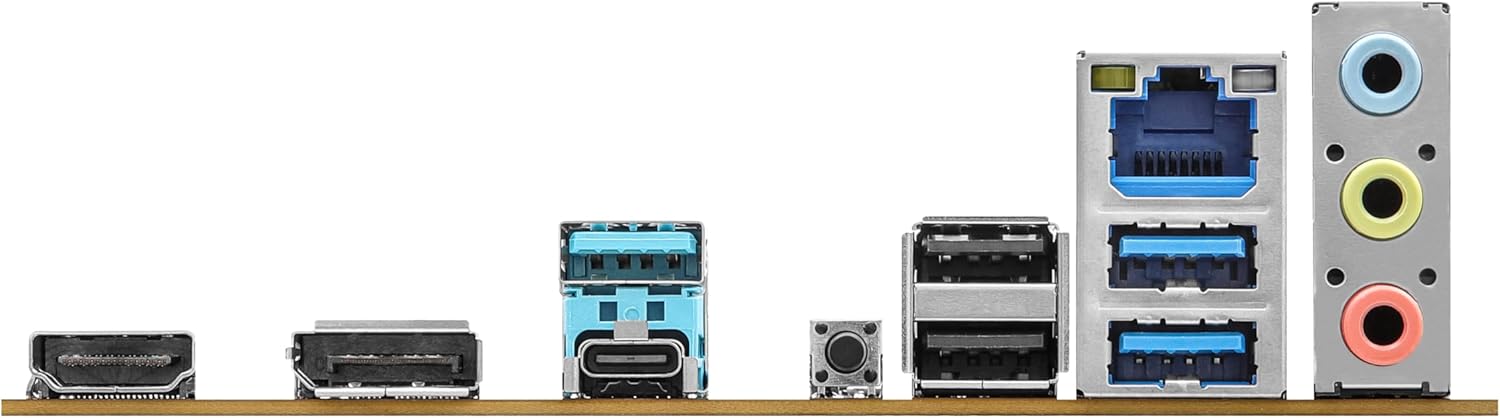
Image: Close-up of the rear I/O panel, showing USB ports, HDMI, DisplayPort, Ethernet, and audio jacks.
5. Sąranka ir diegimas
Norėdami tinkamai įdiegti pagrindinę plokštę ir jos komponentus, atlikite šiuos veiksmus.
5.1 CPU diegimas (LGA1851)
- Atidarykite procesoriaus lizdo svirtį.
- Carefully align the CPU with the socket, ensuring the notches match.
- Švelniai įdėkite procesorių į lizdą, jo nespausdami jėgos.
- Uždarykite lizdo svirtį, kad pritvirtintumėte procesorių.
5.2 Atminties (RAM) diegimas
The ASRock B860M-X supports 2 x DDR5 DIMMs for dual-channel memory up to 9066+ MHz (OC).
- Atidarykite spaustukus abiejuose DIMM lizdo galuose.
- Align the memory module with the slot, ensuring the notch on the module matches the slot key.
- Tvirtai spauskite abu atminties modulio galus, kol spaustukai užsifiksuos vietoje.
5.3 Saugyklos įrengimas (M.2 ir SATA)
The motherboard supports M.2 drives and up to 4 SATA3 6.0 Gb/s devices.
- M.2 SSD: Locate the M.2 slot(s). Insert the M.2 SSD into the slot at an angle and secure it with the provided screw/standoff.
- SATA diskai: Connect SATA data cables from your storage devices (HDDs/SSDs) to the SATA3 ports on the motherboard. Connect power cables from your power supply to the SATA devices.
5.4 Išplėtimo plokštės (PCIe) diegimas
The motherboard features PCIe slots for graphics cards and other expansion cards.
- Align your graphics card or other PCIe card with the appropriate slot.
- Press down firmly until the card is seated correctly and the retention clip locks.
- Secure the card to the PC case with a screw.
5.5 Maitinimo šaltinio jungtys
Prijunkite 24 kontaktų ATX maitinimo jungtį ir 8 kontaktų CPU maitinimo jungtį iš maitinimo šaltinio prie atitinkamų pagrindinės plokštės prievadų.
5.6 Priekinio skydelio jungtys
Connect the front panel cables (power button, reset button, USB ports, audio jacks, etc.) to their respective headers on the motherboard. Refer to the motherboard diagram for exact locations.
6. Naudojimo instrukcijos
6.1 Pirmasis paleidimas
After assembling your system, connect your monitor, keyboard, and mouse. Power on your system. The system should display the ASRock logo and enter the BIOS setup or begin the operating system installation process.
6.2 BIOS / UEFI sąranka
Norėdami patekti į BIOS sąrankos programą, paspauskite Ištrinti or F2 key during the Power-On Self-Test (POST) screen. Here you can configure various system settings, including boot order, CPU settings, memory timings, and fan speeds.
6.3 Tvarkyklės diegimas
After installing your operating system, install the necessary drivers for your motherboard components (chipset, audio, LAN, graphics, etc.) from the ASRock website or the included driver CD/USB drive.
7. Priežiūra
7.1 BIOS naujinimas
Keeping your BIOS updated ensures compatibility with new hardware and improves system stability. ASRock provides two methods for BIOS updates: USB BIOS Flashback and Instant Flash.
Video: ASRock Motherboard BIOS Update Tutorial. This video demonstrates two methods for updating your ASRock motherboard's BIOS: USB BIOS Flashback and Instant Flash.
7.2 Valymas
Reguliariai valykite kompiuterio korpusą ir pagrindinę plokštę, kad išvengtumėte dulkių kaupimosi, kuris gali sukelti perkaitimą ir komponentų gedimą. Norėdami pašalinti dulkes nuo ventiliatorių, radiatorių ir kitų komponentų, naudokite suslėgtą orą. Prieš valydami įsitikinkite, kad sistema išjungta ir atjungta nuo elektros tinklo.
8. Problemų sprendimas
Jei kyla problemų, vadovaukitės šiais dažniausiai pasitaikančiais trikčių šalinimo patarimais:
- Nėra galios: Patikrinkite visas maitinimo jungtis (24 kontaktų ATX, 8 kontaktų CPU, GPU, SATA). Įsitikinkite, kad maitinimo jungiklis įjungtas.
- Nėra ekrano: Verify monitor connection and input source. Reseat the graphics card and memory modules.
- Sistemos nestabilumas: Check memory compatibility and seating. Ensure CPU cooler is properly installed. Update BIOS and drivers.
- Įkrovos problemos: Check boot order in BIOS. Verify storage device connections.
9. Specifikacijos
Key technical specifications for the ASRock B860M-X Micro ATX Motherboard:
| Funkcija | Specifikacija |
|---|---|
| Prekės ženklas | ASRock |
| Modelio pavadinimas | B860M-X |
| CPU lizdas | LGA 1851 |
| Suderinami procesoriai | Intel Core Ultra |
| Lustų rinkinio tipas | Intel B860 |
| RAM atminties technologija | DDR5 |
| Atminties laikrodžio greitis | 9066 MHz (nuolatinis dažnis) |
| Maksimali atminties talpa | 128 GB |
| Galimi atminties lizdai | 2 |
| Iš viso SATA prievadų | 4 |
| Total PCIe Ports | 3 |
| Grafikos išvesties parinktys | 1 HDMI, 1 DisplayPort |
| Ethernet prievadų skaičius | 1 |
| Garso kodekas | „Realtek ALC1220“ 7.1 kanalo HD garso kodekas |
| Power Phase Design | 7+1+1+1+1 |
| RGB apšvietimas | Polichrominis RGB |
Vaizdo įrašas: Užbaigtaview of Intel B860 Series Motherboards. This video highlights key features and design aspects of the ASRock B860 motherboard series.
10. Garantija ir palaikymas
ASRock provides a 3-year warranty for this product. For technical support, driver downloads, and further information, please visit the official ASRock websvetainėje. Ten taip pat rasite papildomų pagalbos išteklių ir DUK.
For warranty claims or service, please contact your retailer or authorized ASRock service center with your proof of purchase.


