1. Įvadas
This manual provides detailed instructions for the installation, operation, maintenance, and troubleshooting of your TP-Link Archer NX600 5G Wireless Router. The Archer NX600 is designed to deliver high-speed 5G connectivity with Wi-Fi 6 AX3600Mbps dual-band performance. It features a 2.5G WAN/LAN port and two Gigabit LAN ports, offering a plug-and-play setup for advanced network sharing. It is compatible with EasyMesh and HomeShield for flexible and secure home networking.
2. Pakuotės turinys
Patikrinkite, ar pakuotėje yra visi daiktai. Jei kurio nors daikto trūksta arba jis pažeistas, susisiekite su pardavėju.
- TP-Link Archer NX600 5G Wireless Router
- Maitinimo adapteris
- Ethernet kabelis
- Greito montavimo vadovas
3. Aparatūra baigtaview
Susipažinkite su maršrutizatoriaus fiziniais komponentais.
3.1 Priekinis skydelis

Vaizdo aprašymas: The front panel of the Archer NX600 router is white with a vertical black strip containing LED indicators. These indicators show the status of signal strength, internet connection, Wi-Fi, and power.
3.2 Galinis skydelis
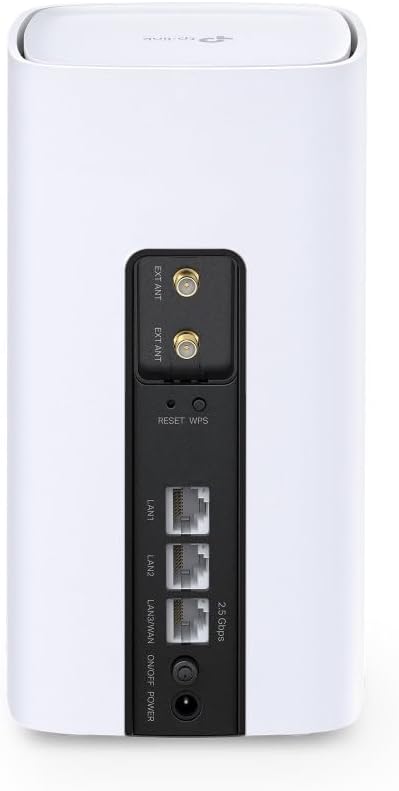
Vaizdo aprašymas: The rear panel of the Archer NX600 router features various ports and buttons. From top to bottom, it includes two external antenna connectors (EXT ANT), a Reset/WPS button, two Gigabit LAN ports (LAN1, LAN2), a 2.5G WAN/LAN port, an On/Off switch, and a power input port.
3.3 LED indikatoriai
- Signalo stiprumas: Indicates the strength of the 5G/LTE cellular signal.
- Internetas: Rodo interneto ryšio būseną.
- „Wi-Fi“: Rodo „Wi-Fi“ tinklo aktyvumą.
- Galia: Rodo įrenginio maitinimo būseną.
3.4 Prievadai ir mygtukai
- SIM kortelės lizdas: Įdėkite savo 5G/4G SIM kortelę čia.
- 2.5G WAN/LAN Port: Connect to a modem for wired internet or to a device for high-speed LAN connection.
- Gigabito LAN prievadai (x2): Prijunkite laidinius įrenginius, tokius kaip kompiuteriai ar žaidimų konsolės.
- Atstatyti / WPS mygtukas: Press and hold to reset the router to factory settings. Press briefly to activate WPS.
- Maitinimo prievadas: Prijunkite pridedamą maitinimo adapterį.
- Įjungimo / išjungimo jungiklis: Power the router on or off.
4. Sąranka
Follow these steps for initial setup of your Archer NX600 router.
4.1 Įdėkite SIM kortelę
- Įsitikinkite, kad maršrutizatorius išjungtas.
- Suraskite SIM kortelės lizdą, paprastai esantį įrenginio apačioje arba šone.
- Insert your 5G/4G SIM card into the slot until it clicks into place. Ensure the correct orientation as indicated on the router.
4.2 Įjungimas
- Prijunkite pridedamą maitinimo adapterį prie maršrutizatoriaus maitinimo prievado, o tada – prie maitinimo lizdo.
- Press the On/Off switch to power on the router.
- Wait for the LED indicators on the front panel to stabilize. The Signal Strength and Internet LEDs should indicate a stable connection.
4.3 Prisijunkite prie interneto
The router is designed for plug-and-play operation with a SIM card. Once the SIM card is inserted and the router is powered on, it should automatically connect to the 5G/4G network.
You can connect your devices to the router via Wi-Fi or Ethernet cable:
- „Wi-Fi“ ryšys: Find the Wi-Fi network name (SSID) and password printed on the label at the bottom of the router. Select this network on your device and enter the password.
- Ethernet jungtis: Connect an Ethernet cable from one of the router's LAN ports to your computer or other wired device.
4.4 Prieiga Web Valdymo sąsaja
For advanced settings and configuration, access the router's web valdymo sąsaja:
- Connect your device to the router (Wi-Fi or Ethernet).
- Atidarykite a web naršyklę ir įveskite numatytąjį prieigos adresą (pvz., http://tplinkwifi.net or the IP address printed on the router label) in the address bar.
- Log in using the administrator password you set during the first login, or the default password (if not changed).
5. Naudojimo instrukcijos
This section covers common operational aspects of your Archer NX600 router.
5.1 „Wi-Fi“ tinklo valdymas
Per web management interface, you can:
- Change Wi-Fi network names (SSIDs) and passwords.
- Įjungti arba išjungti svečių tinklus.
- Konfigūruokite „Wi-Fi“ saugos nustatymus.
5.2 „EasyMesh“ suderinamumas
The Archer NX600 supports EasyMesh, allowing it to work with other EasyMesh-compatible devices to form a unified mesh Wi-Fi network. This provides seamless coverage with a single Wi-Fi name throughout your home.
- Refer to the EasyMesh setup guide within the router's web interface or on the TP-Link support website for detailed instructions on expanding your mesh network.
5.3 HomeShield Features
TP-Link HomeShield provides comprehensive network protection and parental controls. Access these features via the TP-Link Tether app or the web valdymo sąsaja.
- Tinklo apsauga: Real-time IoT protection, malicious site blocker, intrusion prevention, and home network scanner.
- Tėvų kontrolė: Profile management, content filtering, time limits, and insights.
- Paslaugos kokybė (QoS): Siekdami optimalaus našumo, prioritetizuokite įrenginius ar veiklas.
5.4 Using the 2.5G WAN/LAN Port
The versatile 2.5G port can be configured as either a WAN port or a LAN port:
- WAN režimas: Connect an external modem (cable, fiber, or DSL) to this port to use the Archer NX600 as a traditional wireless router, in addition to its 5G capabilities.
- LAN režimas: Use this port to connect a high-speed wired device, such as a network-attached storage (NAS) or a powerful desktop PC, for faster local network transfers.
6. Priežiūra
Reguliarus maršrutizatoriaus aptarnavimas padeda užtikrinti optimalų našumą ir ilgaamžiškumą.
- Vieta: Maršrutizatorių pastatykite centrinėje vietoje, atokiau nuo kliūčių ir trukdžių šaltinių (pvz., mikrobangų krosnelių, belaidžių telefonų).
- Vėdinimas: Ensure adequate airflow around the router to prevent overheating. Do not cover ventilation openings.
- Firmware atnaujinimai: Periodiškai patikrinkite, ar yra programinės įrangos atnaujinimų, ir įdiekite juos per maršrutizatoriaus web valdymo sąsaja. Atnaujinimai dažnai apima našumo patobulinimus, saugos pataisas ir naujas funkcijas.
- Valymas: Gently clean the router's exterior with a soft, dry cloth. Avoid using liquid cleaners or abrasive materials.
- Perkraukite: If you experience minor performance issues, try rebooting the router by unplugging it from the power outlet for 10 seconds and then plugging it back in.
7. Problemų sprendimas
Šiame skyriuje aptariamos dažniausiai pasitaikančios problemos, su kuriomis galite susidurti.
7.1 Nėra interneto ryšio
- Patikrinkite SIM kortelę: Įsitikinkite, kad SIM kortelė tinkamai įdėta ir aktyvi su duomenų planu.
- LED indikatoriai: Verify that the Signal Strength and Internet LEDs are solid green. If not, try repositioning the router or checking your SIM card.
- APN nustatymai: Į web management interface, check the APN (Access Point Name) settings. These are usually configured automatically, but may need manual adjustment for some carriers.
- Perkraukite: Power cycle the router.
7.2 Lėtas interneto greitis
- Signalo stiprumas: Check the Signal Strength LED. If it's low, try moving the router to a location with better 5G/4G reception.
- Tinklo perkrova: High network traffic from multiple devices can reduce speed. Consider using QoS settings to prioritize important devices or applications.
- „Wi-Fi“ trukdžiai: Other wireless devices can interfere with your Wi-Fi signal. Try changing Wi-Fi channels in the router settings.
- Carrier Throttling: Your mobile carrier might be throttling your speed after a certain data usage. Check your data plan.
7.3 Cannot Connect to Wi-Fi Printer
Some older Wi-Fi printers may have compatibility issues with newer Wi-Fi standards or dual-band networks. If you are experiencing difficulty connecting a Wi-Fi printer:
- Separate Wi-Fi Bands: Maršrutizatoriaus web management interface, try separating the 2.4 GHz and 5 GHz Wi-Fi networks by giving them different SSIDs (network names). Then, attempt to connect your printer specifically to the 2.4 GHz network, as many older printers only support this band.
- Printer Firmware: Įsitikinkite, kad jūsų spausdintuvo programinė įranga yra atnaujinta.
- WPS: Try using the WPS button on the router and your printer (if supported) for an easier connection.
- Ethernet jungtis: If possible, connect the printer to one of the router's LAN ports using an Ethernet cable.
7.4 Router Overheating
If the router feels excessively hot or experiences frequent disconnections, it might be overheating.
- Vėdinimas: Ensure the router is placed in a well-ventilated area and its vents are not blocked.
- Aplinkos temperatūra: Avoid placing the router in direct sunlight or in an enclosed space where heat can build up.
8. Specifikacijos
| Funkcija | Detalė |
|---|---|
| Prekės ženklas | TP-Link |
| Modelio pavadinimas | Archer NX600 5G/4G Wi-Fi 6 |
| Prekės modelio numeris | Archer NX600 |
| Ryšio technologija | Wi-Fi |
| Belaidžio ryšio standartas | „802.11ax“ |
| Dažnių juostos klasė | Dvi juosta |
| Ypatinga funkcija | Dvi juosta |
| Belaidis tipas | „802.11ax“ |
| Operacinė sistema | TP-Link OS |
| Spalva | Baltas |
| Prekės svoris | 600 gramų |
| Pakuotės matmenys | 22.8 x 22.7 x 11.9 cm |
| Rekomenduojami gaminio naudojimo būdai | Pradžia |
| Suderinami įrenginiai | Smartphone, Tablet, PC, Gaming Console, Smart TV, Surveillance Camera, Smart Thermostat, Printer |
| Įtraukti komponentai | TP-Link Archer NX600 |
9. Garantija ir palaikymas
Dėl garantijos informacijos ir techninės pagalbos kreipkitės į oficialią TP-Link svetainę. website or the warranty card included with your product. You can typically find:
- Produkto registracija.
- Technical support contact information (phone, email, chat).
- Firmware downloads and FAQs.
- Garantijos sąlygos.
Apsilankykite TP-Link palaikymas dėl naujausios informacijos.


