1. Produktas baigtasview
The AODELAN BR-3 is a wireless remote control designed for compatible Nikon cameras. It features an OLED screen for real-time status updates, USB-C fast charging, and supports various camera functions including still image shooting, video recording, BULB mode, zoom, and focus control. Its compact design allows for easy portability.
Pagrindinės funkcijos:
- OLED Screen: Displays charging status, battery level, and pairing status.
- USB-C Rechargeable: Built-in battery with fast charging (approx. 1.5 hours).
- Firmware Upgrades: Supports updates via the Type-C port for future compatibility.
- Multi-functional: Controls still photos, video, BULB mode, zoom, and focus.
- Operating Range: Up to 30m (97ft) wireless control.
- Anti-shake Function: Enhances shooting stability.

Image 1.1: AODELAN BR-3 Wireless Remote Control with its OLED screen and various function buttons.
2. Sąranka ir susiejimas
2.1 Nuotolinio valdymo pulto įkrovimas
Before initial use, fully charge the remote control using the provided USB-C cable. Connect the cable to the remote's USB-C port and a power source (e.g., power bank, laptop, USB wall adapter). The OLED screen will display the charging status and battery level. A full charge typically takes about 1.5 hours.

Image 2.1: The remote control connected via USB-C for charging.
2.2 Pairing with Nikon Z Series Cameras
- On your Nikon Z series camera, press the MENIU mygtuką.
- Eikite į [Wireless remote (ML-L7) options].
- Pasirinkite [Save wireless remote controller] ir paspauskite OK mygtuką.
- On the AODELAN BR-3 remote control, press and hold the Suporuoti button for at least 2 seconds. The OLED screen will display "Scanning" and then "OK!" upon successful pairing.
Note: For Nikon Z series cameras, remote zooming of the lens is not supported, but remote zooming of the previewed image is supported. Functions cannot be assigned to the Fn1 and Fn2 buttons on the remote for these models.
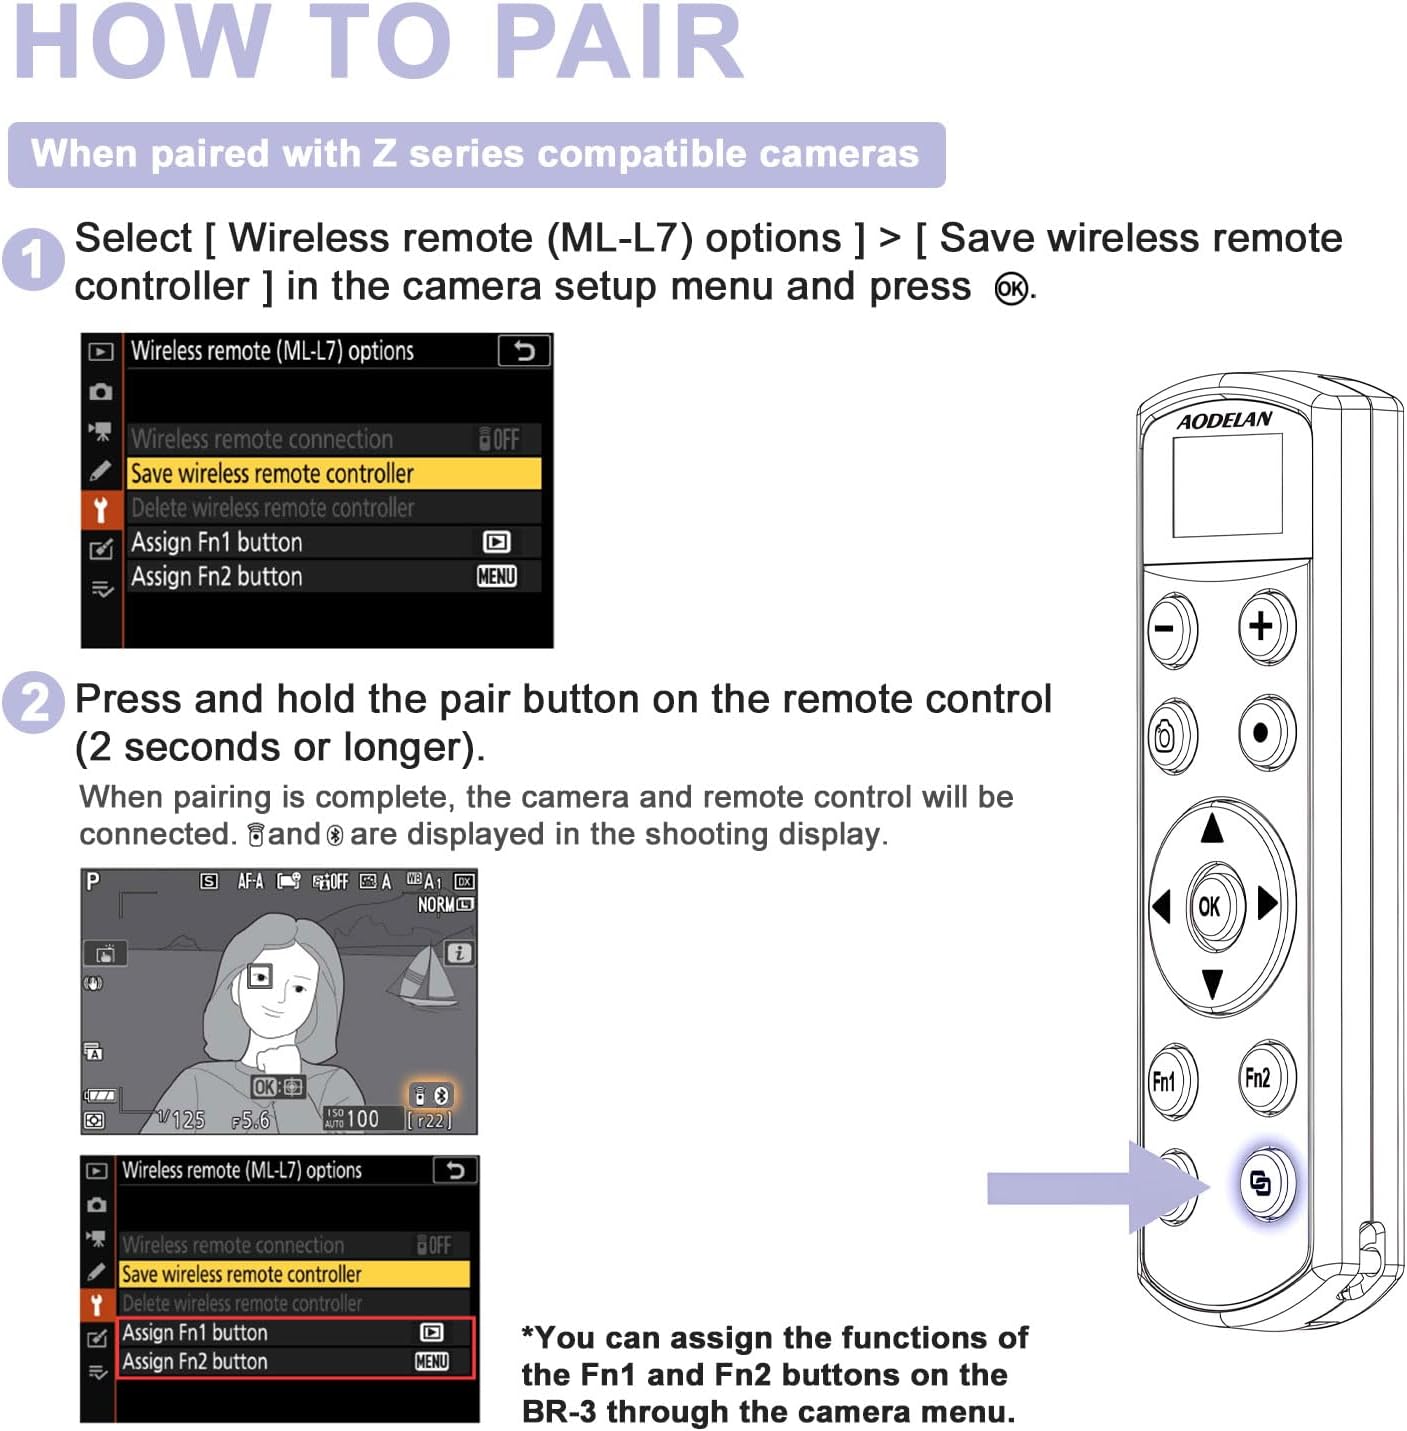
Image 2.2: Visual guide for pairing the remote with Nikon Z series cameras.
Video 2.1: Demonstrates the pairing process for the AODELAN BR-3 remote control with an OLED screen for Nikon cameras.
2.3 Pairing with Nikon Coolpix Cameras
- On your Nikon Coolpix camera, press the MENIU mygtuką.
- Use the multi selector (▲▼◀▶), kad pasirinktumėte „T“ menu icon, then press the OK mygtuką.
- Pasirinkite [Choose connection] ir paspauskite OK mygtuką.
- Pasirinkite [Nuotolinio valdymo pultas] ir paspauskite OK mygtuką.
- Pasirinkite [Connection to remote] ir paspauskite OK button. The camera will now wait for a connection.
- On the AODELAN BR-3 remote control, press and hold the Suporuoti button for at least 2 seconds. Upon successful connection, the camera's shooting display will show relevant indicators.
Note: Coolpix cameras do not support assigning functions to the Fn1 and Fn2 buttons on the BR-3.

Image 2.3: Visual guide for pairing the remote with Nikon Coolpix cameras.
Video 2.2: Instructions on how to pair the AODELAN BR-3 remote control with Nikon Coolpix cameras.
3. Naudojimo instrukcijos
3.1 Power On/Off and Pairing Status
Ilgai paspauskite mygtuką Galia button to turn the remote on. The OLED screen will display "Scanning" to indicate it's searching for a paired camera. If no Bluetooth connection is established within 3 minutes, the remote will automatically shut down to conserve battery.

Image 3.1: The remote's OLED screen showing "Scanning" during the pairing process.
3.2 Still Image Shooting
To take a still photo, ensure your camera's photo/video selector is set to the photo icon (📷). Paspauskite Užrakto atleidimas button on the remote control. The OLED screen will display the shutter icon (◧) when pressed.

Image 3.2: Using the remote to capture still images.
3.3 Vaizdo įrašymas
To record a video, set your camera's photo/video selector to the video icon (▶). Paspauskite Movie record button on the remote control to start recording. Press it again to stop recording. The OLED screen will display the movie record icon (●) when pressed.

Image 3.3: Using the remote to start and stop video recording.
3.4 Priartinimo valdymas
Paspauskite - button on the remote to zoom to the wide-angle side, or the + button to zoom to the telephoto side. The OLED screen will display W- plataus kampo ir T+ for telephoto zoom.
Note: Nikon Z series cameras do not support remote zooming of the lens. However, remote zooming of the previewed image is supported. When viewing recorded photos on the camera's screen, press the -/+ buttons on the Remote Control to zoom in/out.
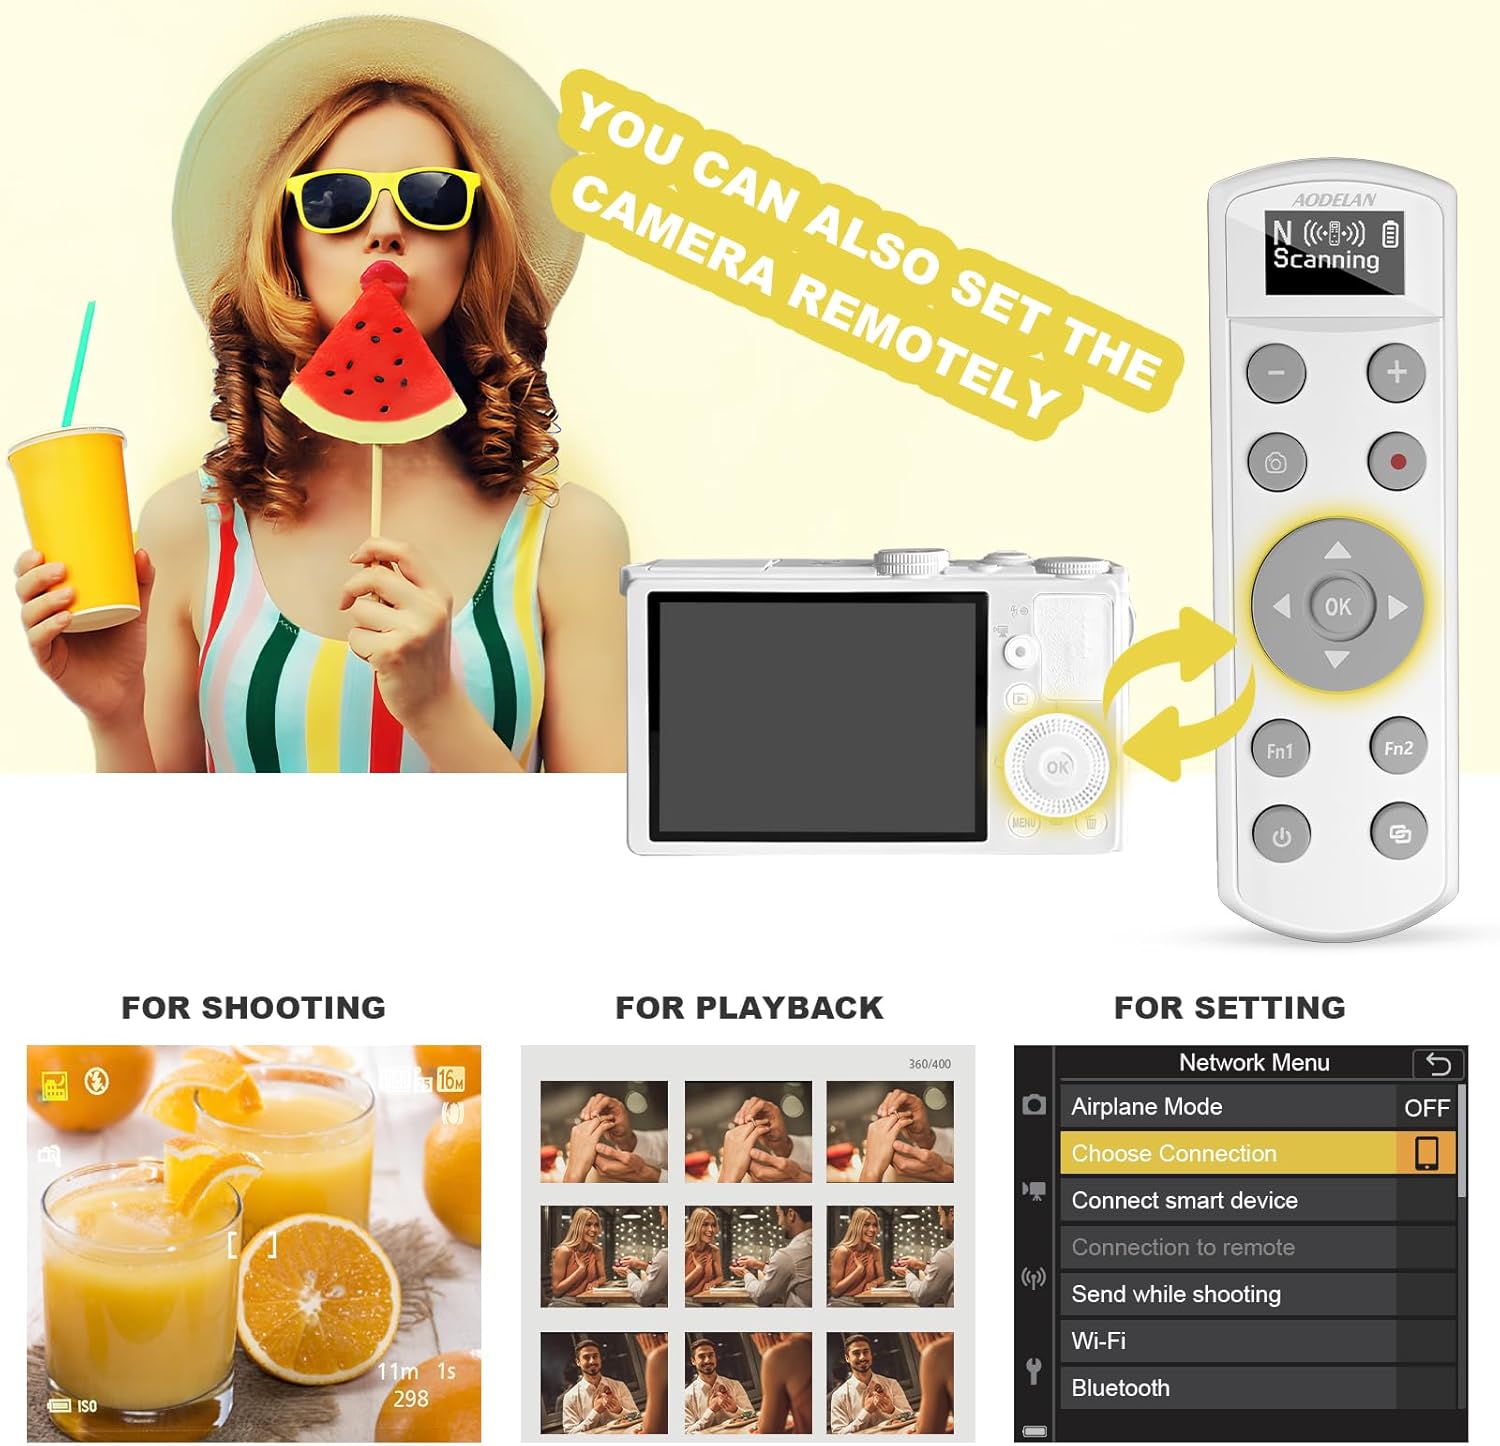
Image 3.4: Demonstrating the zoom in and zoom out functions using the remote.
3.5 BULB Mode
With the camera set to "Bulb" (or "Time") mode, press the Užrakto atleidimas button on the remote to start exposure. Press it again to end exposure.
Image 3.5: The shutter-release button used for Bulb mode photography.
3.6 Remote Camera Settings (Multi Selector)
The multi selector (▲▼◀▶) ir OK button on the remote can be used to navigate and select options within the camera's menu for shooting, playback, and general settings.
- For Shooting: While the shooting screen is displayed, use the multi selector to adjust settings like flash mode, self-timer, focus mode, exposure compensation, brightness, vividness, hue, and Active D-Lighting.
- Atkūrimui: While the playback screen is displayed, use the multi selector to change the displayed image or move the display area when a zoomed image is shown.
- For Settings: Navigate the camera's Network Menu (e.g., Airplane mode, Choose connection, Connect smart device, Send while shooting, Wi-Fi, Bluetooth) using the multi selector and confirm with the OK mygtuką.

Image 3.6: The remote control interacting with camera settings and playback.
4. Priežiūra
- Valymas: Use a soft, dry cloth to clean the remote control. Do not use liquid cleaners or solvents.
- Saugykla: Nuotolinio valdymo pultą laikykite vėsioje, sausoje vietoje, apsaugotoje nuo tiesioginių saulės spindulių ir ekstremalių temperatūrų.
- Akumuliatoriaus priežiūra: To maintain battery health, avoid fully discharging the remote frequently. Recharge it regularly, especially if storing for extended periods.
- Firmware atnaujinimai: Periodically check the AODELAN official website for any available firmware updates to ensure optimal performance and compatibility with new camera models. Updates can be performed via the USB-C port.
5. Problemų sprendimas
| Problema | Galima priežastis | Sprendimas |
|---|---|---|
| Nuotolinio valdymo pultas neįsijungia. | Senka baterija. | Charge the remote control using the USB-C cable. |
| Cannot pair with camera. | Incorrect pairing steps, camera not in pairing mode, or remote too far. |
|
| Remote functions (shutter, zoom) not working. | Not paired, camera mode incorrect, or specific function not supported by camera model. |
|
| OLED screen is blank or unresponsive. | Išsikrovęs akumuliatorius arba įrenginio gedimas. | Charge the remote. If the issue persists after charging, contact customer support. |
6. Gaminio specifikacijos
| Funkcija | Detalė |
|---|---|
| Modelis | BR-3 |
| Prekės ženklas | AODELANAS |
| Ryšys | Belaidis ryšys („Bluetooth“) |
| Veikimo diapazonas | Iki 30 m (97 pėdų) |
| Maitinimo šaltinis | Built-in Lithium Ion battery (rechargeable via USB-C) |
| Įkrovimo laikas | apytiksliai 1.5 valandas |
| Matmenys | 3.74 x 1.97 x 0.79 colio (paketo matmenys) |
| Prekės svoris | 1.06 uncijos |
| Compatible Nikon Models | Z6 III, Z30, Z50, Z50II, Zfc, Zf; Z6II, Z7II, Z5 (with V1.40 or later firmware update); Coolpix A1000, B600, P1000, P950. |
| Ypatingos savybės | OLED Display, Rechargeable, Firmware Upgradable |
7. Klientų aptarnavimas ir garantija
For technical assistance, warranty information, or to report any issues with your AODELAN BR-3 Wireless Remote Control, please contact AODELAN customer support.
Kontaktinė informacija:
- Refer to the contact details provided in your product packaging or on the official AODELAN websvetainę.
- If purchased through Amazon, you may contact the seller "Fotolinko" directly via your Amazon order history for support.
AODELAN is committed to customer satisfaction. If you are not satisfied with the product for any reason, please reach out for assistance.