1. Įvadas
This manual provides essential information for the safe and effective operation of your ION Audio Retro Glow Boombox. This device combines classic audio playback with modern connectivity, featuring an AM/FM radio, cassette player/recorder, Bluetooth 5.3, USB, and SD card playback capabilities. Please read this manual thoroughly before use and retain it for future reference.
2. Saugos informacija
- Saugokite įrenginį nuo vandens ar drėgmės.
- Venkite įrenginio statyti šalia šilumos šaltinių arba tiesioginiuose saulės spinduliuose.
- Užtikrinkite tinkamą vėdinimą; neužblokuokite jokių ventiliacijos angų.
- Naudokite tik gamintojo nurodytus priedus/priedus.
- Atjunkite įrenginį žaibuojant arba kai nenaudojate ilgą laiką.
- Visus techninės priežiūros darbus patikėkite kvalifikuotam techninės priežiūros personalui.
3. Kas įskaičiuota
Išpakuodami įsitikinkite, kad visi toliau išvardyti daiktai yra supakuoti ir yra geros būklės:
- ION Audio Retro Glow Boombox
- Maitinimo kabelis
- Greitas pradmenų gidas
4. Produktas baigtasview
The Retro Glow Boombox features a translucent housing with multi-colored LED lights that synchronize with music. It includes dual full-range speakers for robust audio output.
Priekinis skydelis

1 pav.: priekis view of the Retro Glow Boombox, showcasing the cassette deck, radio tuner, and illuminated dual speakers.
Viršutiniai valdikliai

2 pav. Išsamus view of the top panel, including volume, bass, treble controls, cassette function buttons (Pause, Stop/Eject, F.FWD, REW, Play, REC), and mode selectors (Tape, Aux, Radio, Bluetooth/USB/SD).
Side Panel and Rear
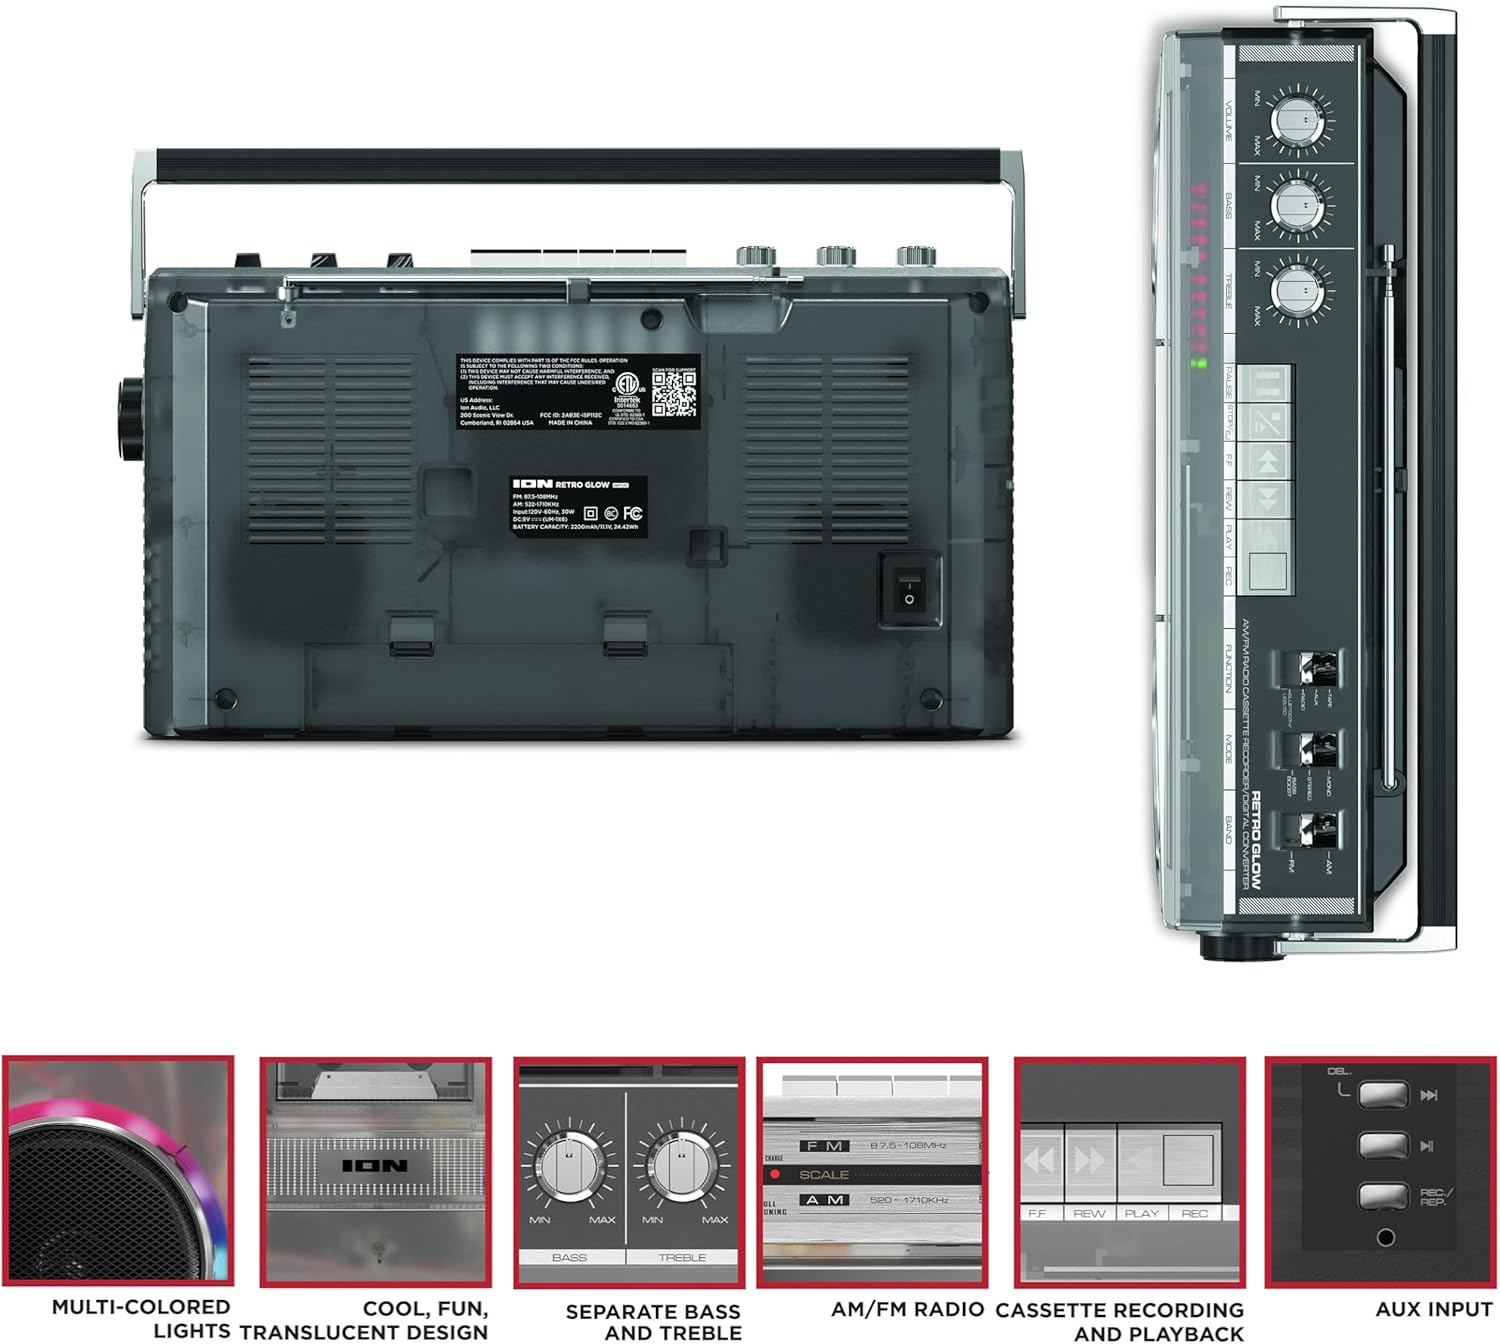
Figure 3: Side panel illustrating the USB port, SD card slot, and playback control buttons. The rear panel includes the power input and battery compartment.
5. Sąranka
„Boombox“ maitinimas
The Retro Glow Boombox can be powered via the included AC power cable or by batteries for portable use.
- Kintamosios srovės maitinimas: Connect the power cable to the AC input on the rear of the unit and then to a wall outlet.
- Baterijos galia: Open the battery compartment on the rear and insert the required batteries (type and quantity specified in specifications).

4 pav.: galinis view of the boombox, highlighting the power input and the battery compartment for portable operation.
6. Naudojimo instrukcijos
Bendra operacija
- Maitinimo įjungimas/išjungimas: Norėdami įjungti arba išjungti įrenginį, naudokite maitinimo jungiklį.
- Garsumo valdymas: Adjust the 'VOLUME' knob on the top panel to increase or decrease the sound level.
- Tono valdymas: Use the 'BASS' and 'TREBLE' knobs to customize the audio output to your preference.
- LED lemputės: The multi-colored LED lights around the speakers dance in sync with the music. Refer to the Quickstart Guide for specific controls to change light modes or turn them off.
Radijo funkcionalumas
- Switch the 'FUNCTION' selector to 'RADIO'.
- Select 'AM' or 'FM' using the 'BAND' switch.
- Ištieskite teleskopinę anteną, kad gautumėte optimalų FM priėmimą. AM priėmimui pasukite įrenginį, kad gautumėte geriausią priėmimą.
- Use the 'TUNING' knob to scan for stations.
Kasečių grotuvas / įrašymo įrenginys
- Atkūrimas: Press the 'STOP/EJ' button to open the cassette door. Insert a cassette tape and close the door. Press 'PLAY' to begin playback.
- Įrašas: To record from the radio, built-in microphone, or an external source (via Aux input), ensure a blank cassette is inserted. Select the desired source using the 'FUNCTION' switch. Press the 'REC' button (often simultaneously with 'PLAY') to start recording.
- Greitas atsukimas pirmyn/atgal: Use the 'F.FWD' and 'REW' buttons for tape navigation.
Bluetooth ryšys
- Switch the 'FUNCTION' selector to 'BLUETOOTH/USB/SD'. The unit will enter pairing mode.
- On your Bluetooth-enabled device, search for 'Retro Glow Boombox' and select it to pair.
- Once paired, you can stream audio wirelessly to the boombox.
USB ir SD kortelių atkūrimas
- Insert a USB drive or SD card into the respective slot on the side panel.
- Switch the 'FUNCTION' selector to 'BLUETOOTH/USB/SD'. The unit should automatically detect and begin playing audio fileiš įdėtos laikmenos.
- Use the playback control buttons (play/pause, skip forward/backward) on the side panel to manage your audio.
Pagalbinis įėjimas
- Connect an external audio device (e.g., smartphone, MP3 player) to the 'AUX' input using a 3.5mm audio cable (not included).
- Switch the 'FUNCTION' selector to 'AUX'. Audio from your external device will play through the boombox speakers.
7. Priežiūra
- Valymas: Išorinį įrenginio paviršių valykite minkštu, sausu skudurėliu. Nenaudokite abrazyvinių valiklių ar tirpiklių.
- Kasečių grotuvo priežiūra: Reguliariai valykite juostos galvutes ir suspaudimo volelius vatos tamponėliu, lengvai jį suvilgydami.amppraturtintas izopropilo alkoholiu, kad būtų užtikrinta optimali garso kokybė ir išvengta kasečių pažeidimų.
- Saugykla: When not in use, store the boombox in a cool, dry place away from direct sunlight and extreme temperatures.
8. Problemų sprendimas
Nėra galios
- Įsitikinkite, kad maitinimo laidas yra tvirtai prijungtas tiek prie įrenginio, tiek prie veikiančio maitinimo lizdo.
- Jei naudojate baterijas, patikrinkite, ar jos įdėtos teisingai ir ar nėra išsikrovusios.
Nėra garso
- Check the volume level on the boombox and the connected audio source (if applicable).
- Ensure the correct function mode (Radio, Tape, Bluetooth, USB/SD, Aux) is selected.
- For cassette playback, verify the tape is inserted correctly and the heads are clean.
„Bluetooth“ poravimo problemos
- Make sure the boombox is in Bluetooth pairing mode.
- Ensure your Bluetooth device is within range (typically 30 feet or 10 meters).
- Pabandykite atjungti ir vėl susieti įrenginį.
9. Specifikacijos
| Gaminio matmenys | 9.25 x 16.25 x 5.25 colio |
| Prekės svoris | 8.93 svaro |
| Ryšio technologija | Bluetooth 5.3, USB, SD Card, Aux Input |
| Garsiakalbio tipas | Stereo, Full-Range |
| Maitinimo šaltinis | AC Power Cable, Rechargeable Battery (approx. 10-hour life) |
| Ypatingos savybės | AM/FM Radio, Cassette Player/Recorder, Multi-colored LED Lights, Retro VU Meters, Separate Bass and Treble Controls |
10. Garantija ir palaikymas
For warranty information or technical support, please refer to the Quickstart Guide included with your product or visit the official ION Audio website. Keep your purchase receipt as proof of purchase may be required for warranty claims.


