1. Įvadas
This manual provides essential instructions for the safe and efficient operation, installation, and maintenance of your Primo Water Dispenser Model 601380. Please read all instructions carefully before use and retain this manual for future reference.
2. Saugos informacija
Observe the following safety precautions to reduce the risk of fire, electric shock, or injury.
- Always connect the dispenser to a grounded electrical outlet.
- Nenaudokite dozatoriaus su pažeistu laidu ar kištuku.
- Laikykite dozatorių atokiau nuo tiesioginių saulės spindulių ir šilumos šaltinių.
- Ensure adequate ventilation around the dispenser. Maintain at least 4 inches of clearance from walls.
- The hot water function dispenses water at high temperatures. Exercise caution to prevent burns. Utilize the child safety lock feature on the hot water tap.
- Nemerkite dozatoriaus, laido ar kištuko į vandenį ar kitus skysčius.
- Prieš valydami ar atlikdami bet kokią techninę priežiūrą, atjunkite dozatorių nuo elektros tinklo.
3. Pakuotės turinys
Patikrinkite, ar yra visi komponentai:
- Primo Water Dispenser Unit (Model 601380)
- Drip Tray and Grill
- Water Probe Assembly (for bottom loading)
- Maitinimo laidas (integruotas)
- Instrukcijų vadovas
4. Produktas baigtasview
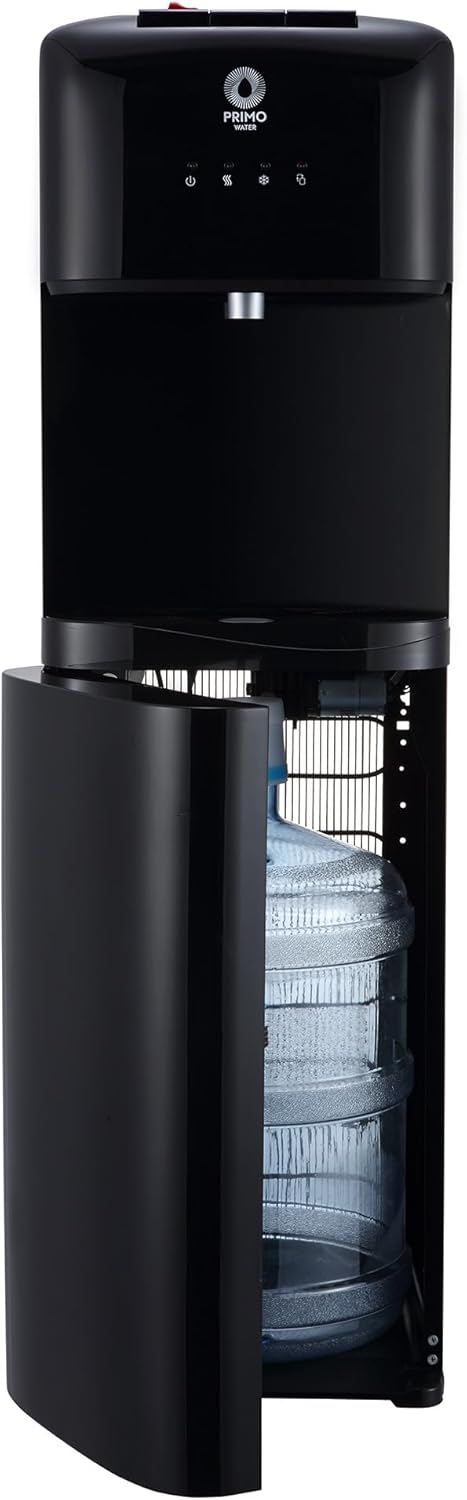
The Primo Water Dispenser Model 601380 is a bottom-loading unit designed for 3- and 5-gallon water bottles, providing both hot and cold water.

5. Sąranka
5.1 Išpakavimas
Carefully remove the dispenser from its packaging. Inspect for any shipping damage. Retain packaging materials for potential future transport.
5.2 Įdėjimas
Place the dispenser on a level, stable surface. Ensure it is positioned in an upright position and away from direct sunlight or heat sources. Allow at least 4 inches of clearance from walls for proper ventilation.
5.3 Vandens butelio įrengimas
- Open the lower cabinet door of the dispenser.
- Remove the cap from a 3- or 5-gallon water bottle.
- Insert the water probe assembly into the bottle opening. Ensure the probe reaches the bottom of the bottle.
- Slide the water bottle into the lower cabinet.
- Saugiai uždarykite spintelės dureles.
5.4 Pradinis gruntavimas
Before plugging in the unit, ensure the water bottle is correctly installed. Press the cold water tap until water flows continuously. This primes the system and prevents damage to heating elements.
5.5 Maitinimo jungtis
Plug the dispenser into a grounded 120V AC electrical outlet. The indicator lights will illuminate, and the cooling and heating processes will begin.
6. Operacija
The dispenser features easy push-button controls for water dispensing.

6.1 Šalto vandens pylimas
Place a glass or container under the cold water tap. Press the cold water button to dispense chilled water. Release the button to stop the flow.
6.2 Karšto vandens išpylimas
The hot water tap is equipped with a two-step child safety lock. To dispense hot water:
- Push the child safety lock button inward.
- While holding the safety lock, press the hot water button.
- Release both buttons to stop the flow.
Exercise extreme caution when dispensing hot water to avoid burns.
6.3 Indikacinės lemputės
The dispenser features LED indicator lights:
- Maitinimo indikatorius: Šviečia, kai įrenginys įjungtas.
- Karšto vandens indikatorius: Illuminates when the hot water is heating and turns off when the target temperature is reached.
- Šalto vandens indikatorius: Illuminates when the cold water is cooling and turns off when the target temperature is reached.
- Užpildymo indikatorius: Illuminates when the water bottle is empty and needs replacement.
7. Priežiūra
7.1 Lašėjimo padėklo valymas
Lašėjimo padėklą reikia reguliariai ištuštinti ir valyti, kad jis nepersipildytų ir nesidaugintų bakterijos. Tiesiog ištraukite padėklą, išpilkite susikaupusį vandenį, nuplaukite švelniu muilu ir vandeniu, kruopščiai nuskalaukite ir įdėkite atgal.
7.2 Išorės valymas
Nuvalykite dozatoriaus išorinius paviršius minkšta,amp audinys. Nenaudokite abrazyvinių valiklių ar tirpiklių.
7.3 Draining the System (for extended storage or relocation)
- Atjunkite dozatorių nuo elektros lizdo.
- Nuimkite vandens buteliuką.
- Place a large bucket under the drain plug located at the back of the dispenser.
- Remove the drain plug to allow water to empty from the reservoirs.
- Išleidus skystį, sandariai užsukite išleidimo kamštį.
8. Problemų sprendimas
| Problema | Galima priežastis | Sprendimas |
|---|---|---|
| Nėra vandens išpylimo | Water bottle empty or not properly installed. System not primed. | Replace water bottle. Ensure water probe is fully inserted. Prime the system by pressing cold water tap until water flows. |
| Vanduo nepakankamai karštas/šaltas | Heating/cooling switch off. Insufficient time for heating/cooling. Poor ventilation. | Ensure hot/cold switches (if present, typically internal) are on. Allow 15-30 minutes for water to reach desired temperature. Ensure 4 inches of clearance around the unit. |
| Nutekėjimas | Water bottle cap not sealed properly. Drain plug loose. | Check water bottle for cracks or improper seal. Ensure drain plug is tightened. |
| Neįprastas triukšmas | Kompresoriaus ciklinis veikimas (normalus). Įrenginys nelygus. | Some noise during cooling/heating cycles is normal. Ensure the unit is on a level surface. |
9. Specifikacijos
- Modelis: 601380
- Prekinis ženklas: Primo
- Talpa: Compatible with 3 and 5 Gallon Bottles
- Gaminio matmenys (G x P x A): 14.2" x 12.2" x 40.9"
- Prekės svoris: 39.4 svaro
- Stilius: Pakrovimas iš apačios
- UPC: 817206013808
- Sertifikatai: UL-certified, Energy Star rated

10. Garantija ir palaikymas
For warranty information and customer support, please refer to the documentation included with your purchase or visit the official Primo Water websvetainėje. Išsaugokite pirkimo įrodymą garantiniams reikalavimams.


