Įvadas
This manual provides detailed instructions for the installation, operation, and maintenance of your Vetroo M06 Micro-ATX/Mini-ITX Gaming PC Case. Please read this manual thoroughly before beginning assembly to ensure proper setup and optimal performance.

Image: The Vetroo M06 Micro-ATX/Mini-ITX Gaming PC Case in black, showcasing its mesh front panel and side window, viewed iš kampo.
Pagrindinės savybės
- Kompaktiškas dizainas: Micro-ATX / Mini-ITX form factor with a high-airflow mesh front panel, designed for space-efficient builds.
- Optimizuotas aušinimas: Supports up to five 120mm fans and a 240mm top-mounted liquid radiator for efficient thermal management.
- GPU suderinamumas: Talpina iki 355 mm ilgio vaizdo plokštes.
- Flexible PSU Mounting: Features an adjustable power supply installation area with a maximum length of 160mm.
- Šiuolaikinis ryšys: Front panel includes USB Type-C and USB 3.0 ports for convenient peripheral access.
Pakuotės turinys
Prieš tęsdami montavimą, patikrinkite, ar yra visi komponentai:
- Vetroo M06 PC Case
- Priedų dėžutė (varžtai, tarpikliai, kabelių laikikliai)
- SFX PSU Bracket (1x)
- Vartotojo vadovas (šis dokumentas)
Specifikacijos
| Funkcija | Detalė |
|---|---|
| Modelio pavadinimas | M06 |
| Atvejo tipas | Mini bokštas |
| Pagrindinės plokštės suderinamumas | Micro ATX, Mini ITX |
| Gaminio matmenys (I x P x A) | 15.55 colio x 7.87 colio x 13.07 colio (395 mm x 200 mm x 332 mm) |
| Prekės svoris | 13.37 svaro (6.06 kg) |
| Medžiaga | Acrylonitrile Butadiene Styrene (ABS), SPCC (0.8mm metal plate) |
| Maksimalus GPU ilgis | 355 mm |
| Maksimalus procesoriaus aušintuvo aukštis | 165 mm |
| Maksimalus PSU ilgis | 160mm (Adjustable mounting) |
| Ventiliatorių palaikymas | Iki 5 x 120 mm ventiliatoriai |
| Radiatoriaus palaikymas | 1 x 240mm (Top) |
| Priekinės įvesties / išvesties prievadai | 1 x USB Type-C, 1 x USB 3.0, HD Audio, Power Button, Reset Button |

Image: Diagram illustrating the compact dimensions of the Vetroo M06 PC case, measuring 15.5 inches in depth, 7.8 inches in width, and 13.0 inches in height.

Image: A detailed diagram outlining the compatibility specifications for the Vetroo M06 PC case, including maximum CPU cooler height (165mm), GPU length (355mm), PSU length (160mm), and supported motherboard form factors (M-ATX/ITX).
Sąranka ir diegimas
Before starting, ensure you have a clean, static-free workspace. Refer to your component manuals for specific installation details.
1. Pagrindinės plokštės montavimas
- Remove the side panel(s) of the case.
- Install the necessary motherboard standoffs into the case tray according to your motherboard's form factor (Micro-ATX or Mini-ITX).
- Atsargiai uždėkite pagrindinę plokštę ant atramų, sulygiuodami varžtų skyles.
- Pritvirtinkite pagrindinę plokštę varžtais.
2. Grafikos plokštės diegimas
- Remove the appropriate PCIe slot covers from the rear of the case.
- Insert your graphics card into the primary PCIe slot on your motherboard.
- Pritvirtinkite vaizdo plokštę prie korpuso varžtais.
- Connect any required PCIe power cables from your power supply to the GPU.
3. PSU montavimas
- Determine the desired mounting position for your power supply. The Vetroo M06 supports adjustable PSU mounting.
- If using an SFX power supply, attach the included SFX bracket to the PSU.
- Slide the power supply into its designated bay and secure it with screws from the rear of the case.
- Route the necessary power cables to your components.

Paveikslėlis: vidinis view of the Vetroo M06 PC case highlighting the three adjustable mounting positions for ATX/SFX power supplies, along with an illustration of the included SFX bracket.
4. Storage Installation (HDD/SSD)
- Locate the designated mounting points for 3.5" HDDs and 2.5" SSDs.
- Secure your storage drives using the provided screws.
- Connect SATA data and power cables to each drive.
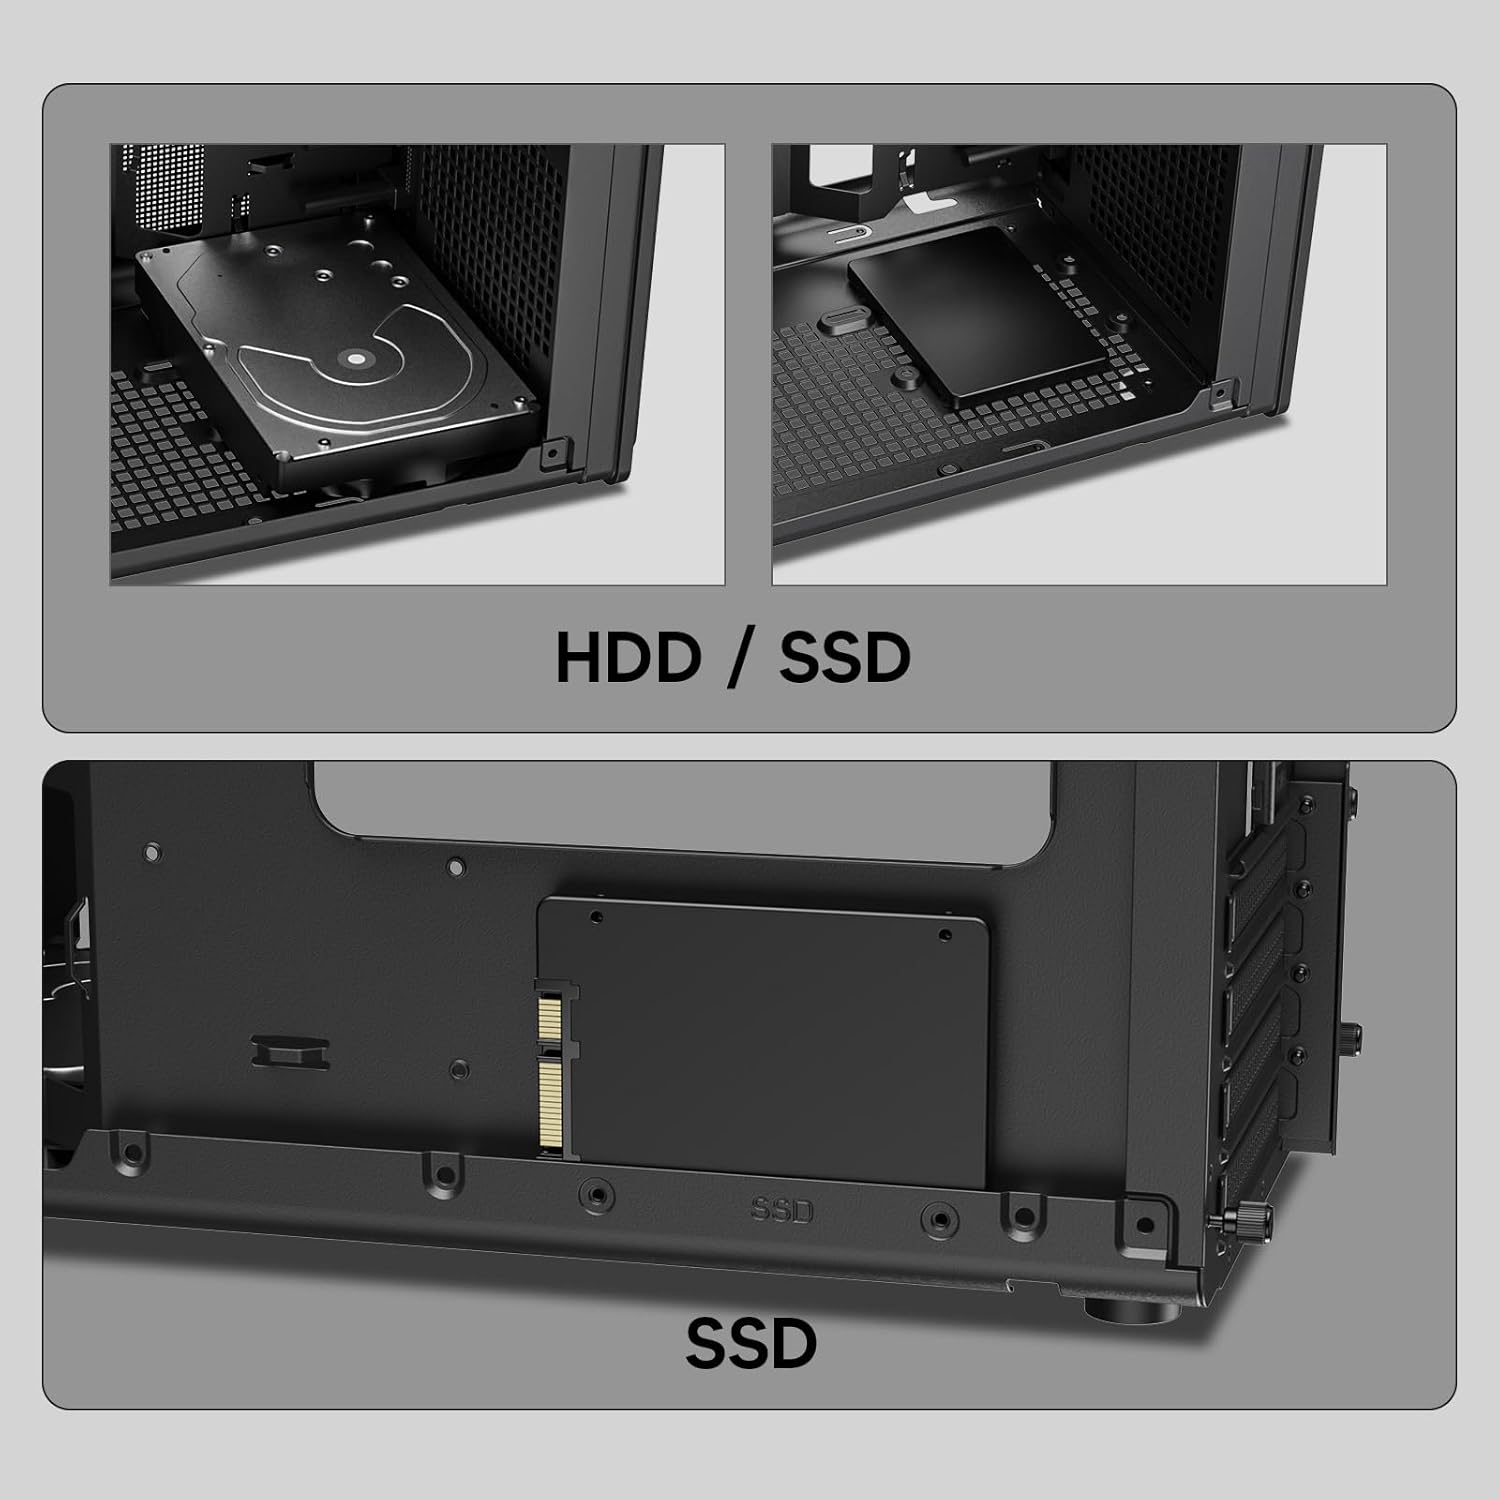
Vaizdas: Stambus planas views of the Vetroo M06 PC case interior, demonstrating the mounting options for both 3.5-inch Hard Disk Drives (HDDs) and 2.5-inch Solid State Drives (SSDs).
5. Cooling System Installation (Fans/Radiator)
- Identify the fan mounting locations (up to five 120mm fans).
- Mount fans using appropriate screws, ensuring correct airflow direction.
- For liquid cooling, install a 240mm radiator at the top mounting position, securing it with screws.
- Connect fan and pump cables to your motherboard or fan controller.
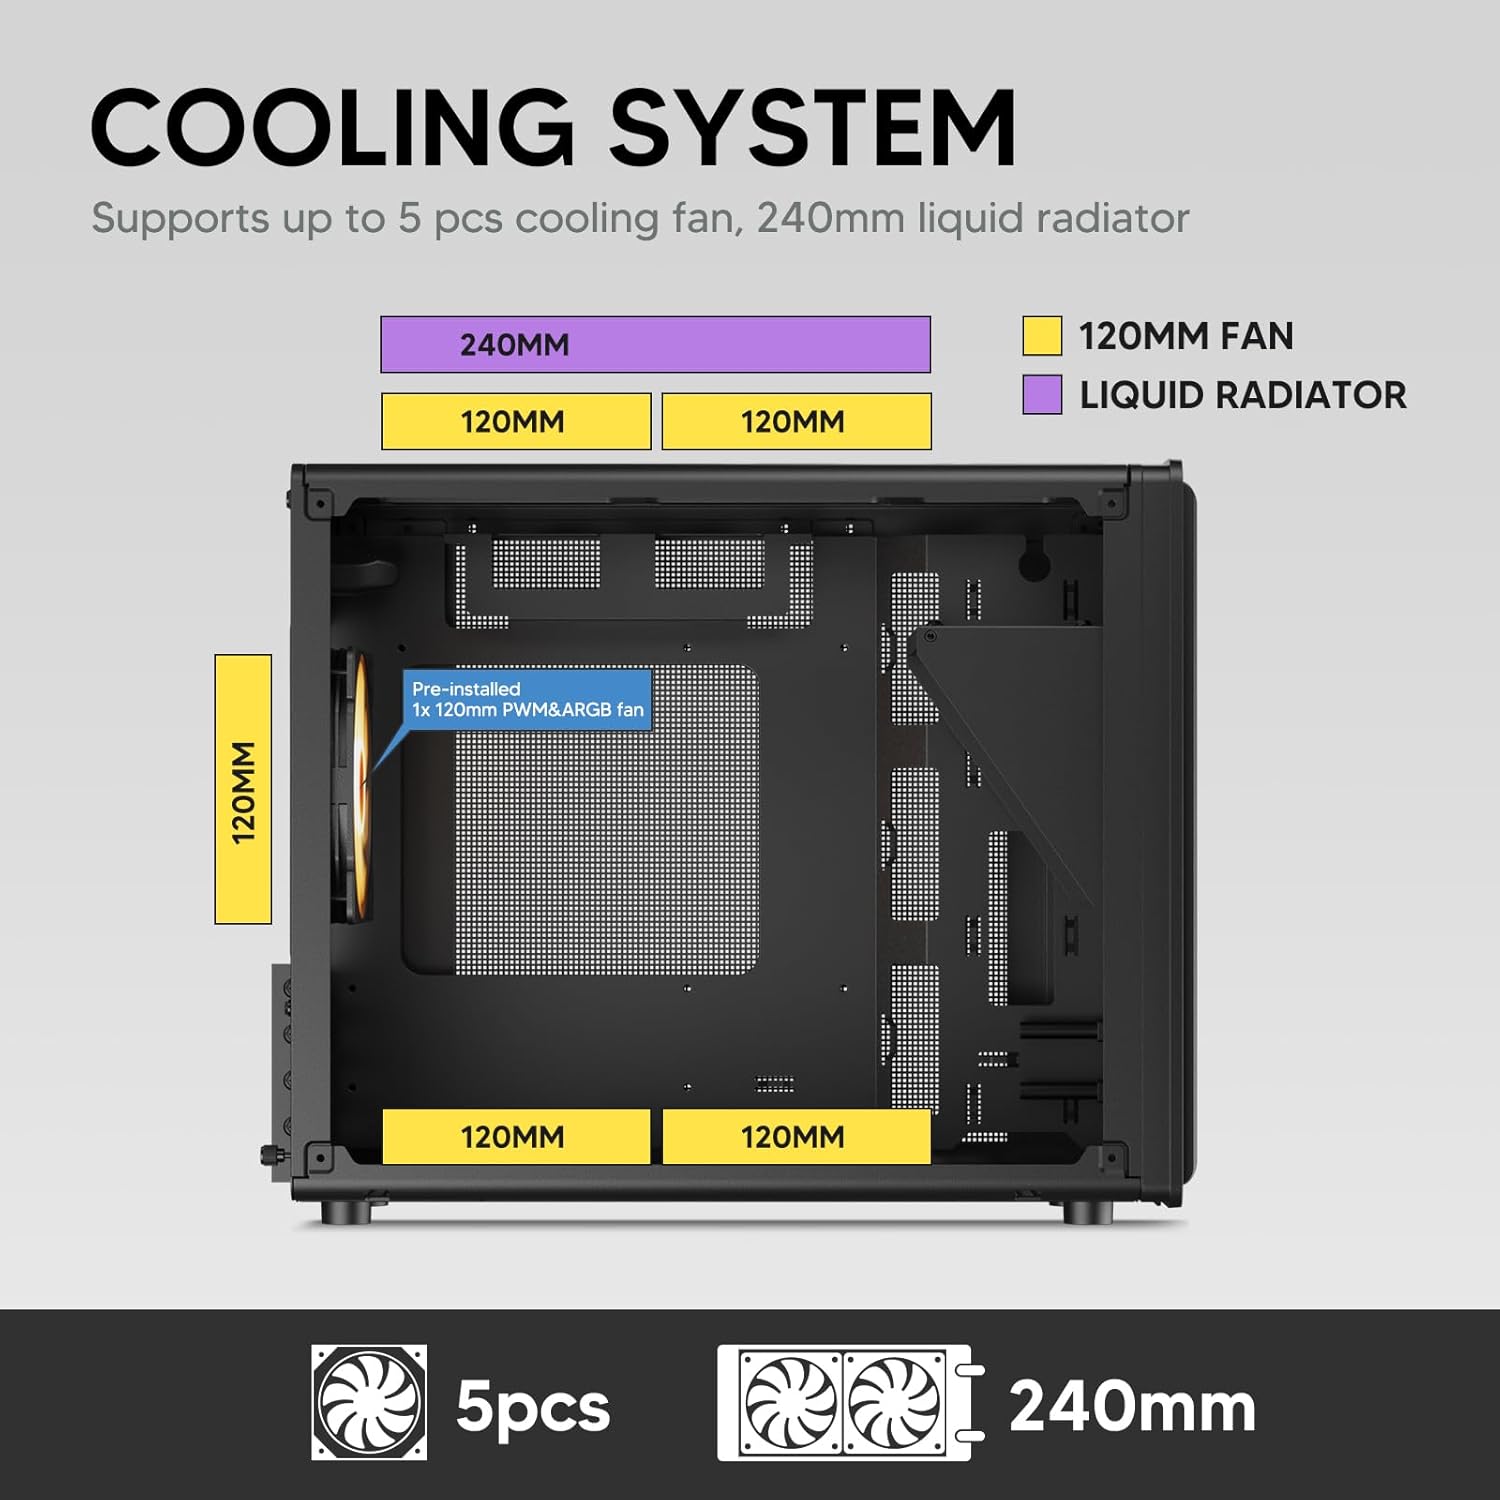
Image: A diagram illustrating the cooling system layout within the Vetroo M06 PC case, detailing the positions for up to five 120mm fans and a 240mm liquid radiator at the top.
6. Įvesties/išvesties skydelio jungtys
- Connect the front panel cables (Power, Reset, USB 3.0, USB Type-C, HD Audio) to the corresponding headers on your motherboard. Refer to your motherboard manual for header locations.

Image: A close-up of the Vetroo M06 PC case's front I/O panel, clearly labeling the Power button, Reset button, USB 3.0 port, HD Audio jack, and USB Type-C port.
Naudojimo instrukcijos
Once all components are installed and cables are connected, replace the side panels. Connect your peripherals (monitor, keyboard, mouse) and power cable to the PSU. Press the power button on the front panel to start your system.
Oro srauto valdymas
The Vetroo M06 case features an excellent airflow design with mesh panels to facilitate optimal cooling. Ensure fans are installed to create a balanced airflow, typically with intake fans at the front/bottom and exhaust fans at the rear/top.

Image: An exploded diagram of the Vetroo M06 PC case, illustrating the intended airflow patterns with blue arrows indicating cool air intake and red arrows showing warm air exhaust through its mesh panels.
Priežiūra
Reguliarus techninis aptarnavimas padeda prailginti kompiuterio komponentų tarnavimo laiką ir užtikrina optimalų našumą.
- Dulkių valymas: Reguliariai valykite dulkių filtrus ir vidinius komponentus suslėgtu oru. Prieš valydami įsitikinkite, kad sistema išjungta ir atjungta nuo elektros tinklo.
- Kabelių valdymas: Verify that internal cables are neatly routed and do not obstruct airflow.
- Komponentų patikrinimai: Ensure all screws are tight and components are securely seated.

Image: A close-up shot of the Vetroo M06 PC case, featuring a digital caliper measuring the thickness of the metal plate, which is specified as 0.8mm, highlighting the case's robust construction.
Trikčių šalinimas
Jei kyla problemų, vadovaukitės toliau pateiktais įprastais trikčių šalinimo veiksmais.
- Sistema neįsijungia:
- Check all power connections, including the PSU to wall outlet, PSU to motherboard (24-pin and CPU 8-pin), and front panel power switch cable to motherboard.
- Įsitikinkite, kad maitinimo šaltinio jungiklis yra „ĮJUNGTA“ padėtyje.
- Nėra ekrano išvesties:
- Verify that your monitor is connected to the graphics card (not the motherboard's integrated graphics ports, unless you are using integrated graphics).
- Iš naujo įstatykite grafikos plokštę ir RAM modulius.
- Perkaitimo problemos:
- Įsitikinkite, kad visi korpuso ventiliatoriai sukasi ir yra tinkamai orientuoti, kad būtų užtikrintas optimalus oro srautas.
- Check CPU cooler installation and thermal paste application.
- Clean any dust buildup from fans and filters.
- Neveikiantys USB prievadai:
- Verify that the front panel USB 3.0 and USB Type-C cables are correctly connected to the motherboard headers.
Garantija ir palaikymas
Vetroo products are designed for quality and reliability. For warranty information and technical support, please visit the official Vetroo websvetainėje arba susisiekite su jų klientų aptarnavimo tarnyba. Išsaugokite pirkimo įrodymą garantiniams reikalavimams.
Vetroo Official Websvetainė: Vetroo Store on Amazon
For further assistance, please refer to the contact information provided with your product packaging or on the official Vetroo support channels.


