1. Įvadas
This manual provides comprehensive instructions for the safe and efficient operation of your TechniSat Viola under-cabinet kitchen radio. Please read this manual thoroughly before using the device and retain it for future reference. This device combines modern design with practical features for your kitchen or bedroom.
2. Saugos informacija
Naudodami šį gaminį, visada laikykitės pagrindinių saugos priemonių, kad sumažintumėte gaisro, elektros smūgio ir sužalojimų riziką.
- Saugokite prietaisą nuo lietaus ar drėgmės.
- Neatidarykite casing. Visus techninės priežiūros darbus patikėkite kvalifikuotiems darbuotojams.
- Užtikrinkite maitinimo šaltinio ttage atitinka įrenginyje nurodytus reikalavimus.
- Nestatykite prietaiso šalia šilumos šaltinių arba tiesioginiuose saulės spinduliuose.
- Laikyti vaikams nepasiekiamoje vietoje.
3. Pakuotės turinys
The TechniSat Viola kitchen radio package includes the following items:
- TechniSat Viola Kitchen Radio (Anthracite)
- Kilpinė antena
- Maitinimo adapteris
- Montavimo priedai
- Vartotojo vadovas
4. Produktas baigtasview
Familiarize yourself with the components and controls of your TechniSat Viola radio.
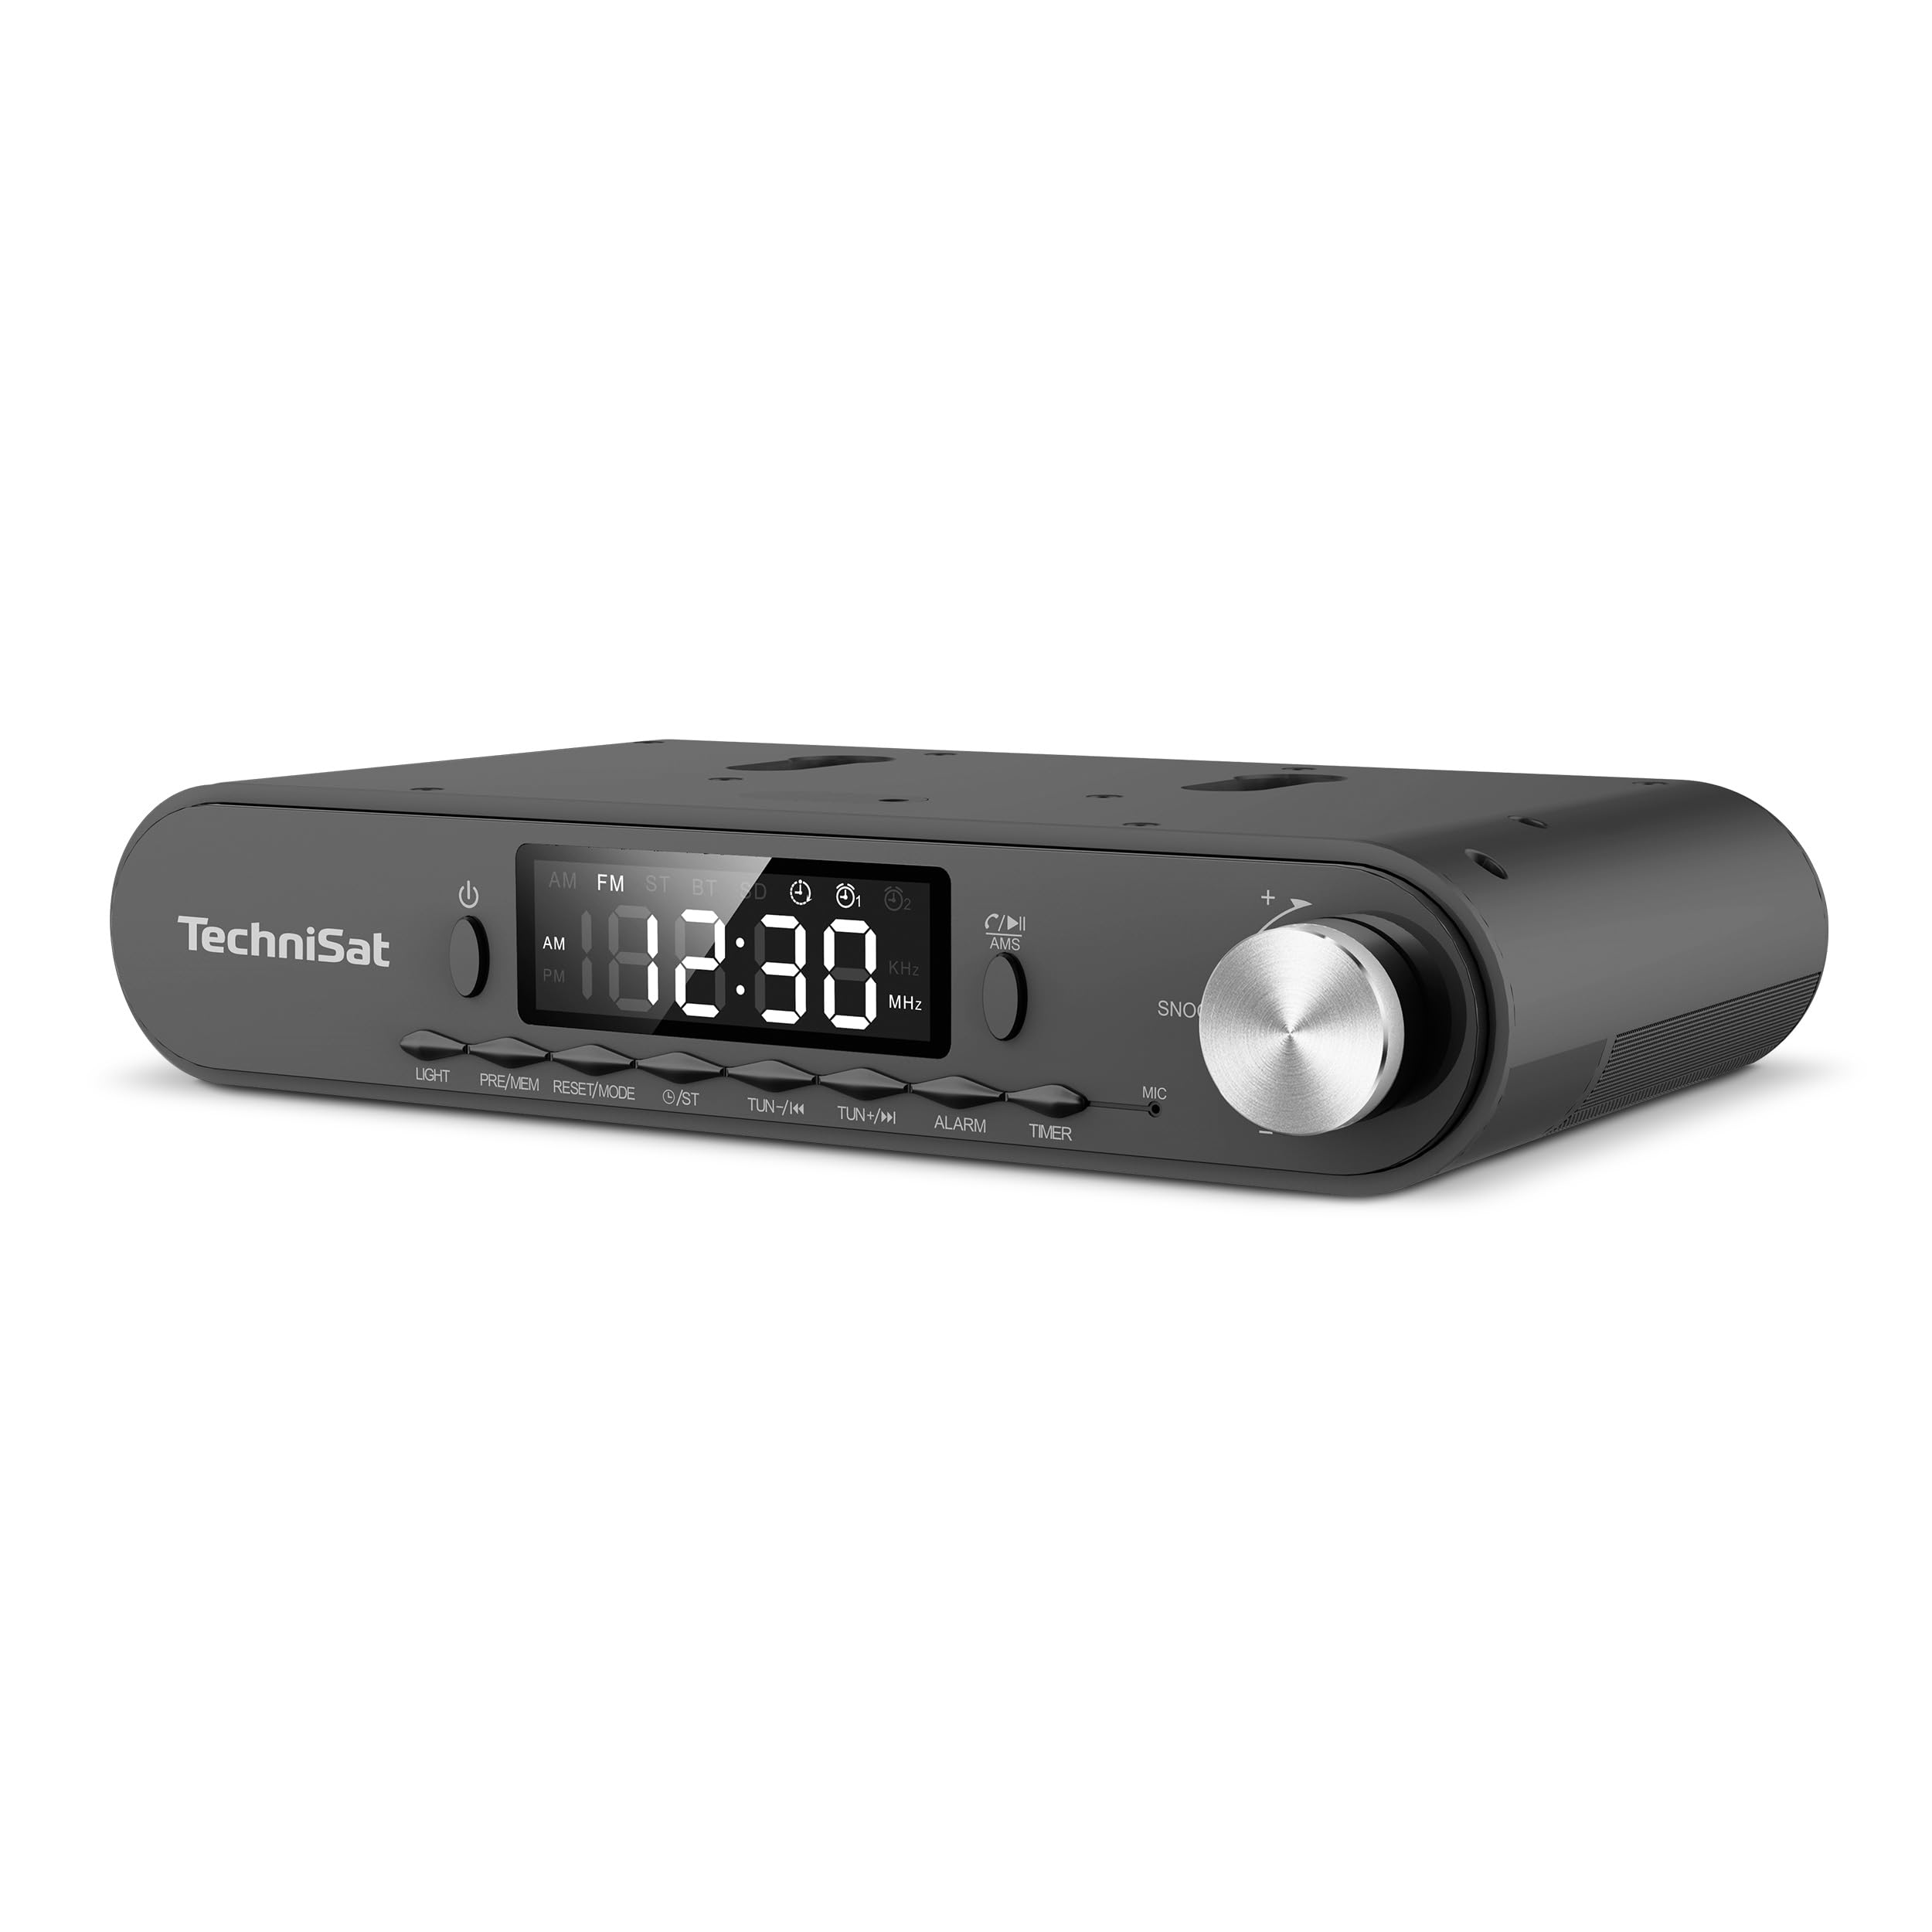
1 paveikslas: Front panel of the TechniSat Viola radio. This image displays the front panel of the TechniSat Viola radio, showing the LED display, control buttons (LIGHT, MODE/RESET, MEM/PRE, TUN-/K, TUN+/I, ALARM, TIMER), power button, and the volume/snooze knob. The TechniSat logo is visible on the left.
Valdymo skydelio išdėstymas:
- Maitinimo mygtukas: Įjungia arba išjungia įrenginį.
- Skystųjų kristalų ekranas: Shows time, frequency, and mode information.
- Šviesos mygtukas: Activates the integrated LED work light.
- MODE/RESET Button: Switches between operating modes and resets settings.
- MEM/PRE Button: Stores and recalls radio station presets.
- TUN-/K and TUN+/I Buttons: Adjusts tuning frequency or navigates tracks.
- ALARM mygtukas: Sets and manages alarm functions.
- TIMER mygtukas: Accesses and controls the cooking timer.
- Volume/Snooze Knob: Adjusts volume; press for snooze function.
- MIC: Microphone for hands-free function.
5. Sąranka
Follow these steps to set up your TechniSat Viola radio:
- Išpakuoti: Atsargiai išimkite visus komponentus iš pakuotės.
- Antenos jungtis: Connect the provided loop antenna to the external antenna port on the back of the radio. Position the antenna for optimal reception.
- Maitinimo jungtis: Connect the power adapter to the DC input port on the radio and then plug the adapter into a standard electrical outlet.
- Placement/Mounting: Decide whether to use the radio as a standalone unit on a flat surface or mount it under a cabinet. Use the provided mounting accessories for under-cabinet installation, ensuring it is securely fastened.
- Pradinis įjungimas: Press the Power button to turn on the radio. The LED display will illuminate.
6. Naudojimo instrukcijos
6.1. Radijo veikimas (FM)
- Pasirinkite FM režimą: Paspauskite REŽIMAS/ATSTATYMAS mygtuką, kol pasirodys „FM“.
- Rankinis derinimas: Naudokite TUN-/K or TUN+/I mygtukais, kad rankiniu būdu reguliuotumėte dažnį.
- Automatic Scan (AMS): Paspauskite ir palaikykite MEM/PRE button to automatically scan and store available FM stations. The radio supports up to 40 favorite memory slots.
- Atšaukti išankstinius nustatymus: Trumpai paspauskite MEM/PRE mygtuką, kad peržiūrėtumėte išsaugotas stotis.
6.2. Bluetooth funkcija
The integrated Bluetooth receiver allows you to stream audio wirelessly from your smartphone or tablet.
- Įjunkite „Bluetooth“ režimą: Paspauskite REŽIMAS/ATSTATYMAS button until 'BT' is displayed. The radio will enter pairing mode, indicated by a flashing Bluetooth icon.
- Poravimas: On your smartphone or tablet, enable Bluetooth and search for available devices. Select 'TechniSat Viola' from the list.
- Garso transliacija: Once paired, you can play music from your device, and the audio will be streamed through the radio's speakers.
- Skambinimas laisvų rankų įranga: When a call comes in while connected via Bluetooth, you can answer it using the radio's controls and speak through the built-in microphone (MIC).
6.3. Laikmačio funkcija
The radio features a convenient cooking timer.
- Nustatyti laikmatį: Paspauskite LAIKMATIS button to access the timer settings. Use the TUN-/K or TUN+/I buttons to adjust the desired countdown time.
- Laikmačio paleidimas / sustabdymas: Paspauskite LAIKMATIS button again to start or pause the countdown.
6.4. Žadintuvas ir snaudimas
Utilize the alarm functions for daily reminders or wake-up calls.
- Nustatyti zadintuva: Paspauskite SIGNALAS button to enter alarm setup. Use the TUN-/K or TUN+/I buttons to set the alarm time and select the alarm source (e.g., radio or buzzer).
- Įjungti/išjungti signalą: Paspauskite SIGNALAS button repeatedly to toggle the alarm on or off.
- Snaudimo funkcija: Kai skamba žadintuvas, paspauskite Volume/Snooze Knob to activate the snooze function, pausing the alarm for a short period.
6.5. LED Work/Night Light
The integrated LED lighting can serve as a work light or a subtle night light.
- Įjungti šviesą: Paspauskite ŠVIESA mygtuką, kad įjungtumėte LED lemputę.
- Adjust/Deactivate Light: Paspauskite ŠVIESA button again to cycle through brightness levels or turn off the light.
7. Priežiūra
Proper care ensures the longevity of your TechniSat Viola radio.
- Valymas: Clean the radio with a soft, dry cloth. Do not use abrasive cleaners, solvents, or chemical sprays, as these can damage the surface.
- Maitinimo atjungimas: Always unplug the device from the power outlet before cleaning or if it will not be used for an extended period.
- Vėdinimas: Įsitikinkite, kad ventiliacijos angos nėra užblokuotos, kad išvengtumėte perkaitimo.
8. Problemų sprendimas
Jei kyla problemų dėl radijo imtuvo, žr. šias dažniausiai pasitaikančias problemas ir jų sprendimus:
| Problema | Galima priežastis | Sprendimas |
|---|---|---|
| Nėra maitinimo / Įrenginys neįsijungia | Neprijungtas maitinimo adapteris arba sugedęs lizdas. | Check if the power adapter is securely plugged into the radio and a working electrical outlet. Try a different outlet. |
| Nėra garso | Volume too low; incorrect audio source selected. | Increase the volume using the knob. Ensure the correct mode (FM, Bluetooth) is selected. |
| Prastas radijo priėmimas | Antenna not properly positioned or connected; weak signal. | Adjust the position of the loop antenna. Ensure it is fully connected. Try moving the radio to a different location. |
| Bluetooth neprisijungia | Radio not in pairing mode; device too far; Bluetooth off on smartphone. | Ensure the radio is in Bluetooth pairing mode. Keep your smartphone within range. Check Bluetooth settings on your smartphone. |
9. Specifikacijos
Key technical specifications for the TechniSat Viola 0000/2932 radio:
| Funkcija | Detalė |
|---|---|
| Prekės ženklas | TechniSat |
| Modelio numeris | 0000/2932 |
| Spalva | Antracitas |
| Ryšio technologija | Bluetooth |
| Ypatingos savybės | Timer control via direct selection button, External antenna connection, Under-cabinet or standalone use, Aluminum volume/selection control, Bluetooth audio streaming, Alarm, Sleep, Snooze, LED work/night light |
| Suderinami įrenginiai | Išmanusis telefonas |
| Maitinimo šaltinis | Elektros kabelis |
| Palaikomos radijo dažnių juostos | FM |
| Tiuningo technologija | FM |
| Gaminio matmenys (I x P x A) | 21.2 cm x 12.1 cm x 4.2 cm |
| Gamintojas | TechniSat |
| Kilmės šalis | Kinija |
10. Garantija ir palaikymas
For warranty information and technical support, please refer to the documentation provided with your purchase or contact TechniSat customer service directly. Specific details regarding spare parts availability and software updates are not provided in this manual.


