This manual provides essential instructions for the safe operation, setup, and maintenance of your JIKEFUN CZ20 Drone. Please read this manual thoroughly before operating the drone to ensure proper function and to prevent damage or injury. Keep this manual for future reference.
Image 1: JIKEFUN CZ20 Drone with included accessories, showcasing the drone, remote control, batteries, and carrying case.
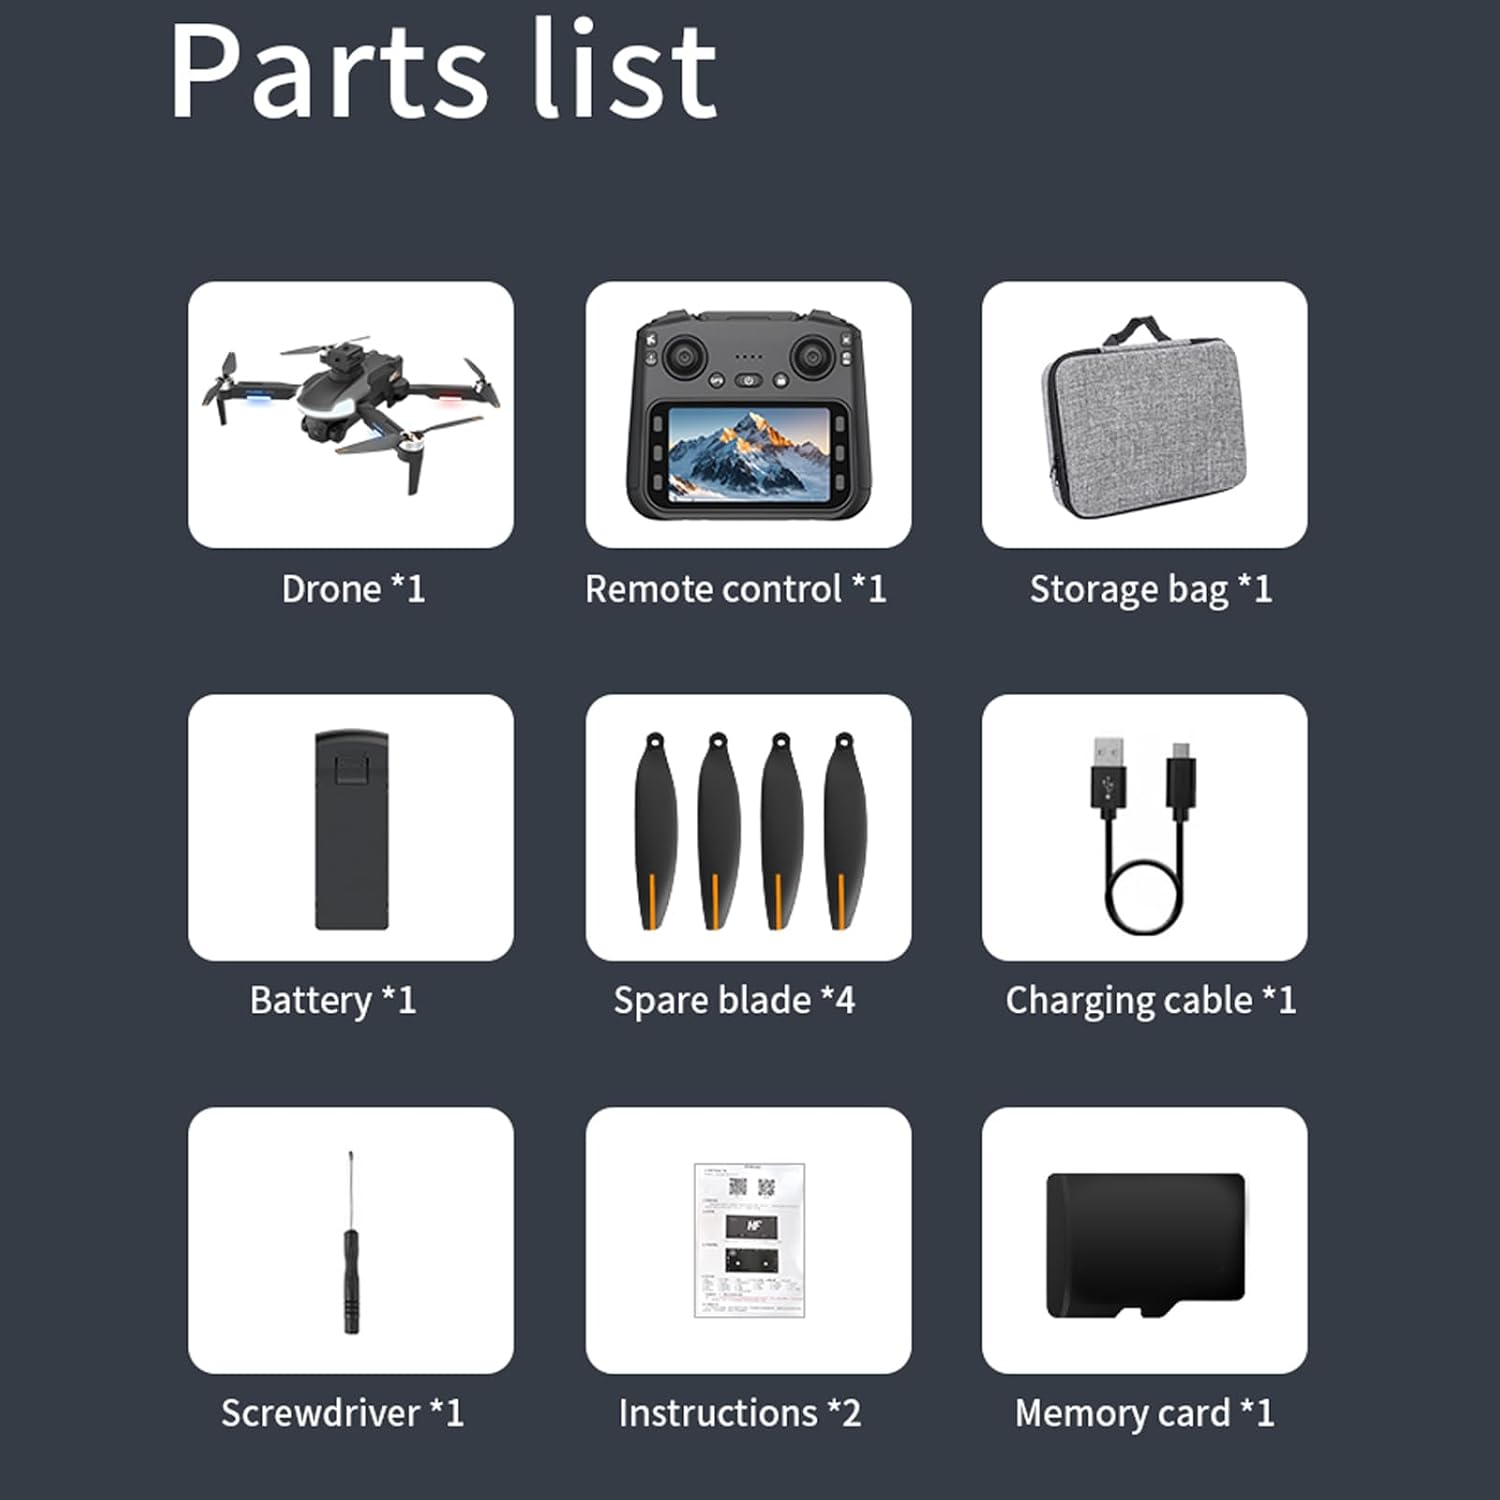
2. Pakuotės turinys
Patikrinkite, ar pakuotėje yra visi toliau išvardyti daiktai:
CZ20 Drone x 1
Remote Control with Screen x 1
Intelligent Flight Battery x 3
Spare Propellers (4A4B) x 1 set
USB įkrovimo laidas x 1
Atsuktuvas x 1
Vartotojo vadovas x 1
Wi-Fi Manual x 1
8GB Memory Card x 1
Kortelių skaitytuvas x 1
2 paveikslėlis: Išsamus view of all components included in the JIKEFUN CZ20 Drone package, including the drone, remote, batteries, and tools.
3. Saugos gairės
Norėdami užtikrinti saugų darbą ir išvengti žalos, laikykitės šių nurodymų:
Amžiaus apribojimas: This product is not intended for users under 16 years old.
Baterijos sauga: Always fully charge batteries before use. Low power can lead to loss of control.
Skrydžio aplinka: Skriskite atvirose vietose, atokiau nuo žmonių, gyvūnų, pastatų ir kliūčių. Venkite skraidyti pučiant stipriam vėjui arba esant nepalankioms oro sąlygoms.
Matymo linija: Visada palaikykite vizualinį matymo lauką su dronu.
Propelerio sauga: Laikykite rankas ir veidą atokiai nuo besisukančių sraigtų.
Privatumas: Respect the privacy of others when using the camera.
4. Sąranka
4.1 Akumuliatoriaus įkrovimas
Ensure both the drone's flight battery and the remote control are fully charged before use. A red indicator light signifies charging, and it turns off when charging is complete.
Connect one end of the USB charging cable to the drone battery's charging port.
Connect the other end of the USB cable to a power supply (e.g., USB wall adapter).
Repeat the process for the remote control, connecting the USB cable to its charging port.
Video 1: This video demonstrates the charging process for both the drone battery and the remote control. (Note: This video is a general drone operation tutorial and may not specifically feature the CZ20 model, but the charging steps are applicable.)
4.2 Pre-Flight Preparation
Įdėkite SD kortelę: Insert the provided 8GB memory card into the designated slot on the remote control.
Deploy Drone Arms: Švelniai išskleiskite drono rankas, kol jos užsifiksuos savo vietoje.
Įdėkite drono bateriją: Insert the charged flight battery into the drone's battery compartment until it clicks securely.
Drono įjungimas: Paspauskite ir palaikykite drono maitinimo mygtuką, kol užsidegs indikatoriaus lemputės.
Nuotolinio valdymo pulto įjungimas: Slide the power switch on the remote control to the 'ON' position.
4.3 Kalibravimas
Perform calibration before each flight for optimal stability and control.
Giroskopo kalibravimas: With the drone and remote powered on and connected, press the gyro calibration button on the remote. The drone's front arm lights will become steady, and the rear arm lights will blink, indicating successful calibration.
Geomagnetinis kalibravimas: Press and hold the geomagnetic calibration button on the remote. The drone's lights will flash yellow to green. Pick up the drone and rotate it clockwise horizontally until the remote emits a 'drop' sound. Then, turn the drone clockwise vertically until another 'drop' sound is heard. Place the drone back on a level surface.
4.4 GPS signalo paieška
For outdoor flight, ensure a strong GPS signal. The drone's yellow lights will turn blue upon successful GPS signal acquisition. Ieškokite more than 8 stars to fly.
Image 3: The CZ20 Drone with its remote control, highlighting the GPS automatic homing feature.
5. Naudojimo instrukcijos
Image 4: A detailed diagram of the remote control, indicating the function of each button and joystick.
5.1 Pagrindiniai skrydžio valdymo įtaisai
Kilimas: Press the one-key take-off button to unlock the motors, then push the left rocker up to take off.
Rise/Descend: Push the left rocker up to rise, down to descend.
Pasukimas: Push the left rocker left for left rotation, right for right rotation.
Advance/Recoil: Push the right rocker up to advance, down to recoil.
Left/Right Fly: Push the right rocker left for left-hand fly, right for right-hand fly.
5.2 Remote Control Screen Functions
The remote control features an integrated screen for enhanced control and viewing.
Open Screen: Press and hold the screen open button (bottom left) to activate the screen.
Nuotrauka / vaizdo įrašas: Press the photo button (top right) to take a picture. Press the record button (bottom right) to start/stop video recording.
Meniu naršymas: Press the menu button (bottom left) to enter the menu. Use the up/down buttons to navigate and the OK button to select.
Ekrano ryškumas: In the menu, select the brightness adjustment function and use the up/down buttons to adjust.
Formatuoti SD kortelę: In the menu, select the format function to format the SD card.
5.3 greičio reguliavimas
The drone has multiple speed gears:
Mažas greitis: Numatytasis nustatymas.
Vidutinis greitis: Press the speed switch button once (remote emits two 'drop' sounds).
Didelis greitis: Press the speed switch button twice (remote emits three 'drop' sounds).
5.4 Camera Power Control
Power Down Camera: Press the camera power down button.
Power Up Camera: Press the camera power up button.
5.5 Kliūčių vengimo režimas
To activate the obstacle avoidance mode, press and hold the speed switch button.
Image 5: The CZ20 Drone showcasing its 360-degree omnidirectional obstacle avoidance capability.
5.6 Automatic Return Mode
Long press the return button on the remote control to activate the automatic return mode. The drone will automatically return to its take-off point.
5.7 Indoor Flight Preparation
For indoor flight, where GPS signals may be weak or unavailable:
Turn off GPS: Press the GPS button on the remote control to disable GPS mode.
Calibrate Gyroscope: Press the gyro calibration button to calibrate the gyroscope for stable indoor flight using optical flow positioning.
5.8 APP Installation and Connection
To use the drone with the mobile application:
Atsisiųsti programą: Scan the QR code in the manual or search for the designated APP (e.g., "LW Pro") in your device's app store. Download and install it.
Įjunkite „Wi-Fi“: Įjunkite „Wi-Fi“ savo išmaniajame telefone.
Connect to Drone Signal:Ieškokite the drone's Wi-Fi signal (e.g., "WIFI-GPS-5BA23E") and connect to it.
Open Drone APP: After successful Wi-Fi connection, open the drone APP. (Note: The remote control screen cannot be connected at this time).
Telefono tvirtinimas: Open the phone stand on the remote control and securely clip your smartphone into place. You can now view the screen through the APP.
6. Priežiūra
6.1 Ašmenų keitimas
If a blade is damaged, replace it promptly to maintain flight performance and safety.
Nuimkite seną peilį: Use the provided screwdriver to carefully remove the screw securing the damaged blade.
Note Blade Type: Observe the distinction between 'A' and 'B' blades. Ensure you install the correct type.
Įdiekite naują peilį: Place the corresponding new blade onto the motor shaft and secure it with a screw using the screwdriver.
11.02 colio ilgio x 10.24 colių pločio x 3.15 colio aukščio
Kameros raiška
720p HD
Skrydžio laikas
Iki 23 minučių su viena baterija (iš viso 69 minučių su 3 baterijomis)
Image 6: A visual representation of the drone's key parameters and dimensions.
8. Problemų sprendimas
Dronas neįsijungia: Ensure the battery is fully charged and correctly inserted. Press and hold the power button for a few seconds.
Nuotolinio valdymo pultas neprisijungia: Ensure both the drone and remote are powered on. Perform gyro calibration. Check battery levels.
Nestabilus skrydis: Perform gyro and geomagnetic calibration. Ensure propellers are correctly installed and undamaged. Fly in calm conditions.
Nėra GPS signalo: Įsitikinkite, kad esate atviroje lauko erdvėje su skaidria view of the sky. Wait for the drone to acquire enough satellites (more than 8 stars).
Programėlės ryšio problemos: Ensure Wi-Fi is enabled on your phone and connected to the drone's Wi-Fi network. Close and reopen the APP.
Kliūčių vengimas neveikia: Ensure the obstacle avoidance mode is activated by pressing and holding the speed switch button.
9. Garantija ir palaikymas
For warranty information, technical support, or service inquiries, please refer to the contact information provided with your purchase or visit the official JIKEFUN websvetainėje. Išsaugokite pirkimo įrodymą garantiniams reikalavimams.
JIKEFUN RC orlaivio instrukcijos ir naudojimo vadovas Išsamios JIKEFUN RC nuotolinio valdymo dronų instrukcijos ir naudojimo vadovas, apimantis tokių modelių kaip FX635, FX620, FX622 ir FX623 sąranką, skrydį, įkrovimą ir trikčių šalinimą.
Cuori Kitchenware and Cookware Catalog 2024 Explore the comprehensive Cuori catalog featuring a wide range of high-quality kitchenware, cookware, knives, thermoses, barware, and kitchen scales. Discover innovative designs and durable products for every culinary need.