1. Įvadas
Thank you for choosing the CROSSIO Mid Century Modern Chandelier. This manual provides essential information for the safe installation, operation, and maintenance of your new lighting fixture. Please read these instructions thoroughly before beginning installation and retain them for future reference.

Image 1.1: The CROSSIO Mid Century Modern Chandelier with green glass shades.
2. Saugos informacija
ĮSPĖJIMAS: Kad sumažintumėte gaisro, elektros smūgio ar kūno sužalojimo riziką, visada laikykitės šių saugos priemonių:
- Atjunkite maitinimą: Always turn off the electrical supply at the main fuse box or circuit breaker before beginning installation or performing any maintenance.
- Kvalifikuotas elektrikas: Installation should be performed by a qualified electrician or a person with adequate electrical knowledge.
- Įžeminimas: Ensure the fixture is properly grounded to avoid potential electrical shocks.
- Elkitės atsargiai: Glass components are fragile. Handle them carefully to prevent breakage.
- Reikalavimai lemputei: Use only G9 bulbs as specified. Do not exceed the maximum wattage nurodyta ant armatūros.
- Venkite vandens: Do not install this fixture in damp or wet locations. It is designed for indoor use only.
- Saugus montavimas: Įsitikinkite, kad tvirtinimo paviršius gali atlaikyti įrenginio svorį.
3. Pakuotės turinys
Verify that all components are present before discarding packaging materials. If any parts are missing or damaged, contact customer support.
- Sietyno rėmo surinkimas
- Green Glass Shades (16 pieces + 1 replacement)
- Tvirtinimo detalės (gaubtas, tvirtinimo plokštė, varžtai, vielinės veržlės)
- Adjustable Downrods (2 x 11.8 inches, 2 x 23.62 inches)
- Instrukcijų vadovas

Image 3.1: The package includes one replacement lampšešėlis.
4. Specifikacijos
| Funkcija | Detalė |
|---|---|
| Prekės ženklas | KRYŽIAUS |
| Modelio pavadinimas | GLS-HLP084GR |
| Spalva | Gold+Green |
| Medžiaga | Stiklas, Metalas |
| Stilius | Mid Century Modern / Art Deco |
| Gaminio matmenys | 39"L x 10"W x 70.87"H (Maximum) |
| Maitinimo šaltinis | Su laidu elektra |
| Diegimo tipas | Pusiau įleidžiamas montavimas |
| Šviesos šaltinio tipas | LED (G9 bulbs recommended, not included) |
| Šviesos šaltinių skaičius | 16 |
| Lemputės pagrindas | G9 |
| Ypatingos savybės | Adjustable Height, Dimmable, 180° Rotatable for Sloped Ceilings |
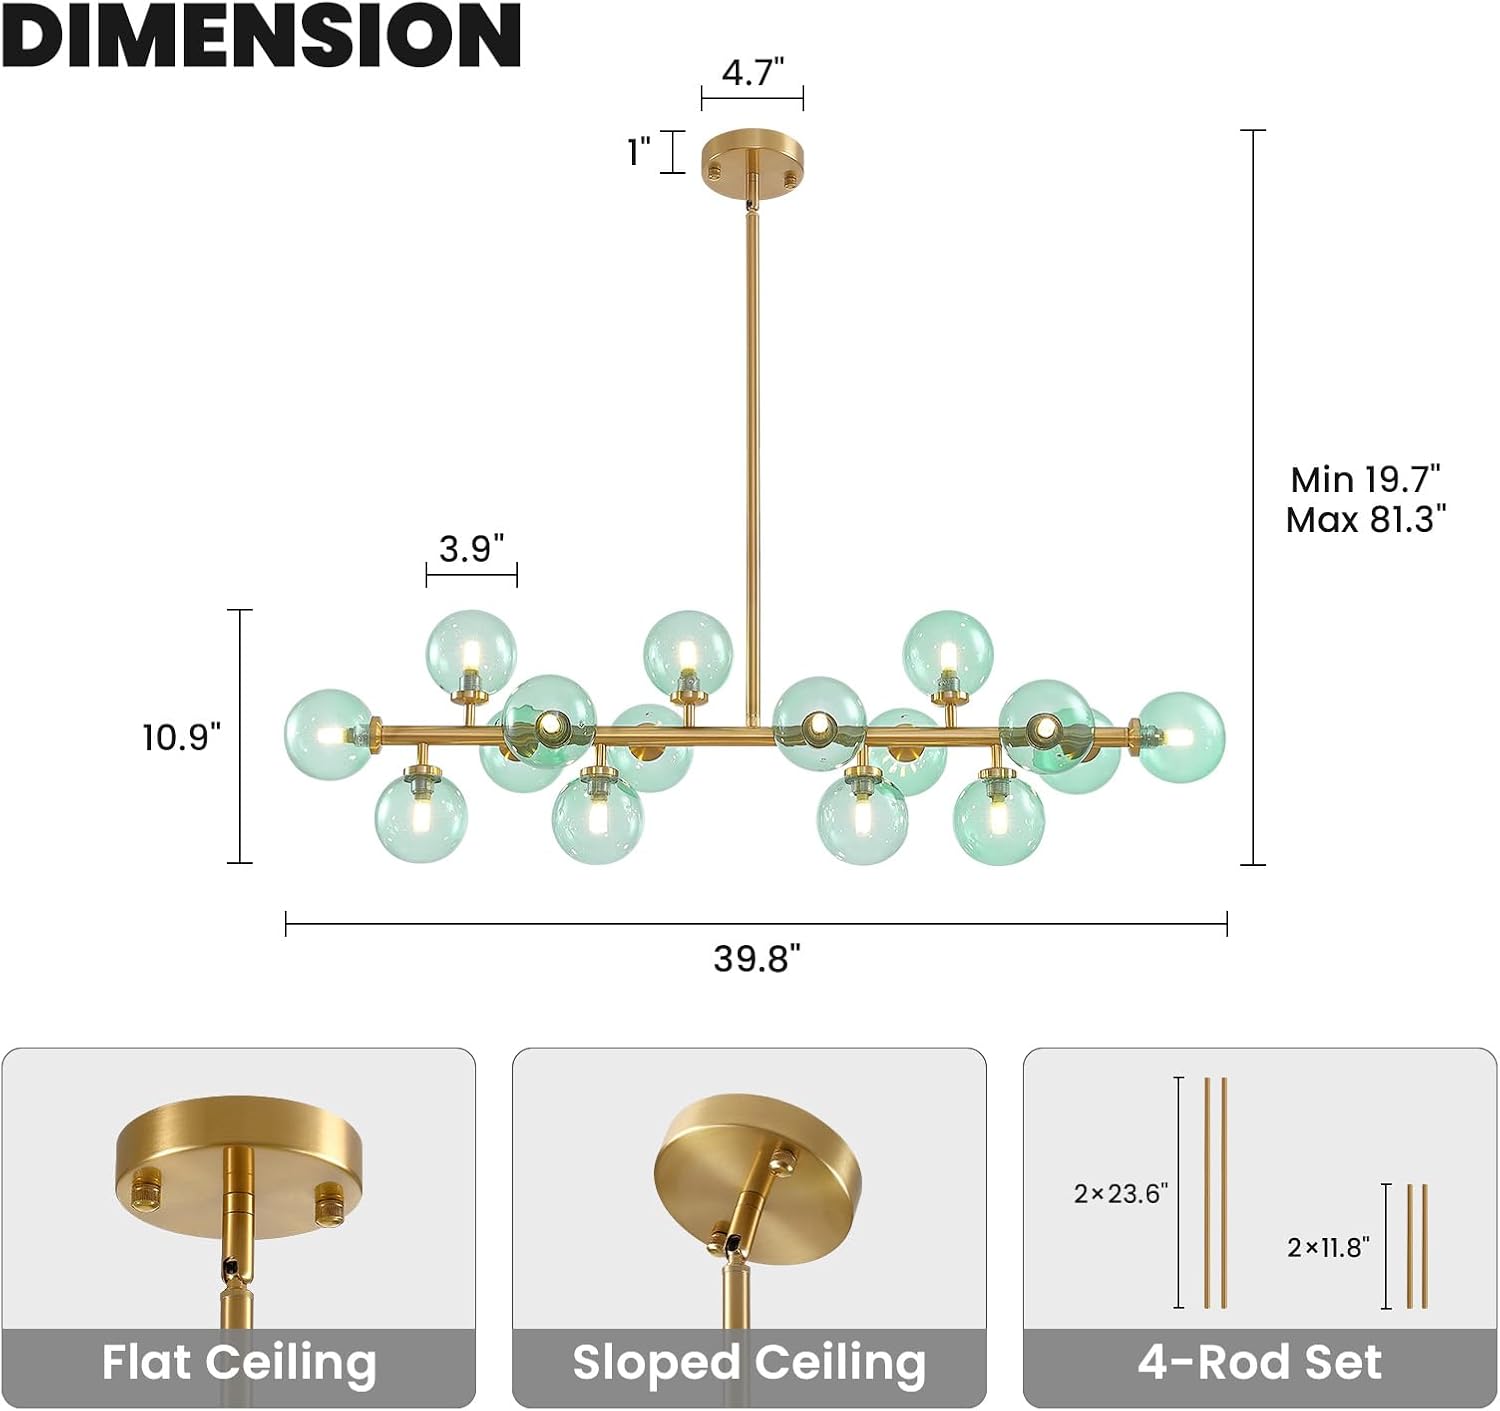
Image 4.1: Chandelier dimensions and adjustable downrod options.
5. Sąranka ir diegimas
Norėdami tinkamai sumontuoti, atlikite šiuos veiksmus. Dėl šviestuvo dydžio ir svorio rekomenduojama, kad montavimą atliktų du žmonės.
- Pasiruoškite montavimui: Išjunkite maitinimą grandinės pertraukikliu. Išvalykite darbo zoną.
- Montavimo plokštės montavimas: Pritvirtinkite tvirtinimo plokštę prie lubose esančios jungiamosios dėžutės naudodami pateiktus varžtus. Įsitikinkite, kad ji tvirtai pritvirtinta.
- Reguliuoti aukštį: Select the appropriate combination of downrods (11.8" x 2, 23.62" x 2) to achieve your desired hanging height. The fixture can be adjusted from a minimum of 19.7" to a maximum of 81.3". For sloped ceilings, the canopy is 180° rotatable.
- Laidų jungtys: Connect the fixture's wires to the household electrical wires according to local electrical codes. Typically, black to black (live), white to white (neutral), and green/bare copper to green/bare copper (ground). Secure connections with wire nuts.
- Baldakimo tvirtinimas: Atsargiai įkiškite laidus į jungiamąją dėžutę ir pritvirtinkite gaubtą prie tvirtinimo plokštės pridėtais varžtais.
- Įdiekite lemputes: Insert 16 G9 bulbs (not included) into the lamp holders. Ensure bulbs are securely seated.
- Pritvirtinkite stiklinius gaubtus: Carefully screw each green glass shade onto its respective lamp holder. Avoid overtightening.
- Atkurti maitinimą: Baigę montuoti, vėl įjunkite maitinimą grandinės pertraukikliu.

Image 5.1: Equipped with four downrods for adjustable hanging height.

Image 5.2: The 180° rotatable canopy allows for installation on sloped ceilings.

Image 5.3: G9 LED light socket for easy bulb installation.
6. Operacija
The CROSSIO Chandelier is designed for ease of use and offers versatile lighting options.
6.1 Maitinimo įjungimas/išjungimas
Operate the chandelier using a standard wall switch. Flip the switch to turn the light fixture on or off.

Image 6.1: Chandelier in a room, demonstrating on and off states.
6.2 Pritemdymo funkcija
This chandelier is fully dimmable when used with compatible G9 dimmable bulbs and a suitable dimmer switch (both not included). This allows you to adjust the light intensity to create the desired ambiance.

Image 6.2: The chandelier is fully dimmable with compatible bulbs and dimmer switch.
6.3 Light Color Effects
If you use color-changing G9 bulbs (not included), you can achieve different light color effects (Cool White, Neutral White, Warm White) by quickly toggling your standard ON/OFF wall switch. This feature depends entirely on the capabilities of the bulbs you install.

6.3 pav.: pvz.ample of 3 light color effects achievable with compatible bulbs.
7. Priežiūra
Reguliarus valymas užtikrina jūsų šviestuvo ilgaamžiškumą ir gerą išvaizdą.
- Valymas: Always turn off the power before cleaning. Use a soft, dry cloth to wipe the metal frame and glass shades. Do not use abrasive cleaners, solvents, or polishes as they may damage the finish.
- Lemputės keitimas: Ensure the fixture is cool before attempting to replace bulbs. Follow the safety instructions for disconnecting power.
- Patikra: Reguliariai tikrinkite visas jungtis ir tvirtinimo detales, kad įsitikintumėte, jog jos yra tvirtos.

Image 7.1: Product details including durable ceiling plate, sleek iron body, and G9 light socket.
8. Problemų sprendimas
Jei kyla problemų dėl liustra, žr. šias dažniausiai pasitaikančias problemas ir sprendimus:
| Problema | Galima priežastis | Sprendimas |
|---|---|---|
| Šviesa neįsijungia | No power, loose wiring, faulty bulb, faulty switch. | Check circuit breaker. Ensure all wire connections are secure. Replace bulbs. Test the wall switch. |
| Šviesos mirga | Loose bulb, incompatible dimmer, loose wiring. | Tighten bulbs. Ensure dimmer switch and bulbs are compatible. Check wire connections. |
| Bulbs burn out frequently | Neteisingas lemputės tipas / galiatage, ttage fluctuations, poor quality bulbs. | Ensure G9 bulbs are used and wattage is not exceeded. Consider higher quality LED G9 bulbs. Consult an electrician for voltage klausimus. |
| Glass shades fall off | Shades not tightened properly, damaged threads. | Ensure shades are securely screwed onto the lamp holders. Do not overtighten. If threads are damaged, contact support for replacement parts. |
9. Garantija ir palaikymas
CROSSIO is committed to providing quality products and customer satisfaction.
- 1 metų garantija: This product is covered by a 1-year warranty. Contact us for free replacement if any quality issues arise within this period.
- Quality Service: If you have any questions or require assistance, our customer service team is available to provide a solution within 24 hours.
- Customization Service: For specific product customization inquiries, please feel free to contact us for consultation.

Image 9.1: CROSSIO Warranty and Service Information.
Dėl pagalbos apsilankykite „CROSSIO“ parduotuvė „Amazon“ platformoje or contact us directly through your purchase platform.


