Įvadas
Thank you for choosing the SHARDOR 64mm Flat Burr Commercial Coffee Grinder and 20 Bar Espresso Machine. This manual provides essential information for the safe and efficient operation, maintenance, and troubleshooting of your appliance. Please read it thoroughly before first use and keep it for future reference.
Svarbios saugos instrukcijos
- ĮSPĖJIMAS: Prieš naudodami prietaisą perskaitykite visas instrukcijas.
- Prieš valydami arba kai nenaudojate, visada atjunkite prietaisą nuo elektros lizdo.
- Nemerkite prietaiso, maitinimo laido ar kištuko į vandenį ar kitus skysčius.
- Darbo metu rankas ir indus laikykite toliau nuo judančių dalių.
- This appliance is for household and light commercial use only.
- Įsitikinkite, kad ttagAnt prietaiso nurodytas e atitiks jūsų vietinį maitinimo šaltinį.
- Nenaudokite prietaiso, kurio laidas ar kištukas pažeistas, arba po to, kai prietaisas neveikia arba buvo kaip nors sugadintas.
- Atidžiai prižiūrėti būtina, kai bet kurį prietaisą naudoja vaikai arba jį naudoja šalia vaikų.
Produktas baigtasview
The SHARDOR coffee system combines a high-performance 64mm flat burr grinder with a professional 20-bar espresso machine, designed to deliver optimal coffee extraction and flavor.
Grinder Components:
- Pupelių bunkeris
- 64mm Flat Burrs (SUS420 Stainless Steel)
- Grind Adjustment Dial (100 settings)
- Grinding Chamber (All-aluminum)
- „Grind Outlet“
- Maitinimo mygtukas
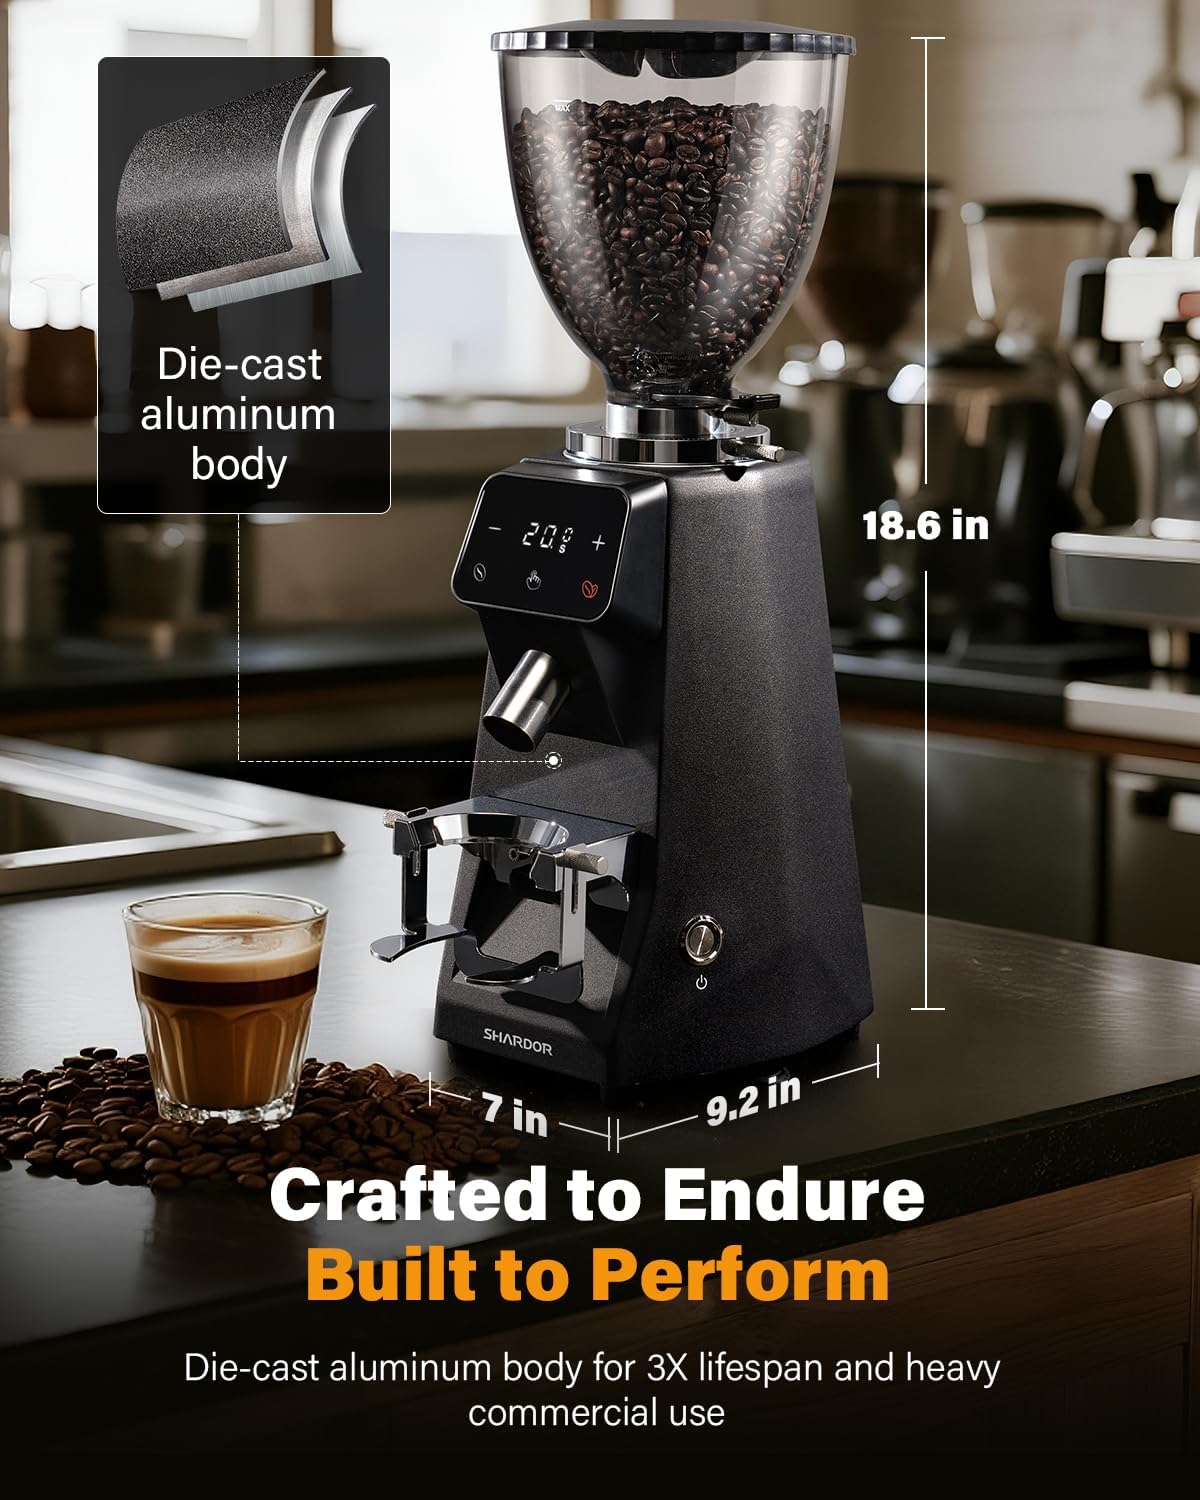
1 paveikslas: SHARDOR 64mm Flat Burr Grinder. This image shows the overall design and dimensions of the grinder, highlighting its die-cast aluminum body and bean hopper.
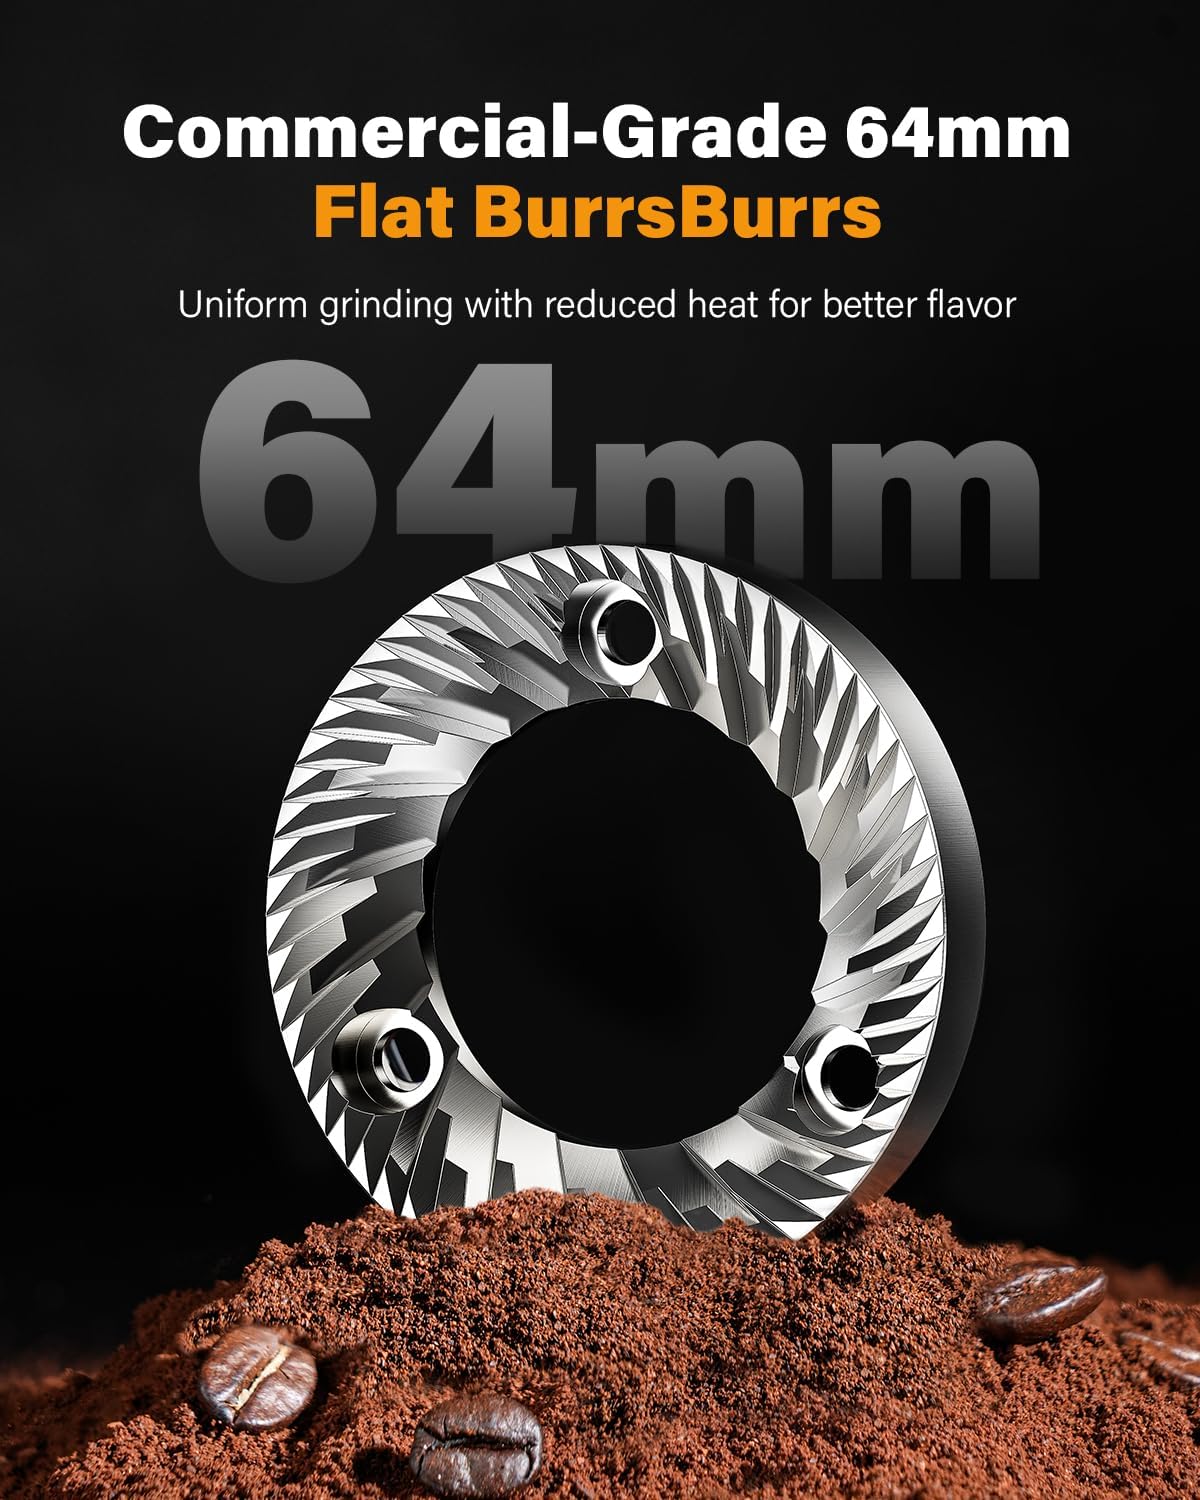
2 paveikslas: 64mm Flat Burr. A detailed view of the 64mm SUS420 stainless steel flat burrs, designed for consistent grinding and minimal heat buildup.
Espresso Machine Components:
- Vandens bakas
- Control Panel (LED display, One-Touch Touchscreen)
- Portafiltro laikiklis
- Garų lazdelė
- Lašėjimo padėklas
- Maitinimo jungiklis

3 paveikslas: SHARDOR 20 Bar Espresso Machine. This image displays the front view of the espresso machine, showing the control panel, portafilter, and steam wand.
Sąranka
- Išpakavimas: Atsargiai išimkite visus komponentus iš pakuotės. Išsaugokite pakuotę būsimam transportavimui ar saugojimui.
- Vieta: Place the grinder and espresso machine on a stable, level, and dry surface. Ensure adequate ventilation around both units.
- Pradinis valymas:
- Wipe the exterior of both units with a damp audinys.
- Wash the bean hopper, portafilter, and water tank with warm, soapy water, then rinse thoroughly and dry.
- Run a cycle of plain water through the espresso machine without coffee to flush the internal system.
- Grinder Assembly:
- Ensure the 64mm flat burrs are correctly seated.
- Attach the bean hopper securely to the top of the grinder.
- Espresso Machine Water Tank: Pripildykite vandens bakelį šviežiu, šaltu filtruotu vandeniu iki MAX linijos.
- Maitinimo jungtis: Plug both the grinder and the espresso machine into grounded electrical outlets.
Naudojimo instrukcijos
A. Coffee Grinder Operation
- Įdėkite kavos pupelių: Pour whole roasted coffee beans into the bean hopper.
- Pasirinkite malimo nustatymą: Rotate the grind adjustment dial to select your desired fineness. The grinder offers 100 settings, from 1 (finest for espresso) to 100 (coarsest for French press). Refer to the guide below for common brewing methods.
- Kavos malimas: Place your portafilter or grind container under the grind outlet. Press the power button to start grinding. The grinder utilizes STO 2.0 Direct Grind Drop Technology to minimize static and retain freshness.
- Nustokite šlifuoti: Press the power button again to stop grinding once the desired amount is achieved.
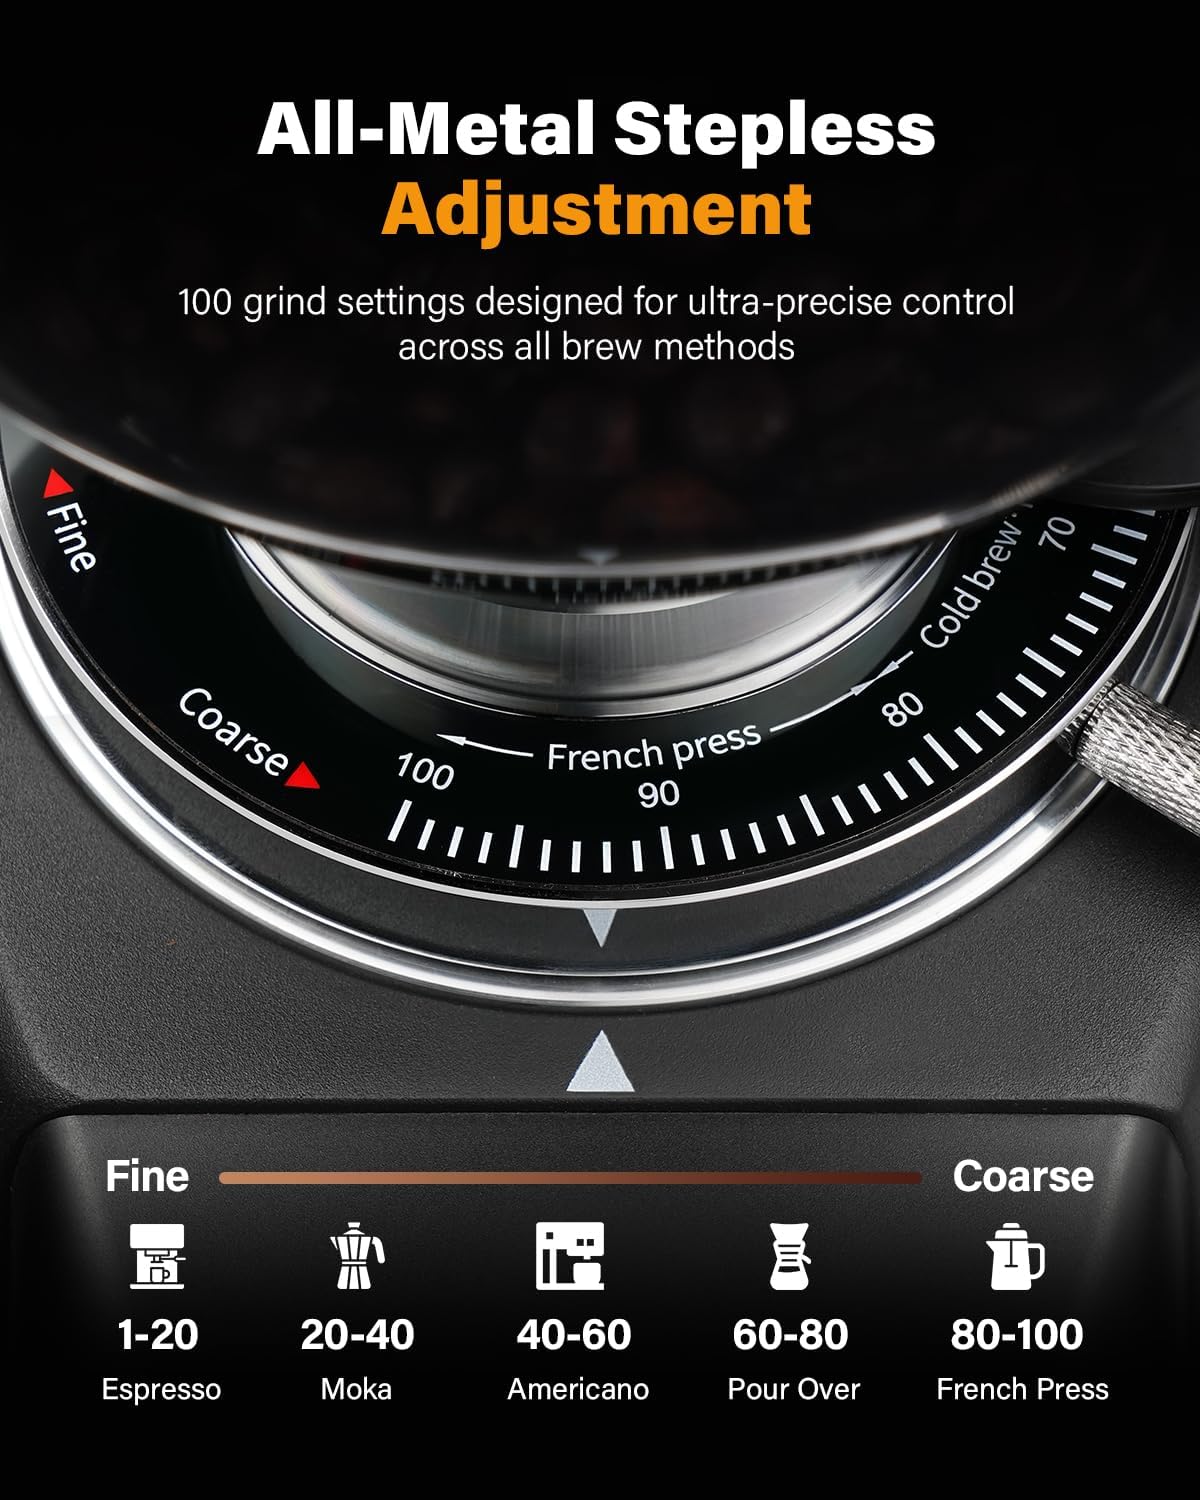
4 paveikslas: All-Metal Stepless Adjustment. This image illustrates the grind adjustment dial with 100 settings, indicating recommended ranges for various brewing methods like Espresso, Moka, Americano, Pour Over, and French Press.
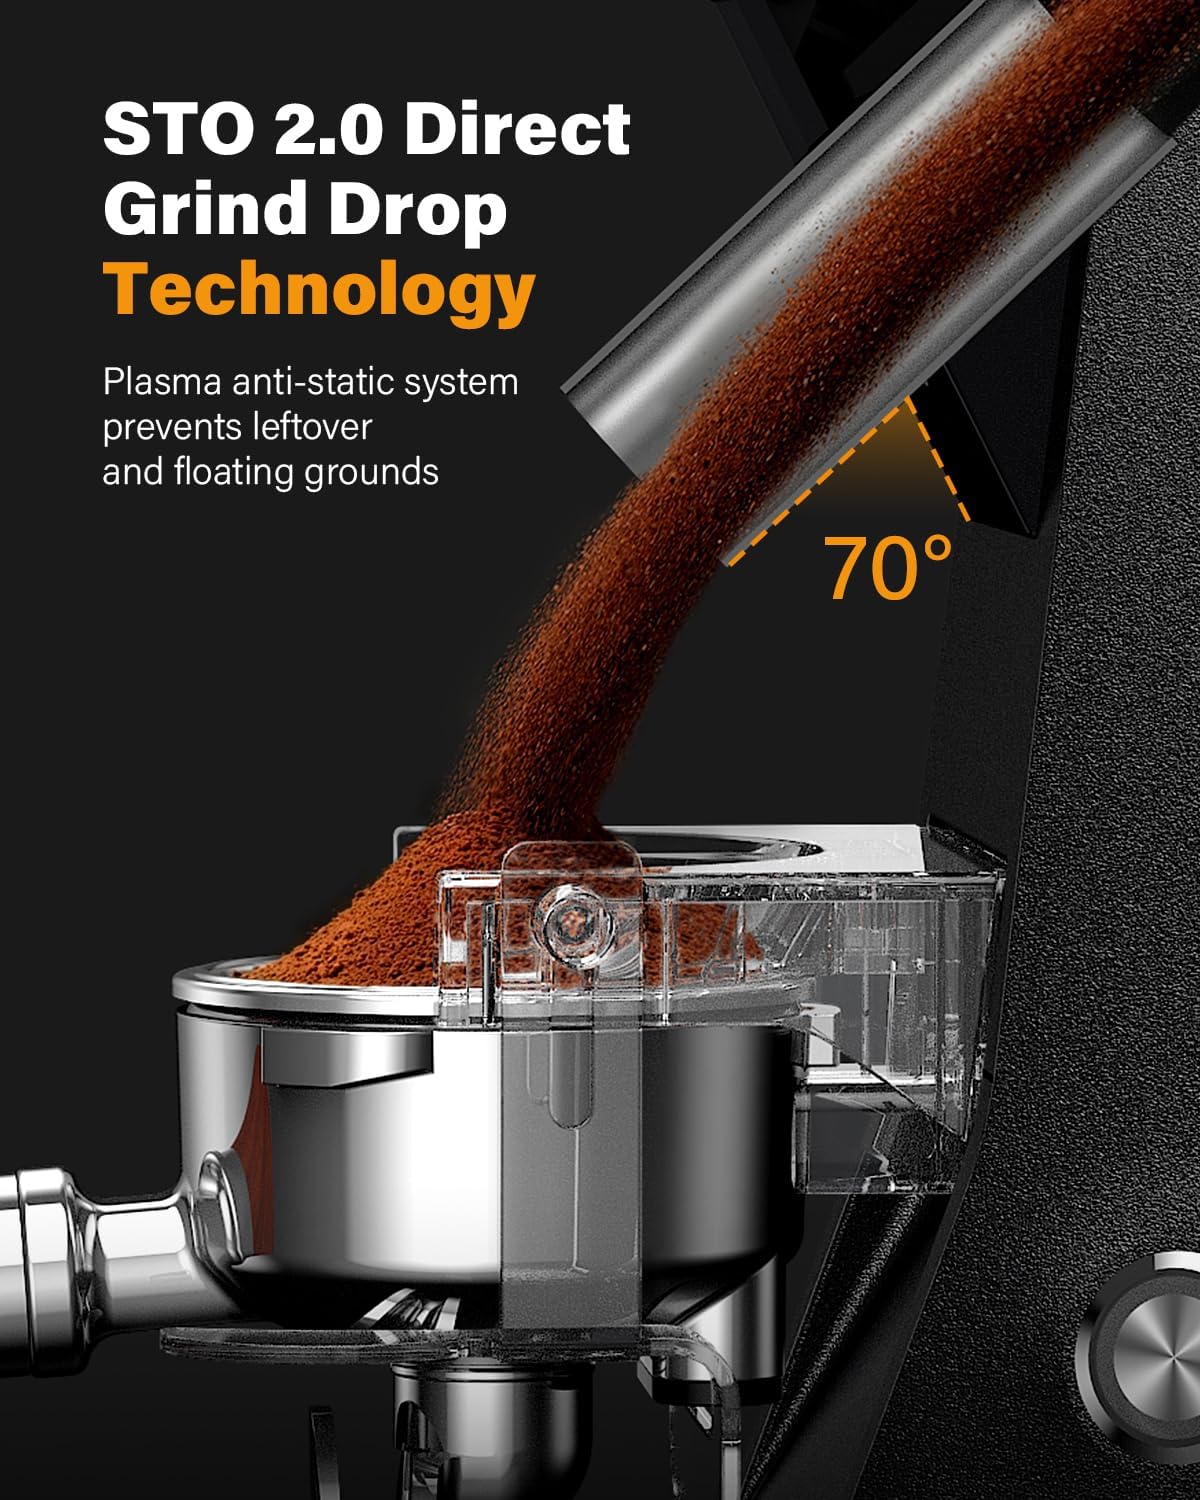
5 paveikslas: STO 2.0 Direct Grind Drop Technology. This image shows coffee grounds being dispensed directly into a portafilter, demonstrating the anti-static system and direct drop design.
B. Espresso Machine Operation
- Maitinimas: Press the ON/OFF button on the touchscreen. The machine will begin preheating.
- Išankstinis pašildymas: Wait for the machine to reach optimal brewing temperature. The LED display will indicate readiness.
- Paruoškite portafiltrą: Fill the portafilter with freshly ground coffee and tamp it evenly. Attach the portafilter securely to the group head.
- Paruoškite espresą:
- Padėkite puodelį (-ius) ant lašų surinkimo padėklo.
- Select "1 CUP" for a single shot or "2 CUP" for a double shot on the touchscreen.
- For customized coffee strength, use the "MANUAL" mode to control the brewing time.
- The 20-bar pump system will extract the espresso.
- Adjust Temperature (NTC Precise Temperature Control): Use the temperature control settings on the touchscreen to select your preferred brewing temperature (198°F, 200°F, or 203°F) for balanced flavors.
- Steam Milk (Powerful Steam Wand):
- Press the "STEAM" button on the touchscreen. Wait for the steam indicator to light up.
- Immerse the steam wand tip just below the surface of cold milk in a frothing pitcher.
- Turn the steam knob to release steam and froth the milk to your desired texture.
- Turn off the steam knob and press the "STEAM" button again to stop.
- Wipe the steam wand immediately after use.
- Automatinis išjungimas: The machine will automatically shut off after 15 minutes of inactivity.

6 paveikslas: 20 Bar Professional Pump. This image illustrates the high-pressure extraction process, showing the rich crema produced by the 20-bar pump system.

7 paveikslas: NTC Precise Temperature Control. This image shows the LED display with temperature options, allowing users to select between low, middle, and high temperature modes for optimal brewing.

8 paveikslas: Powerful Steam Wand. This image demonstrates the steam wand in action, frothing milk in a pitcher for lattes and cappuccinos.
Priežiūra ir valymas
Regular cleaning and maintenance ensure the longevity and optimal performance of your SHARDOR coffee system.
A. Grinder Cleaning
- Atjunkite: Prieš valydami šlifuoklį visada ištraukite iš elektros tinklo.
- Tuščias bunkeris: Išimkite visas likusias kavos pupeles iš bunkerio.
- Švarios šerpetojėlės: Remove the upper burr and use a brush to clean both the upper and lower burrs.
- Švarus šlifavimo kamera: Use a brush or vacuum cleaner to remove coffee grounds from the grinding chamber and outlet.
- Nuvalykite išorę: Nuvalykite išorę skelbimuamp audinys. Nenaudokite abrazyvinių valiklių.
B. Espresso Machine Cleaning
- Atjunkite: Always unplug the espresso machine before cleaning.
- Portafiltras ir filtrų krepšeliai: Po kiekvieno naudojimo nuplaukite šiltu, muiluotu vandeniu.
- Lašėjimo padėklas: Reguliariai ištuštinkite ir valykite nuvarvėjimo padėklą.
- Garų lazdelė: Po kiekvieno naudojimo iš karto nuvalykite garų antgalį specialiu valikliu.amp cloth to prevent milk residue buildup. Periodically, use a pin to clear any blockages in the steam nozzle.
- Vandens bakas: Reguliariai skalaukite vandens bakelį ir pripildykite šviežio vandens.
- Nukalkinimas: The machine features a "ONE-TOUCH DESCALE" function. Follow the instructions on the LED display or refer to the full descaling procedure in the comprehensive manual (if available) for detailed steps. Descale regularly based on water hardness and usage.
- Nuvalykite išorę: Nuvalykite išorę skelbimuamp audinys.
Trikčių šalinimas
| Problema | Galima priežastis | Sprendimas |
|---|---|---|
| Malūnėlis neįsijungia | Not plugged in; Hopper not correctly seated; Power button not pressed. | Check power connection; Ensure hopper is locked in place; Press power button firmly. |
| Neišleidžiami kavos tirščiai | Beans not in hopper; Grinding chamber blocked; Burrs clogged. | Add beans; Clean grinding chamber and burrs. |
| Espresso machine not turning on | Not plugged in; Power switch off. | Check power connection; Ensure power switch is on. |
| Iš grupės galvutės neteka vanduo | Water tank empty; Pump airlocked; Machine not preheated. | Fill water tank; Run a hot water cycle to prime pump; Allow machine to preheat fully. |
| Weak espresso / too fast extraction | Grind too coarse; Insufficient coffee; Tampper lengvas. | Adjust grind to finer setting; Use more coffee; Tamp tvirčiau. |
| Iš vamzdelio nėra garų | Steam function not activated; Wand clogged. | Press "STEAM" button and wait for readiness; Clean steam wand nozzle. |
Specifikacijos
- Šlifuoklio tipas: 64mm Flat Burr
- Burnos medžiaga: SUS420 Stainless Steel, Food-Grade
- Malimo nustatymai: 100 levels (Stepless Adjustment)
- Grinder Housing: Lietas aliuminis
- Šlifavimo kamera: Fully Aluminum
- Espresso Pump Pressure: 20 barų profesionalus siurblys
- Espresso Machine Power: 1350W
- Temperatūros valdymas: NTC Precise Temperature Control (198°F, 200°F, 203°F)
- Valdymo sąsaja: One-Touch Touchscreen LED Display
- Automatinis išjungimas: 15 minutės neveiklumo
- ASIN: B0FSSWNLDY
- Pirmą kartą pasiekiama data: 20 m. rugsėjo 2025 d
Garantija ir palaikymas
SHARDOR products are manufactured to high-quality standards. For warranty information, technical support, or customer service inquiries, please refer to the warranty card included with your purchase or visit the official SHARDOR websvetainę. Kreipdamiesi į palaikymo tarnybą, turėkite po ranka savo modelio numerį ir pirkimo datą.
Official SHARDOR Store: Visit the SHARDOR Store on Amazon


